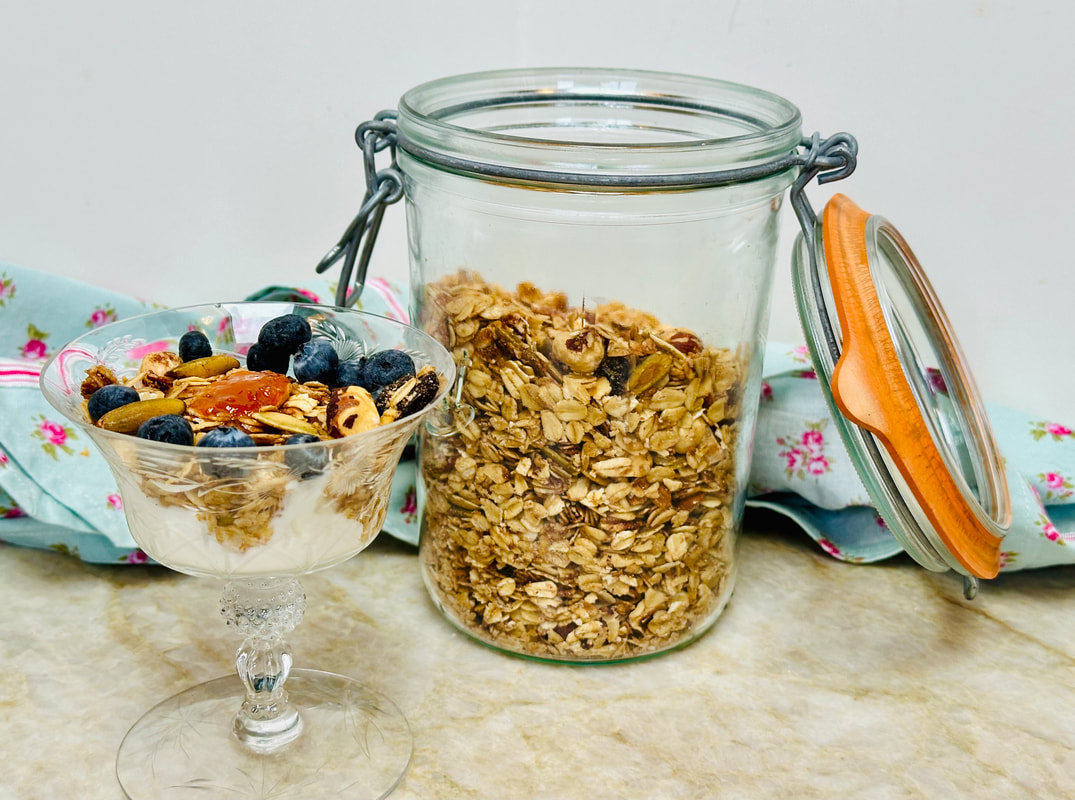
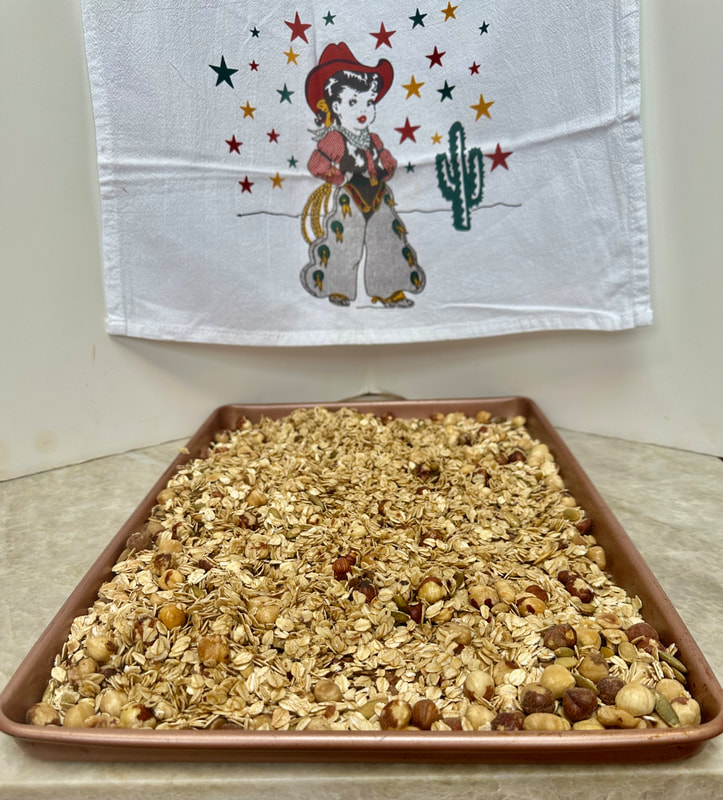
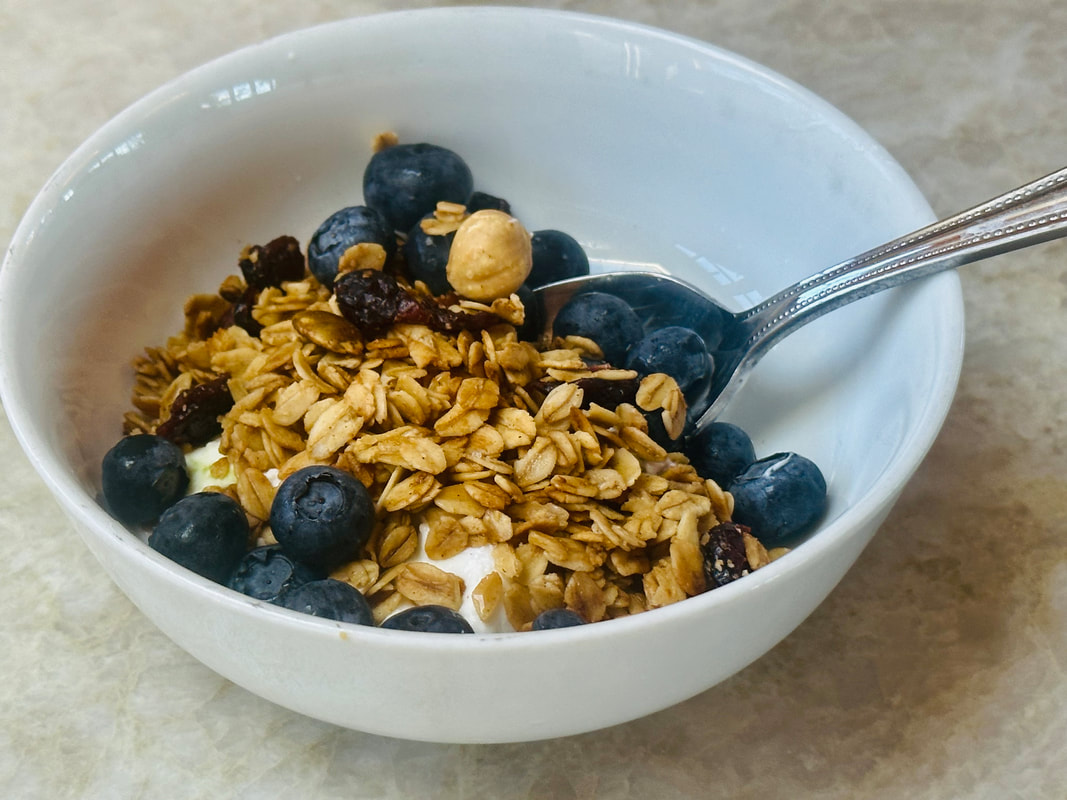
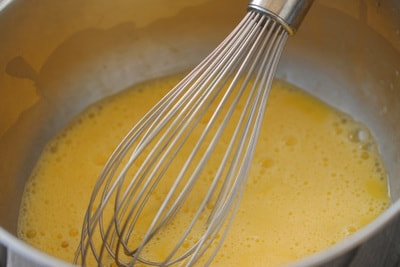
 I am not a big breakfast person. Give me a glass of water, a nice cup of coffee, a piece of toast and I am satisfied. But lately I discovered homemade granola and it has become a game changer. It is my go-to breakfast. Trust me, homemade granola is so much better than the store bought kind. For me, the store bought ones are too sweet and often have things added that I don’t like. With homemade granola, you can choose your own nuts, seeds, dried fruit, sweetener and flavoring. You are able to control whatever you want to add. Once you make it, it lasts for weeks in the pantry. I have been playing with various ingredients for a couple of months. Every homemade granola recipe I have come across uses coconut flakes. But I don’t like coconut.I recommend adding them if you like them. If you have the Smitten Kitchen Cookbook by Deb Perlman, check out her granola recipe. She likes her granola in clusters and adds a whipped egg white to the granola mixture before she spreads it out on the baking sheet. I have not done that. Whatever you do, you will end up with a jar of crunchy, chewy, and lightly sweetened granola. This is also a wonderful project to do with children, that way they can create their own breakfast.  Life at Sunny Cove has had its ups and downs. I find solace in the kitchen as long as my husband cleans up my mess. I have slowed down tremendously. I need breaks now, so no more multi-tasking. I am fortunate that I have family and friends who support me.
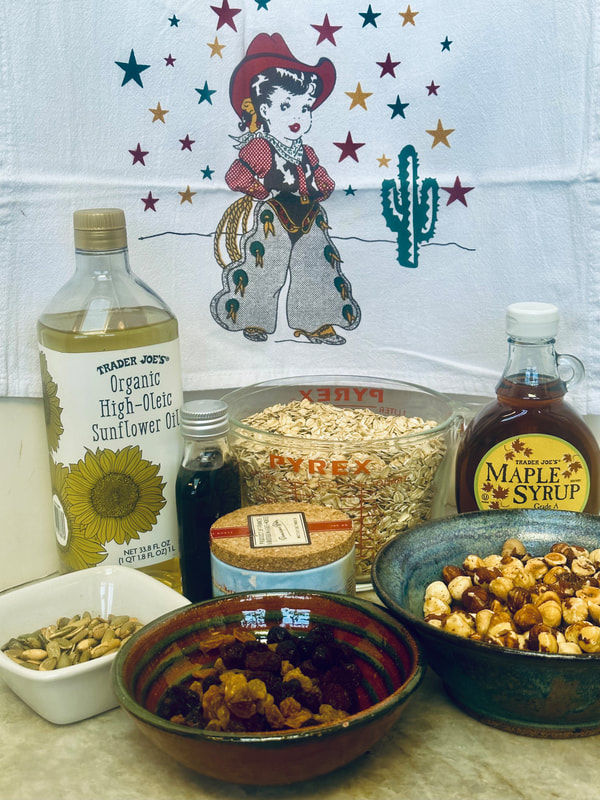
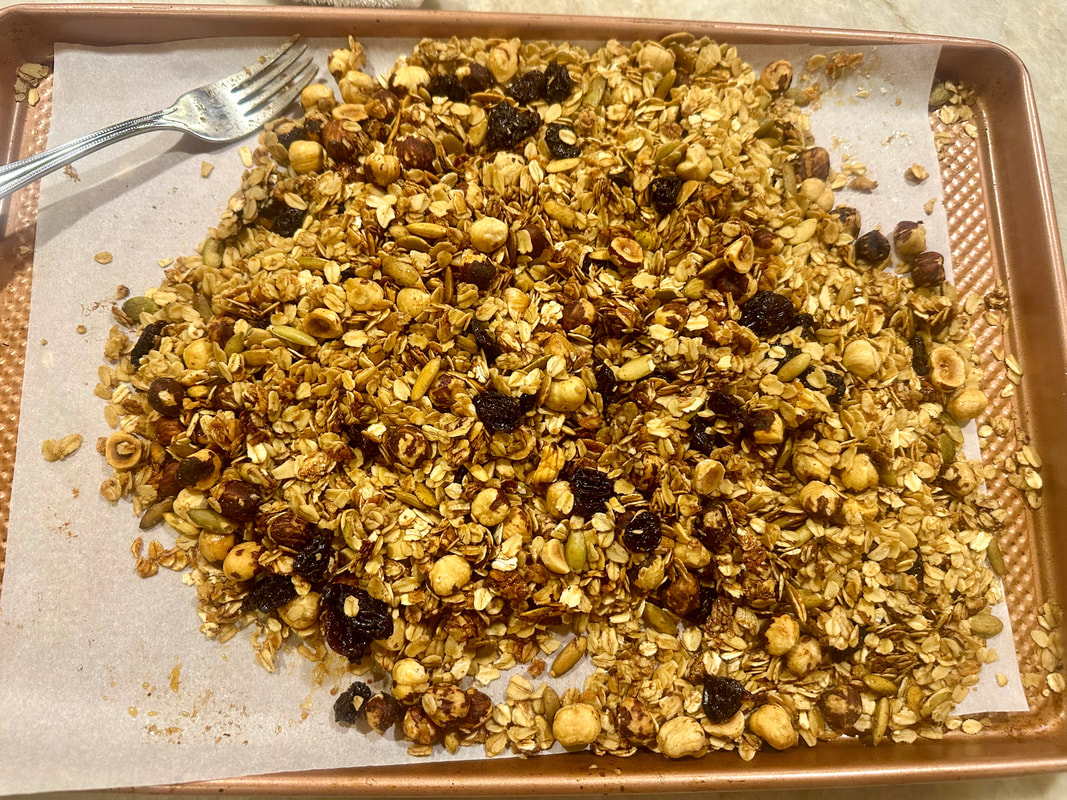
Be creative and design your own granola: add your favorite nuts and seeds, but remember that they need to be roasted before adding them. Use a sweetener if you like, and however much you like. My preferred choice for sweeteners are honey and maple syrup. For dried fruits I use raisins, cranberries, cherries or a mixture of all. Deb Perlman from Smitten Kitchen adds roasted wheat germ. For fats, I use sunflower oil but you may also use olive oil, coconut-, or canola oil. Some recipes call for melted butter. Ingredients: This recipe makes about 4-5 cups of granola 3 ½ cups old fashioned oats 1 cup toasted hazelnuts ¼ cup ground flax seeds 1 tsp. cinnamon 1 tsp.salt ½ cup pumpkin or sunflower seeds ⅓ cup sunflower oil ⅓ cup honey 2 TBS maple syrup ½ tsp. vanilla extract 1 cup (or more) dried cranberries, raisins, cherries, or other fruit Directions: Preheat the to 300˚ F (150˚C) Cover the baking sheet with waxed paper Combine the oats, hazelnuts, and flax seeds in a large bowl. Combine the wet ingredients and spices in another bowl. Mix the wet ingredients with the dry ones. Spread them out on the cookie sheet covered with wax paper and bake until golden, approximately 40-45 minutes, tossing occasionally. Add the dried fruits and store in an airtight container. Guten Appetit! Recipe from the sunnycovechef.com Here are some more recipes for breakfast or brunch. 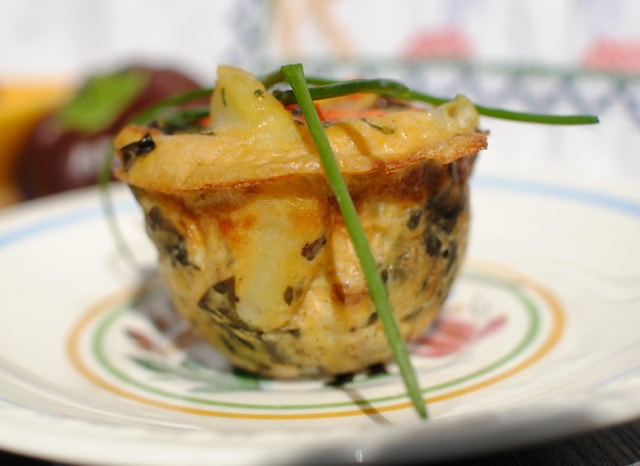 These healthy savory muffins will give you energy for a long time. Click here for the recipe 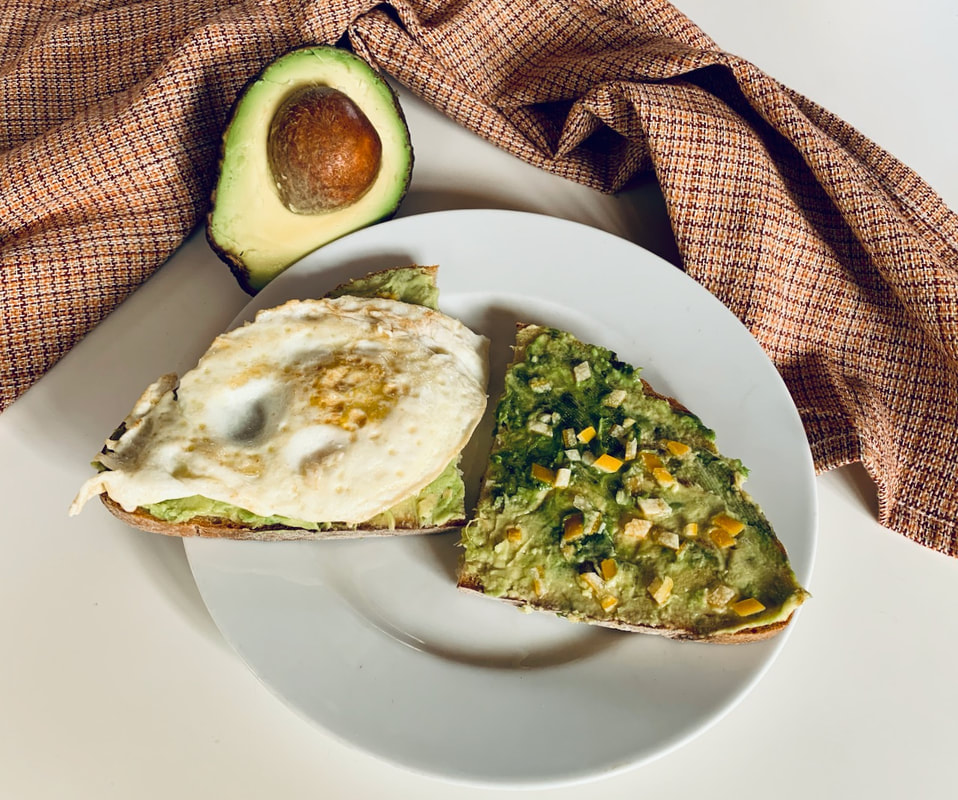 Avocado toast with homemade preserved lemons. Click here for the recipe 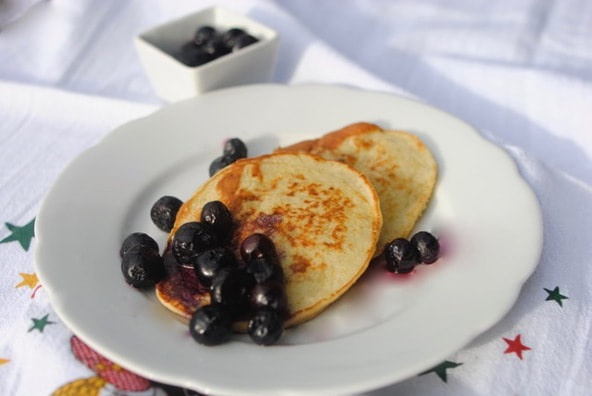 Healthy banana pancakes
Click here for the recipe.
20 Comments
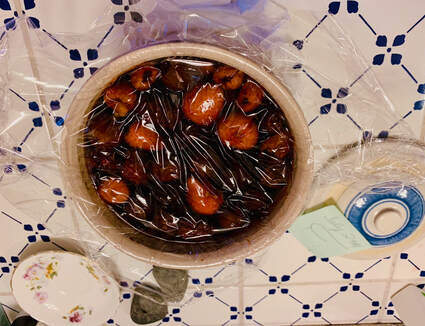
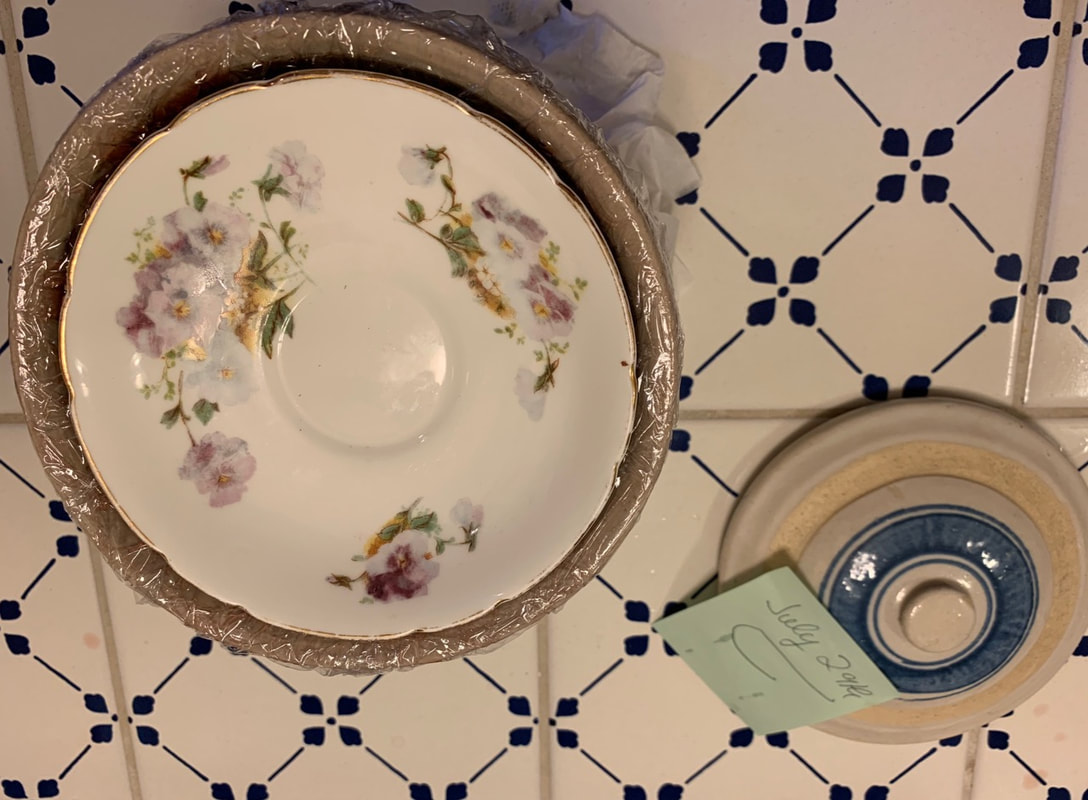
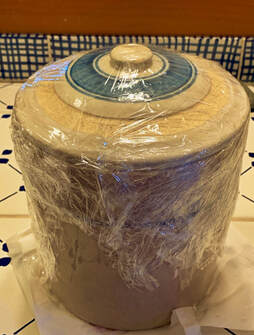
Yum, yum, it’s soaked in rum! If you are looking for an easy way to preserve the taste of summer for a cold winter night, look no further. Make an old-fashioned rum pot with the tastiest strawberries, cherries, raspberries (or any other fruit), add sugar and rum, then let it sit for at least two months. You will end up with a boozy delicacy, which is perfect on pudding, ice cream, flan, cheesecake, almond cake and in drinks. You only need three ingredients and a non-corrosive container with a lid for this classic German condiment. 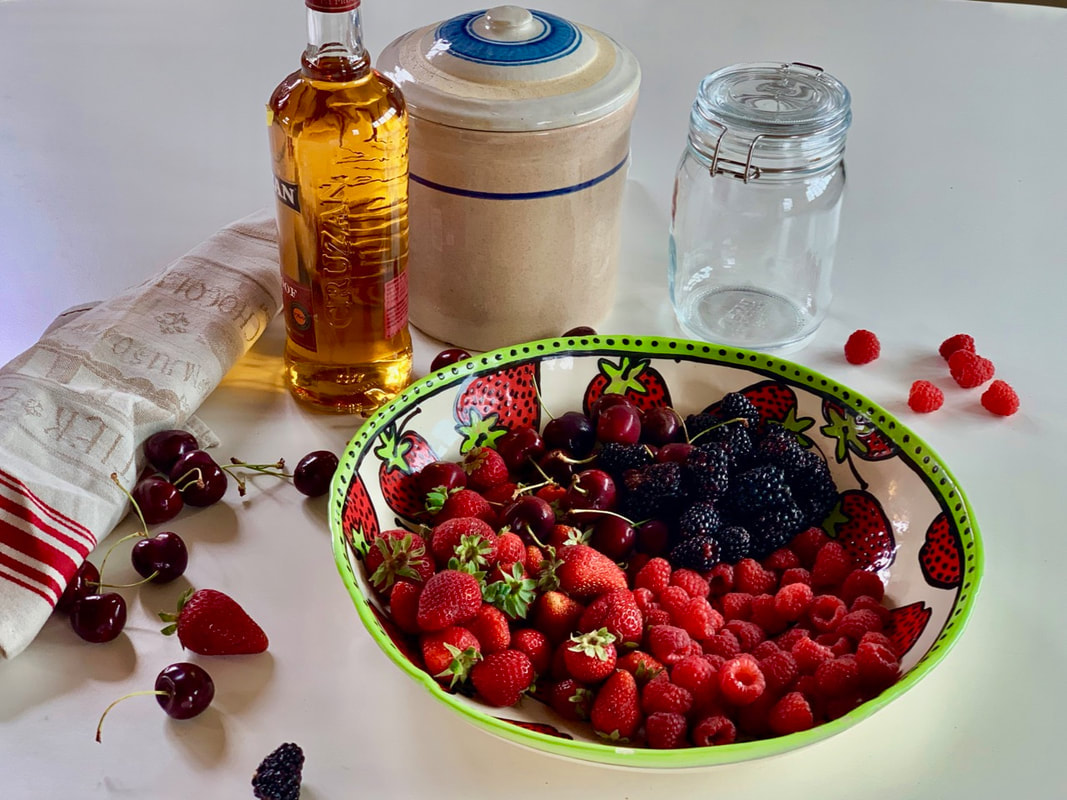 This German tradition of making a rum pot goes back to 18th century, when rum was imported from the Caribbean to the northern Hanseatic towns. Legend has it that some tropical fruit accidentally ended up in a rum barrel. Whether it’s true or not, it’s a good story. My story goes back to my gentle, caring and loving father who wasn’t a cook. How could he be when he worked from dawn to dusk on the farm seven days a week? But he managed somehow to make a rum pot, which he loved to pour over ice cream. 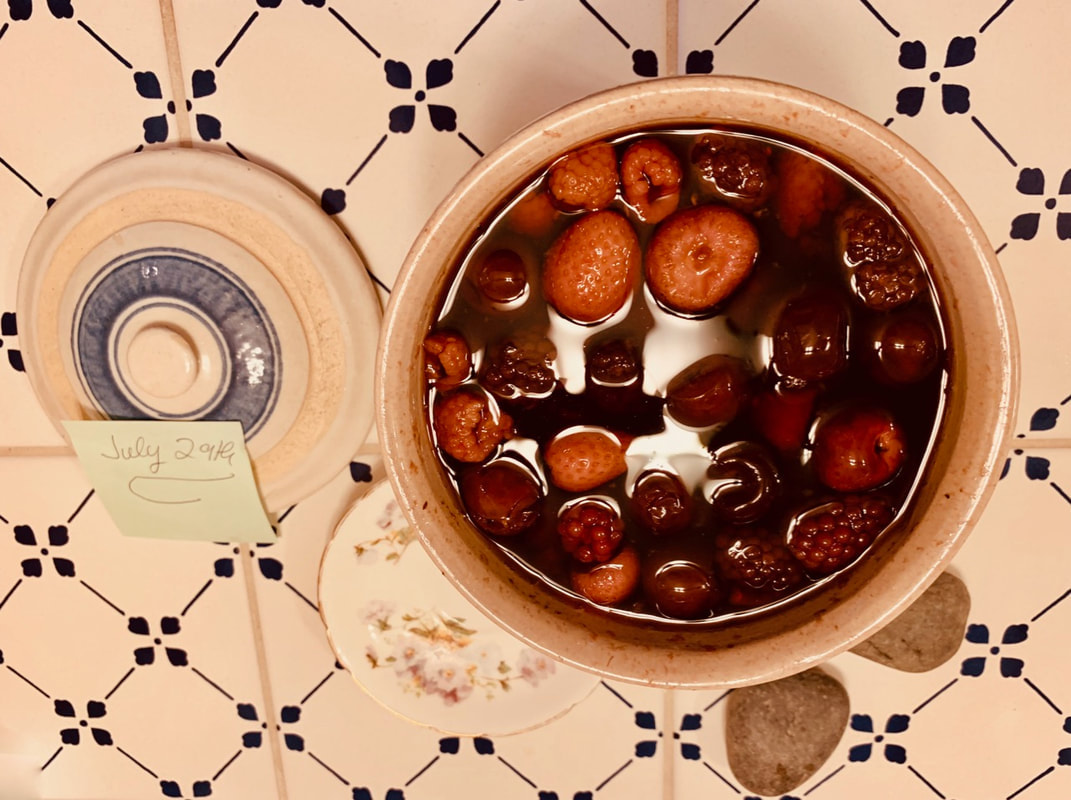 A traditional Rumtopf is done in a special crock pot ( see the photo below) . My father just used a regular crock pot, but a mason jar will do. The fruit is added when it is ripe—strawberries in June, followed by raspberries, apricots, blueberries, cherries, plums (or any other fruit) in July and August. Sugar and rum is added for each addition. The beauty of the Rumtopf is that you can use almost any fruit you have available as long as you top it with rum that is 54% or higher (108 proof). It will put hair on your chest, so be careful and eat responsibly. 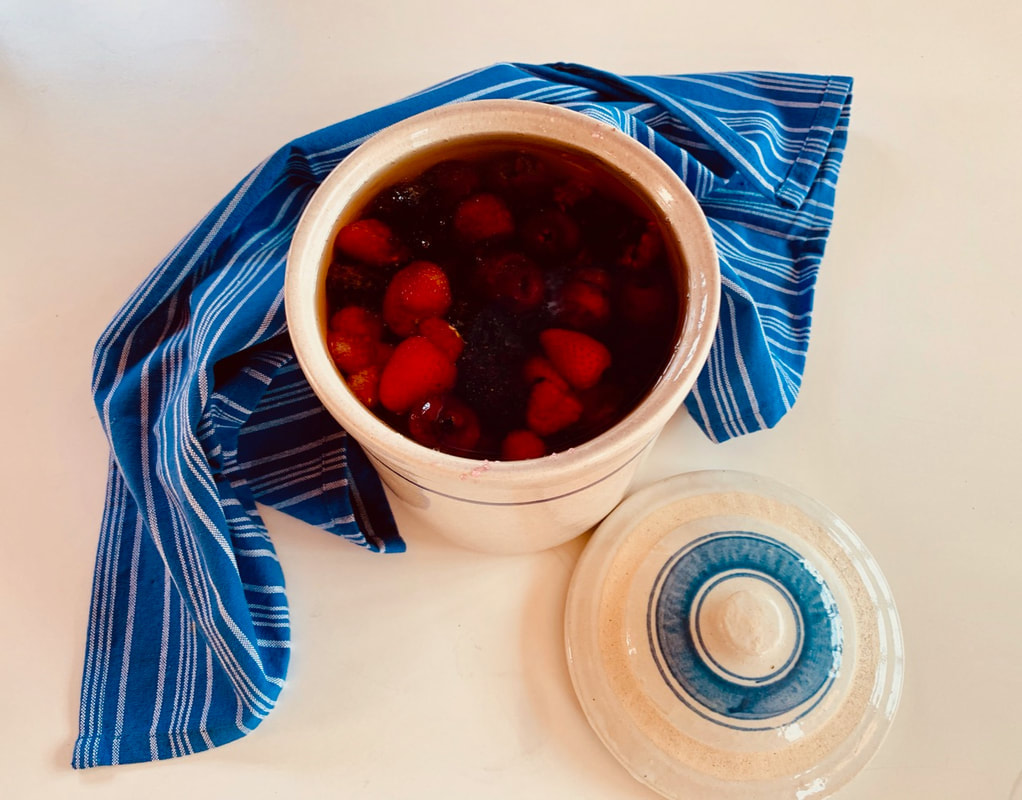 I live in California and only harvest a handful of berries from my garden, but fresh delicious fruit is everywhere else, especially at the farmers markets. I am found of cherries and love to eat them. I ended up with a refrigerator full of fresh fruit and had to do something with it, so the idea of a Rumtopf was born. All I had to do was find was a bottle of rum that was more than 54% alcohol. I am thinking of starting another Rumtopf the traditional way, by adding fruit and sugar and topping it with rum. Layering my Rumptopf with different fruits as time goes by, which keeps the pot going indefinitely. 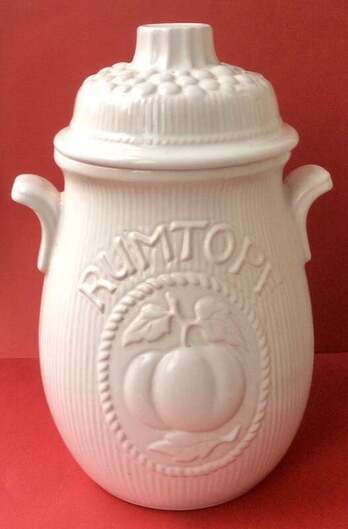 This is a photo of a Rumtopf that is for sale at ETSY. Before you click on the recipe, please understand that this is an experiment , I usually taste my recipes before I post them, so please keep in mind that this is not one of them. If it turns out (and I don’t see why not), I will fill some small mason jars with my Rumtopf and give them to my friends for Christmas. We’ll see! Your container can be a crockpot or a mason jar that has been cleaned thoroughly. I mixed the stronger rum with regular 40% (80 proof) rum. But make sure to use 54% (108 proof ), otherwise your Rumtopf will get moldy. Be careful, because the rum is flammable. It is important that the fruit is covered with rum. You might have to top it off while you are aging it. I loosely put some plastic wrap on top of my pot and and then add a saucer on top of that to make sure that the fruit is immersed in the rum. After I put the lid on, I wrap the top again in plastic wrap. According to all recipes I found, the Rumtopf needs to age at least two months so that the special flavors can develop. Some Rumtopf have been nurtured for years. The Rumtopf is like a perpetual jar, much like sourdough starter that can be kept alive for years
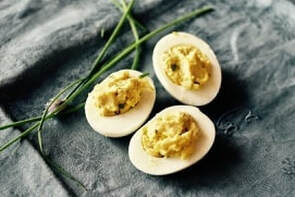
Do you want a fruity drink tonight, try out my recipe for a light Strawberry Punch. Click on the photo for the recipe.  A personal note to followers of my blog: For those of you who been wondering about me, life has had its challenges this year for my family. But we survived and I had to become stronger because of it. It’s been difficult, but the outcome is good for better days ahead. Thank you to all my friends and family for your support and love. I am respecting my husband’s request for privacy to not share more on the worldwide web. Quickly, let me give you my recipe for avocado toast. Take a slice of your favorite bread (toasted or not) and spread a ripe avocado on it. Or just put slices of avocado on your bread. The choice is yours and anyone can do it. If you want to, add a fried egg and call it breakfast or lunch. Or add anything else you like. I see coffee shops and restaurants that sell these toasts for a lot of money. There is a way to elevate this simple toast into a culinary delight by adding finely chopped, preserved lemon rind. Anytime you bite into one of these crunchy little lemon cubes, your palate will experience an explosion of flavors from the floral notes of the released lemon oils to the salty fermented umami crunch.  Preserved lemons are more than just lemons, as they capture the glorious perfume of the lemon and excite your palate. They will enhance almost any dish. Sprinkle them on a salad, a chicken dish or anything else you can think of. Preserved lemons add a fermented quality that regular lemons don’t have with their tart, salty and slightly bitter taste. 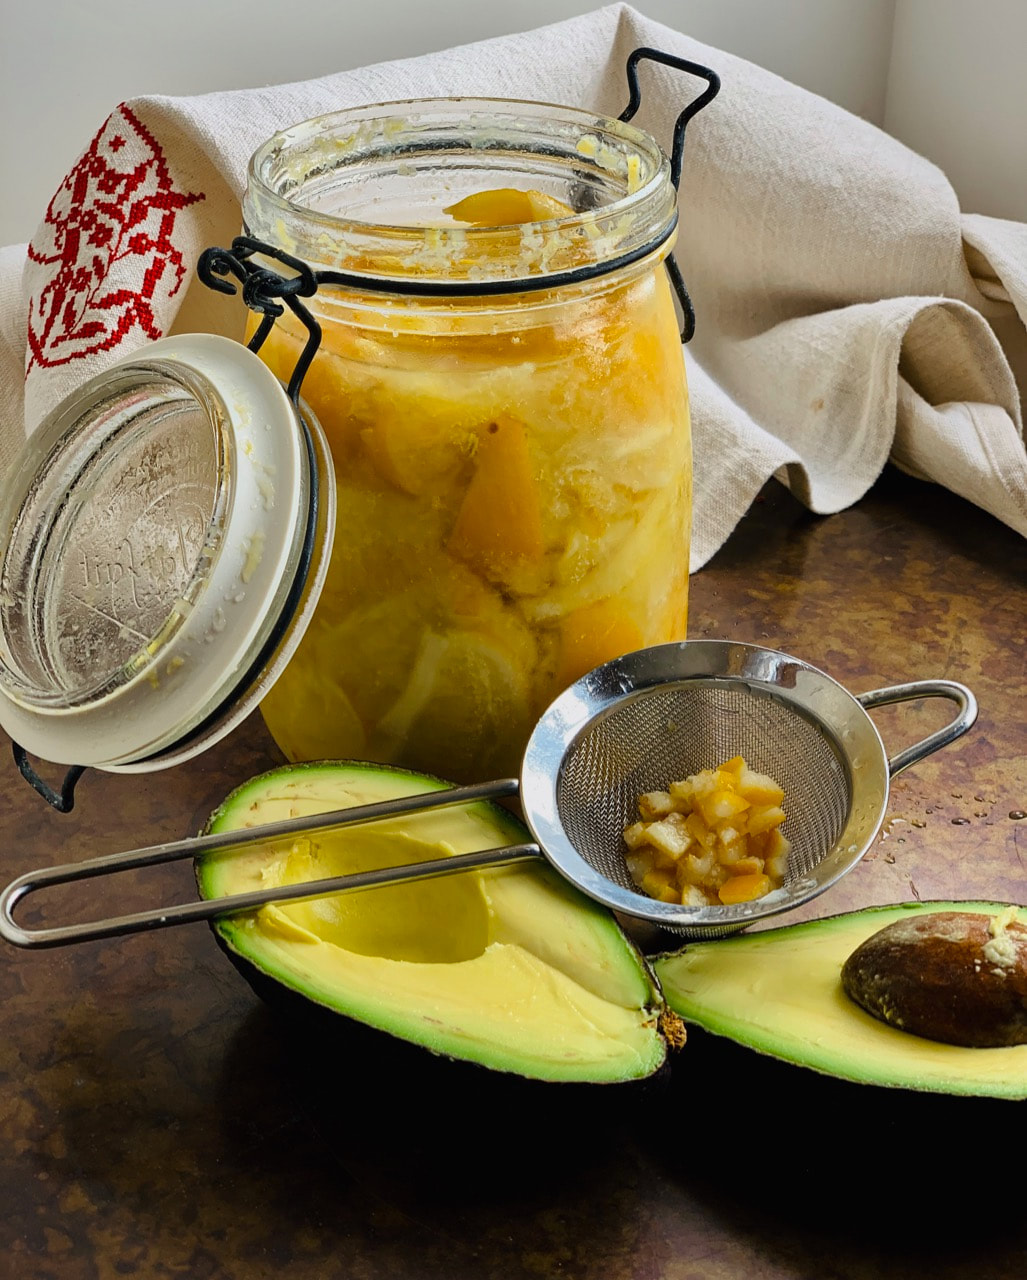 Preserved lemons have been a staple in North African cuisine since the 11th century. It is a way to preserve lemons for use long after their season is over. Paula Wolfert introduced them to the American audience in 1970 with her award-winning cookbook Couscous and Other Good Food from Morocco. If you want a true Moroccan preserved lemon, add the spices. 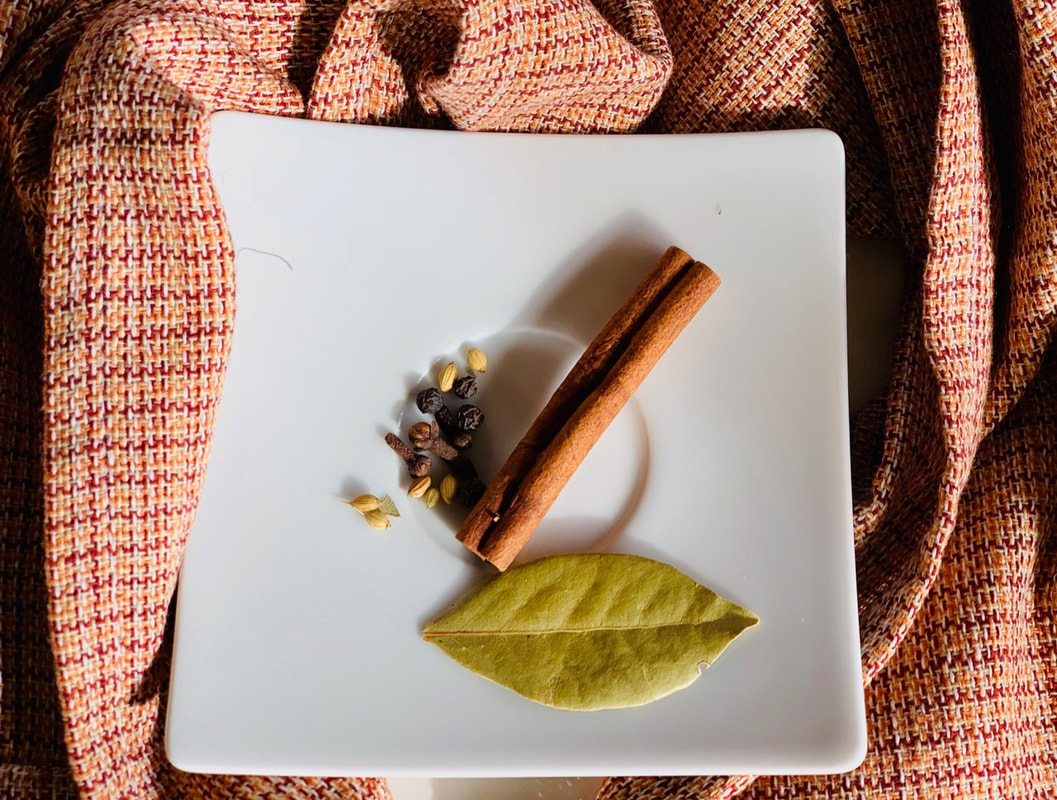 Those who have followed me, know about my lemon trees and my ongoing love for lemons. My blog has many recipes using my Meyer lemons, which I treasure. For years, I have made preserved lemons with some of them, but I have never blogged about them. So, I thought it is time to do so. I have given many jars to my friends and wish I could share them with you too. My niece and her husband took a jar with them back to Germany. I have added whole cloves, dried bay leaves, cinnamon sticks, coriander seeds and black peppercorns. In my last batch, I used just kosher salt, and I think that’s what I prefer. Usually, I use the rind and peel only, removing the pulp and rinsing the peel thoroughly to remove most of the salt. Then, I cut them into into tiny cubes, the smaller the better. I read somewhere that the pulp is great in cocktails, but I haven’t tried that. Lately, I have been adding some preserved lemon when making my chicken stock. 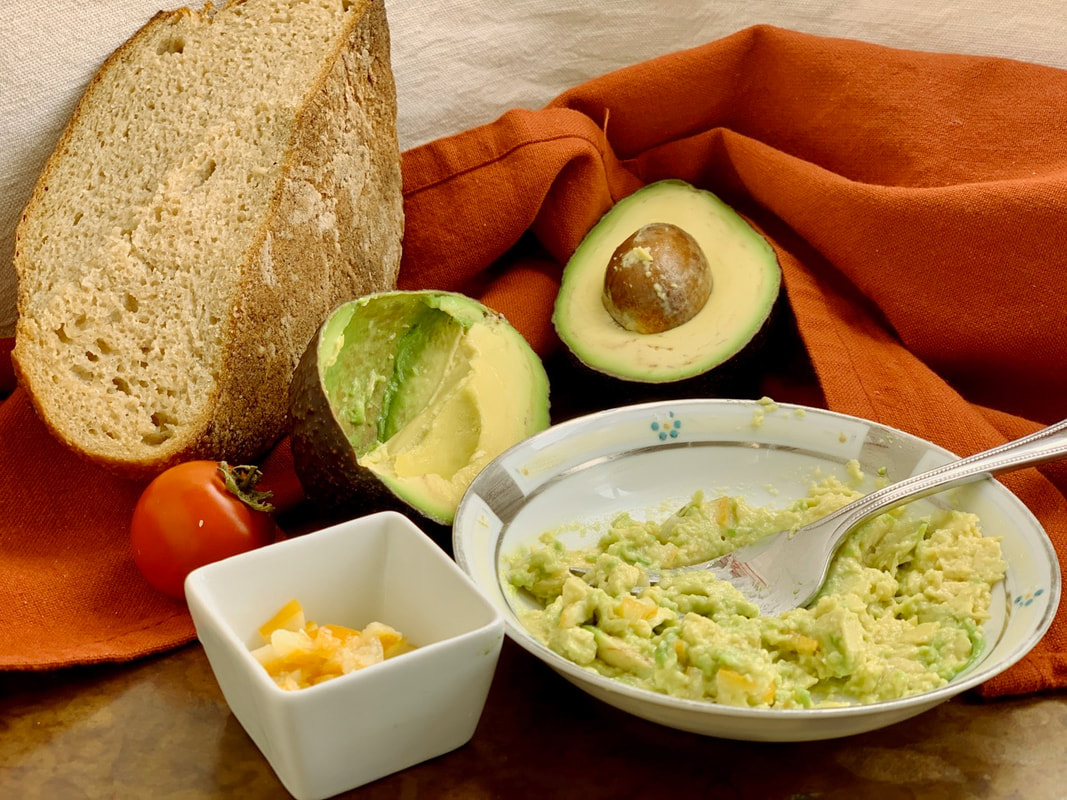 Making preserved lemons at home is easy; it just takes time. Mine have lasted a year or longer in the fridge. 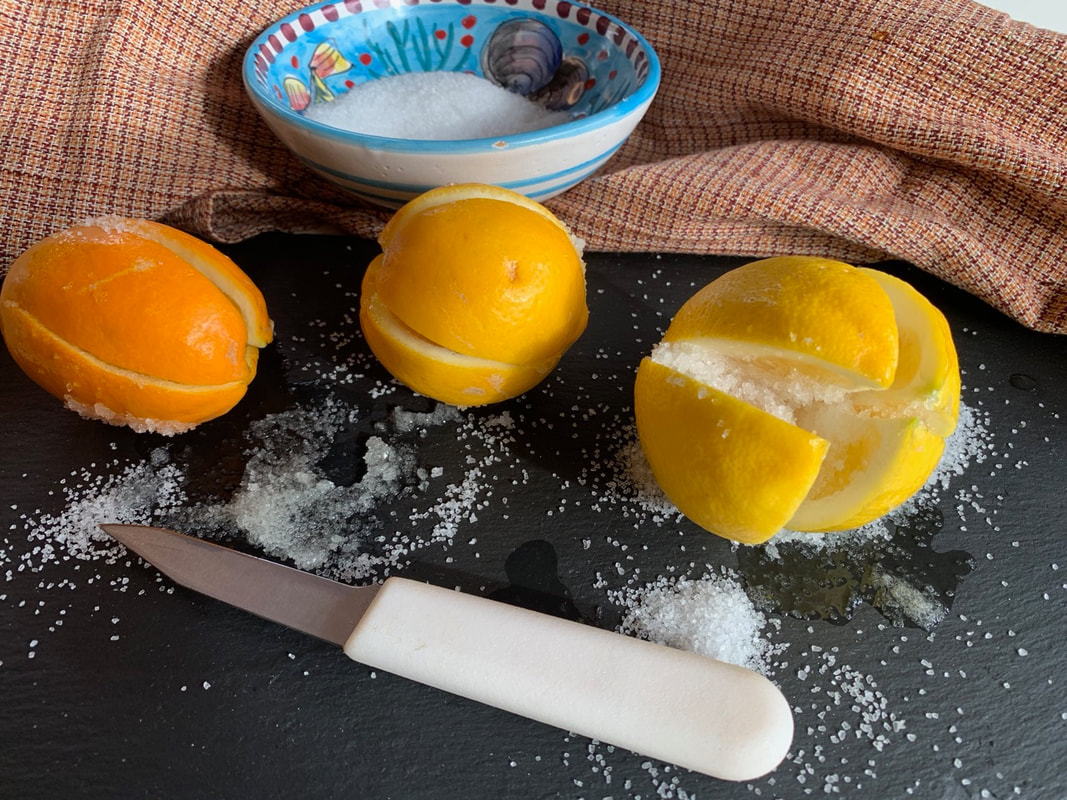 I am leaving for Germany in a few days and I am not sure that I will post again before Easter. Easter is one of my favorite time to visit my family and friends. The arrival of spring is a happy occasion after the long winter. Everybody is happy and ready to embrace the warmer weather and longer days. The restaurants and cafes move their tables outside, as every ray of sunshine is greeted with a smile and spring is celebrated with holidays and festivities. This year is especially nice because the Easter holiday is later in April. I am going to be able to not only to celebrate Easter but also the first of May. In my village, this day is celebrated with a walk through the forest into the next village. Along the route, there are stands with drinks, some of them being little shots of Schnaps (a gin-like drink). The word Schnaps (according to wikipedia) refers to the fact that the drink is a consumed with a quick slug from a shot glass. In the evening, the celebration continues with a gathering around the May tree in the center of the village where Maibowle (May punch) is being served. This punch is wine steeped in an herb called sweet woodruff. I'll post more about my trip when I return, but in the meantime, I will add some photos from my trip on Facebook and Instagram. I can't wait to be with my German family again. Read about one of my previous trips and deviled eggs here.  In this nutty, chewy, not-too-sweet almond lemon cake, whole cooked lemons are being used. It is not your average lemon cake. Click here for the recipe. 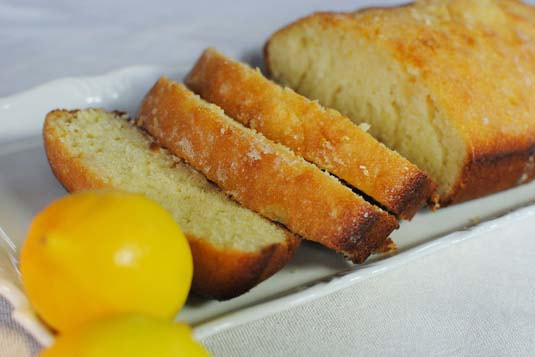 Here is an easy-to-make pound cake that is infused with lemon juice. A great combination and perfect any time of the day. Click here for the recipe. I wish you all a Happy Easter or Fröhliche Ostern as we say in German. 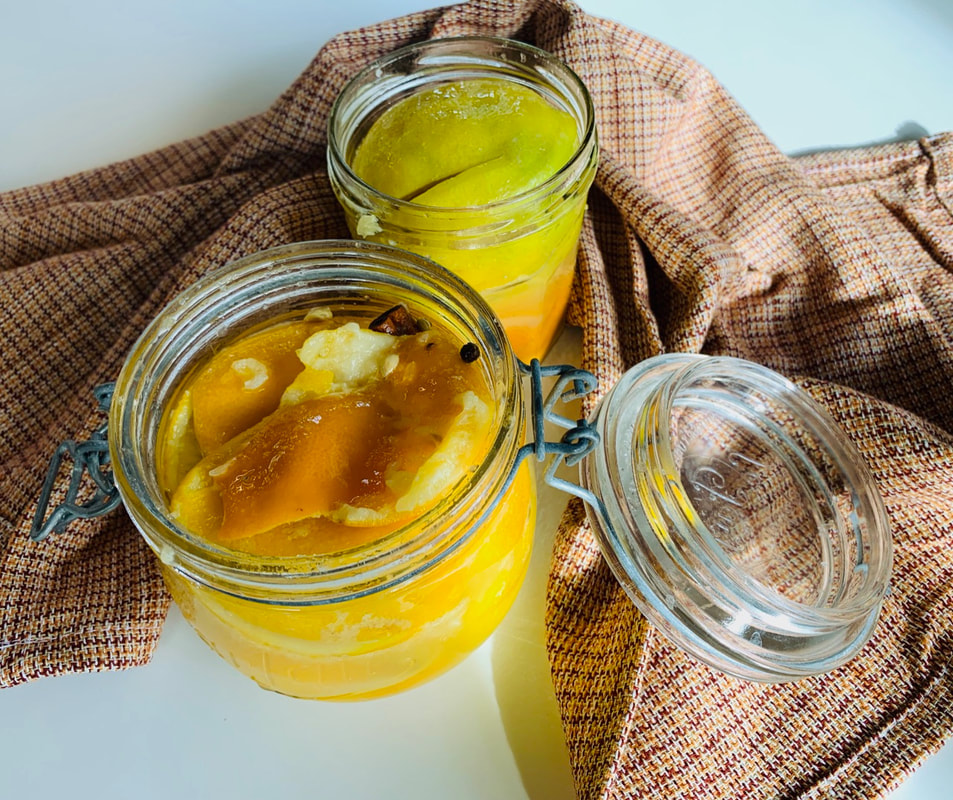 It is important to scrub the lemons very clean with a brush in a tub of water and dry them with a clean towel. Sterilize the jars in boiling water for 15 minutes and then dry them.
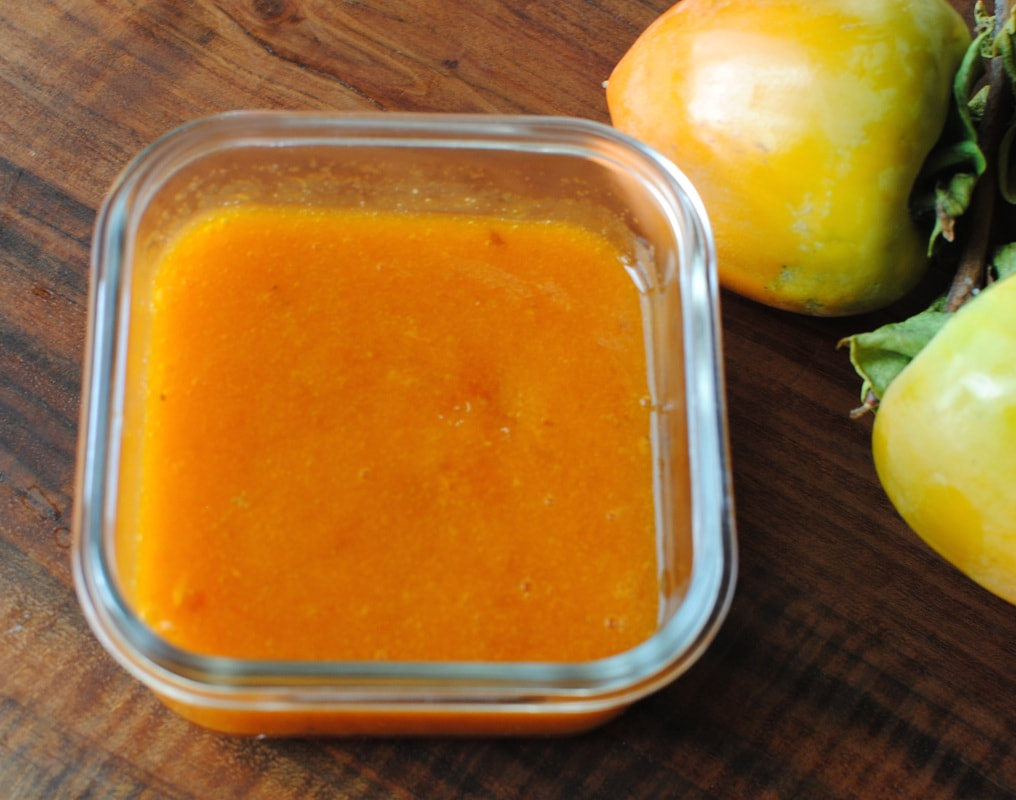
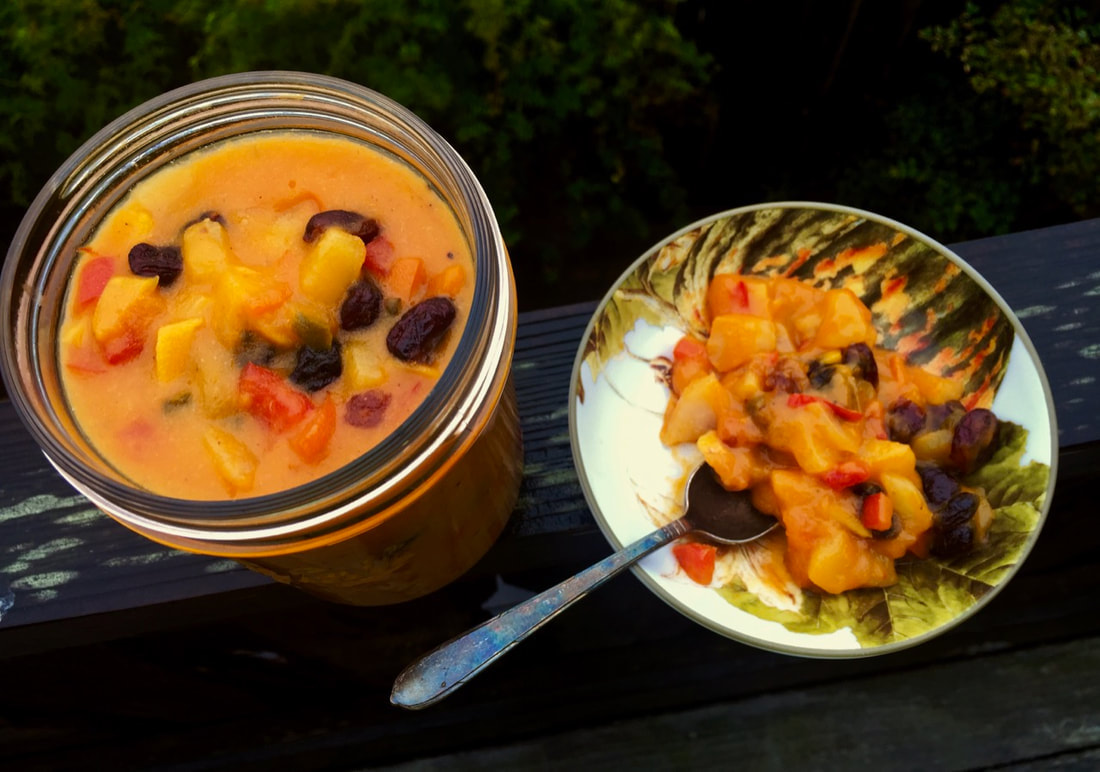
Every year, I eagerly await the time when the persimmons ripen in our little town of Santa Cruz. They are a sure sign that fall has arrived. I don’t have a tree myself, but friends and locals are willing to share their bounty. Hachiya persimmons are the ones I get most of the time. They are teardrop-shaped and have to soften before you can use them. Fuyu persimmons are the flat-looking ones that are great sliced in salads and other dishes. Persimmon trees can grow up to 70 feet tall, and one of these wonderful trees grows in my girlfriend’s son’s garden. 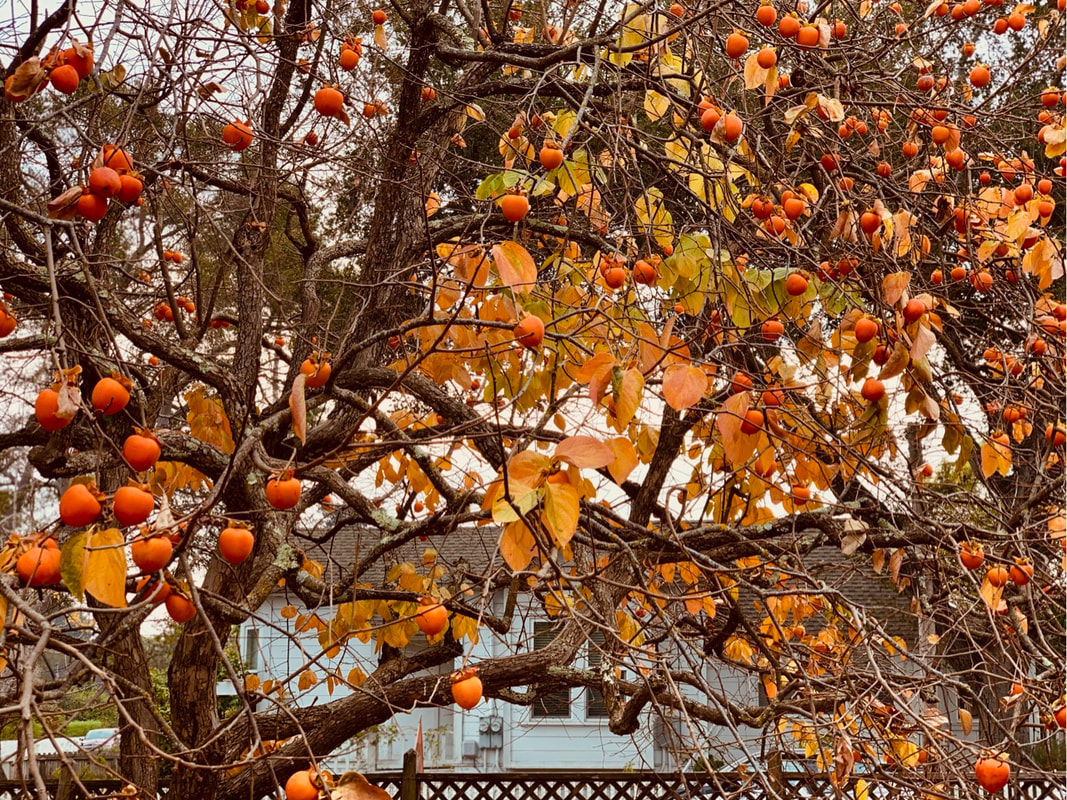 I have been cooking and baking with persimmons for years. Read more about persimmons and the recipe for my persimmon bread on a previous post (click here). 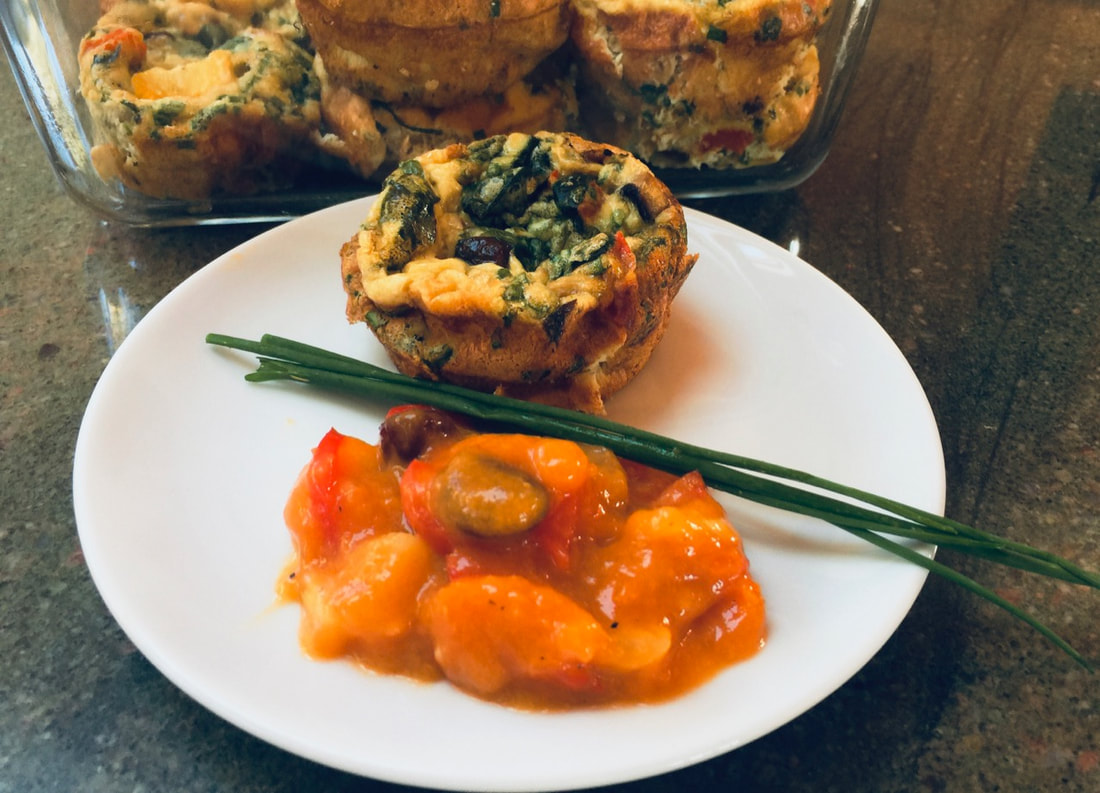 Each year, I can't wait to make this chutney. The recipe comes from a twenty-year-old local newspaper clipping. The chutney is great with a variety of different foods. This year, I am going to make it part of my Christmas cheese board. It is also great with fish, on duck breasts, or with any food you can think of. In the photo above, I am serving it with my muffin quiches without a crust . These quiches make a healthy snack. (click here to get the recipe) 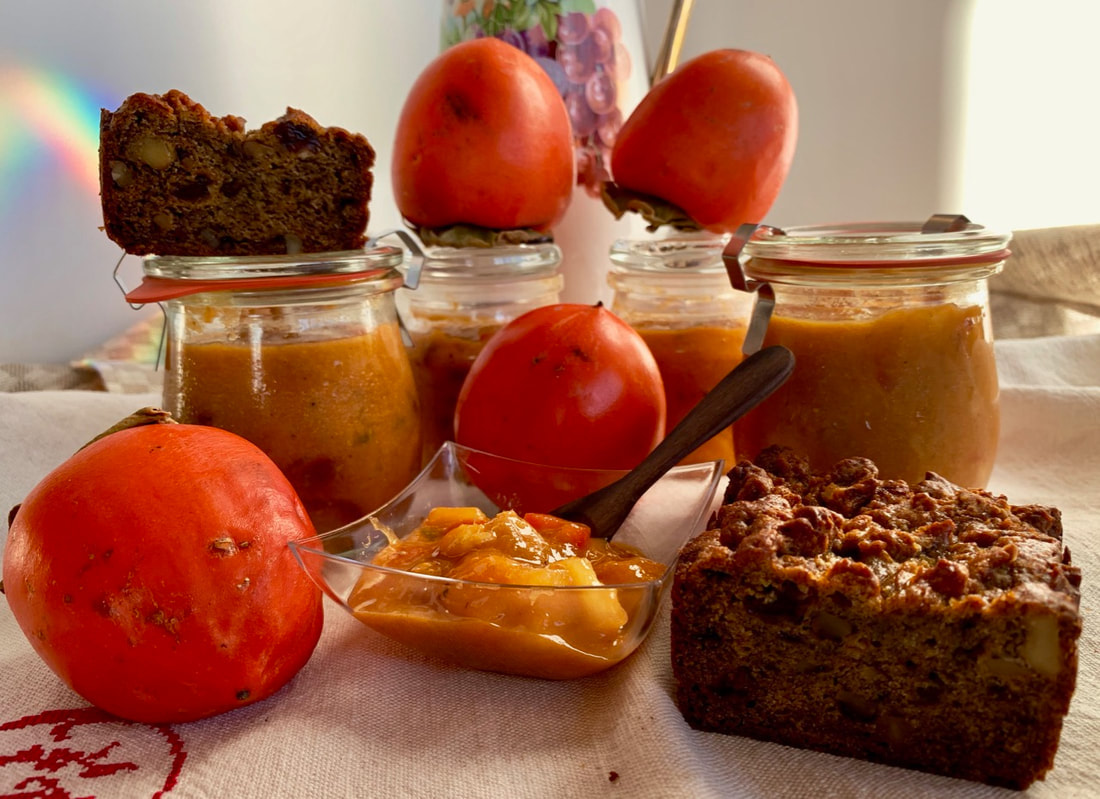 My chutney is rather mild and not overly sweet. The fresh ginger gives it a great flavor. Since I am hosting our book club next week, I am giving each member a jar of my chutney and persimmon bread as a gift. I have also made this persimmon chutney with apples or pears using lemon or lime juice. Personally, I prefer lime juice. The jury is out on whether to use apples or pears, so it is really a matter of your taste. The pears should be firm. For my last batch, I used golden delicious apples. Instead of dried cranberries, you can substitute dried blueberries. The chutney develops its full flavor after a couple of days in the fridge.
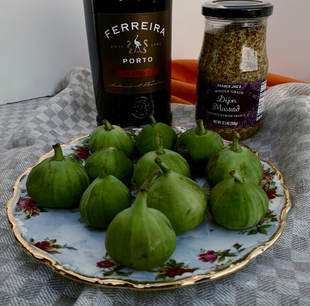
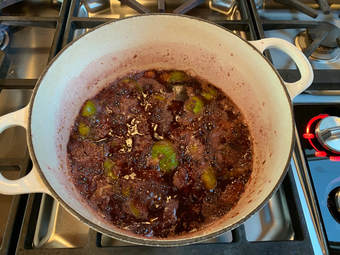
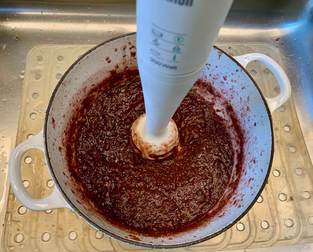
I really shouldn't do this, instead I should go for a walk to give my old body some exercise before a very long flight. But I just have to share this because fig season is almost over and I love this mustard. Have you noticed that I am running a little behind when it comes to seasonal cooking? Later on, I will try making this recipe using dried figs and add it here. 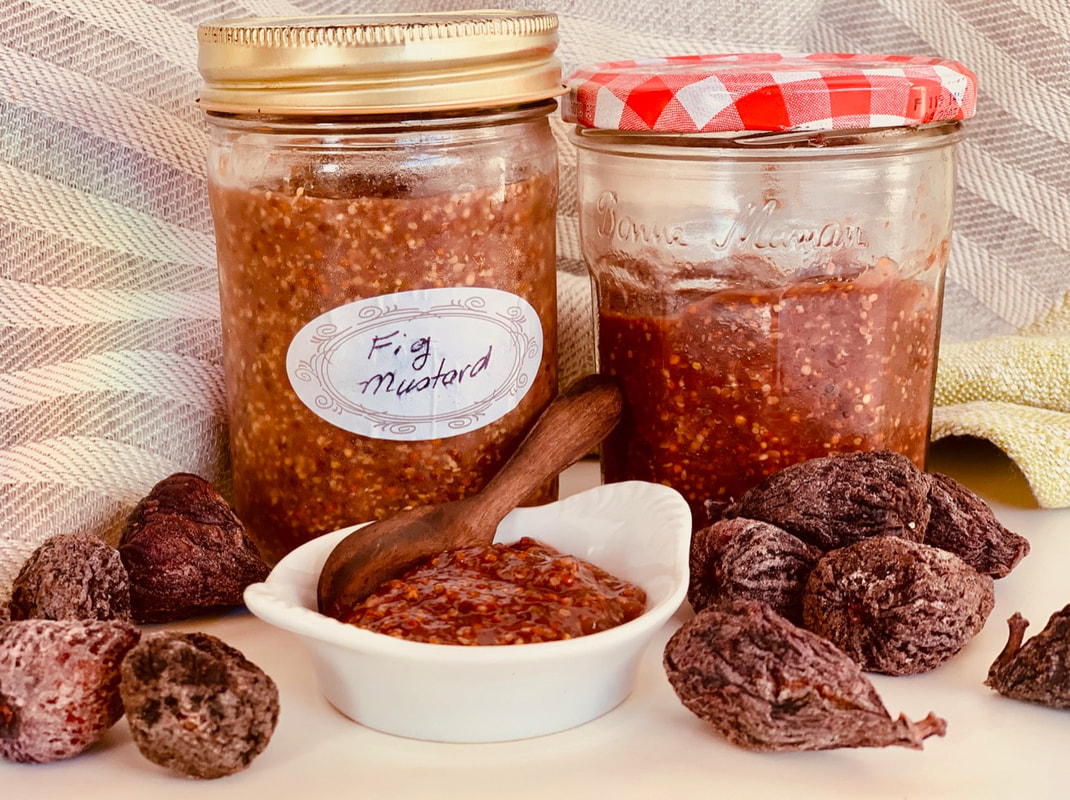 The figs in this photo are dried mission figs It all began with a basket of Italian figs that my girlfriend Diane gave me. 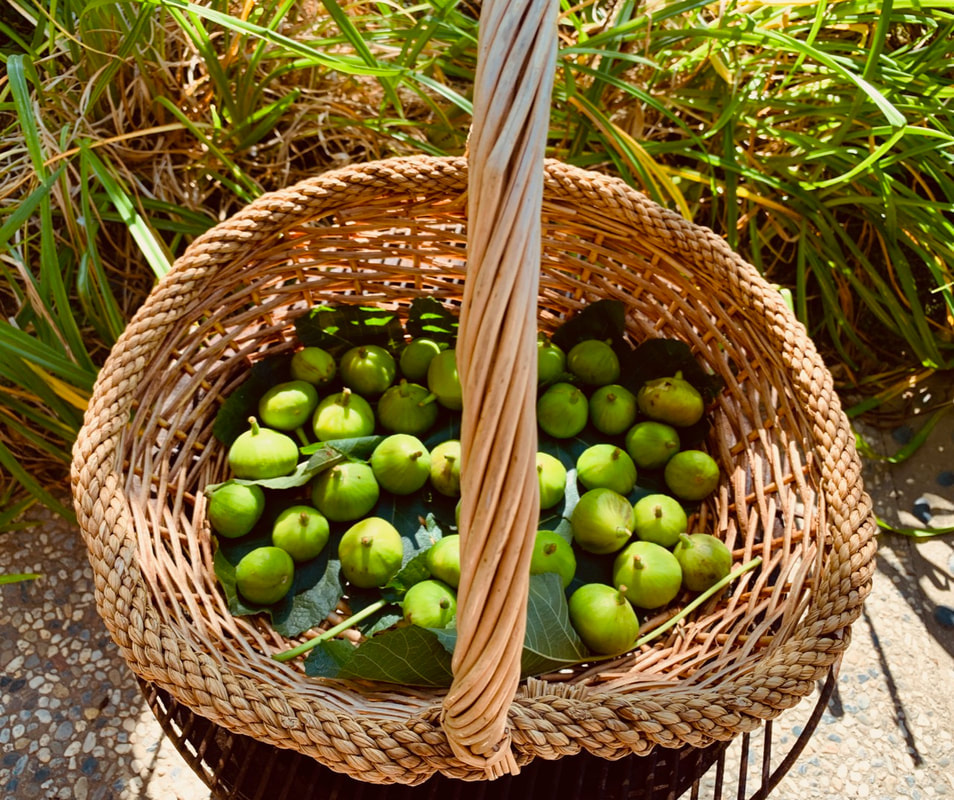 This mustard would be great on a cheese plate or on a turkey sandwich. In France, figs and fig mustard is often served with foie gras, and in Germany it is served with a Weißwurst (veal sausage). This is not a sweet mustard, but it is full of flavor with the taste of the figs and a hint of vinegar. 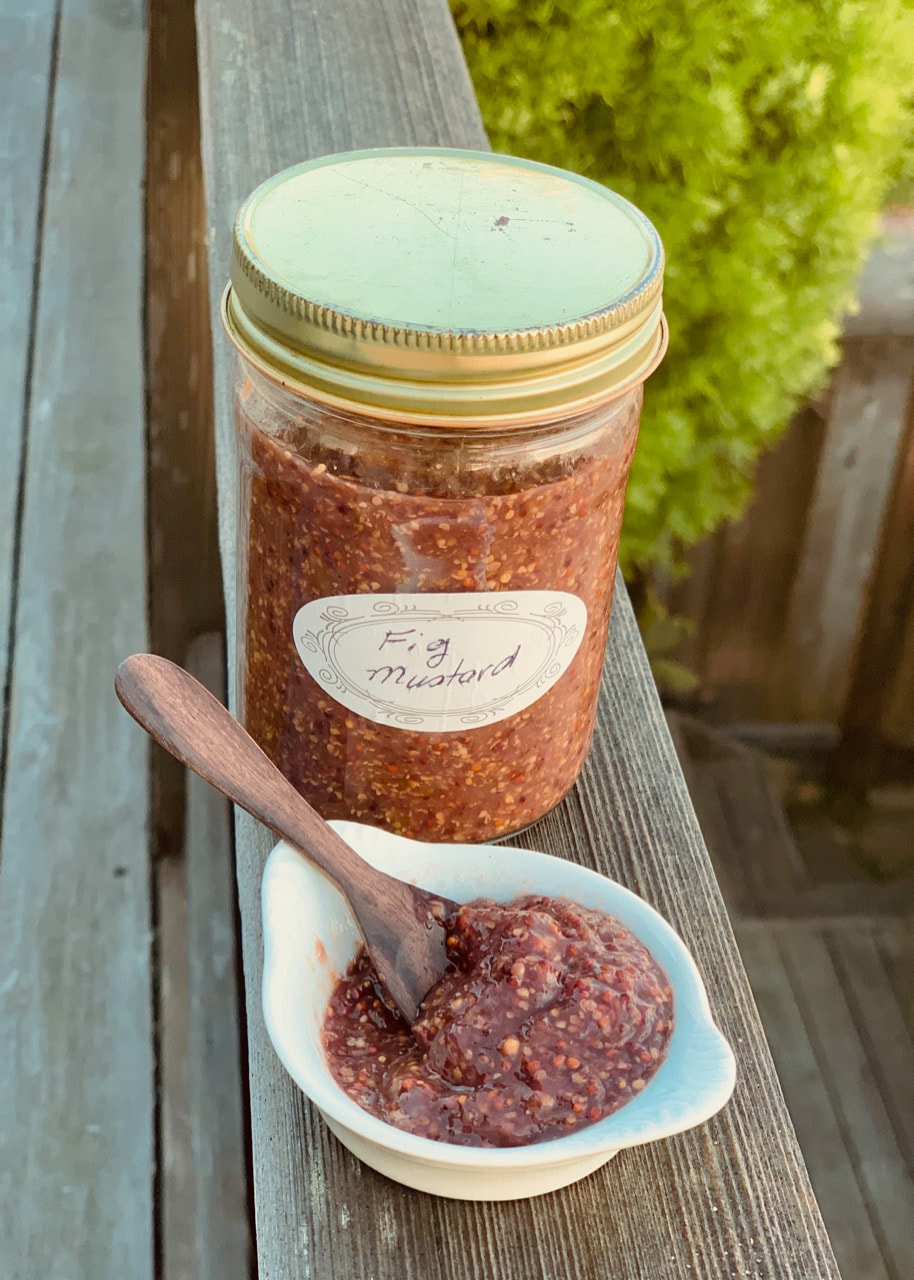 I used Italian figs but mission figs or any other figs can be substituted.
 Dijon in Burgundy, France I can never get enough of different sauces and spreads. I like them thin or thick, and I like them as leftovers used with a salad, a sandwich, or a piece of meat or fish. For me, the right sauce makes the meal. When I visited the Burgundy in France (click here to read about my trip), I had the most incredibly thick eggplant sauce next to a piece of fish with the most delicate flavor I have ever tasted. The great chef had added some African spice, and I have no idea what it was. However, I remember tasting something similar in Morocco. Well, my sauces are nothing like that. They are straightforward, easy to make, delicious and can be used in many ways.
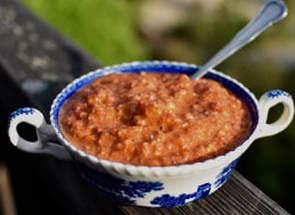
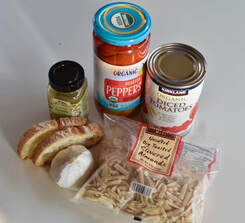
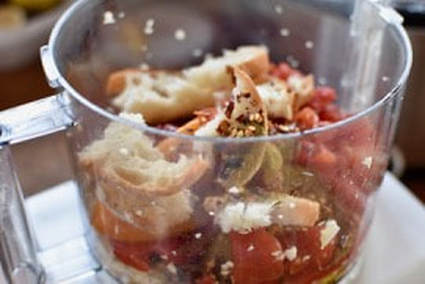
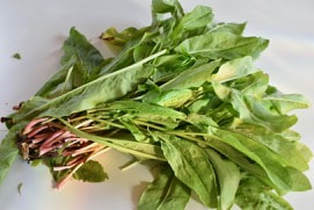
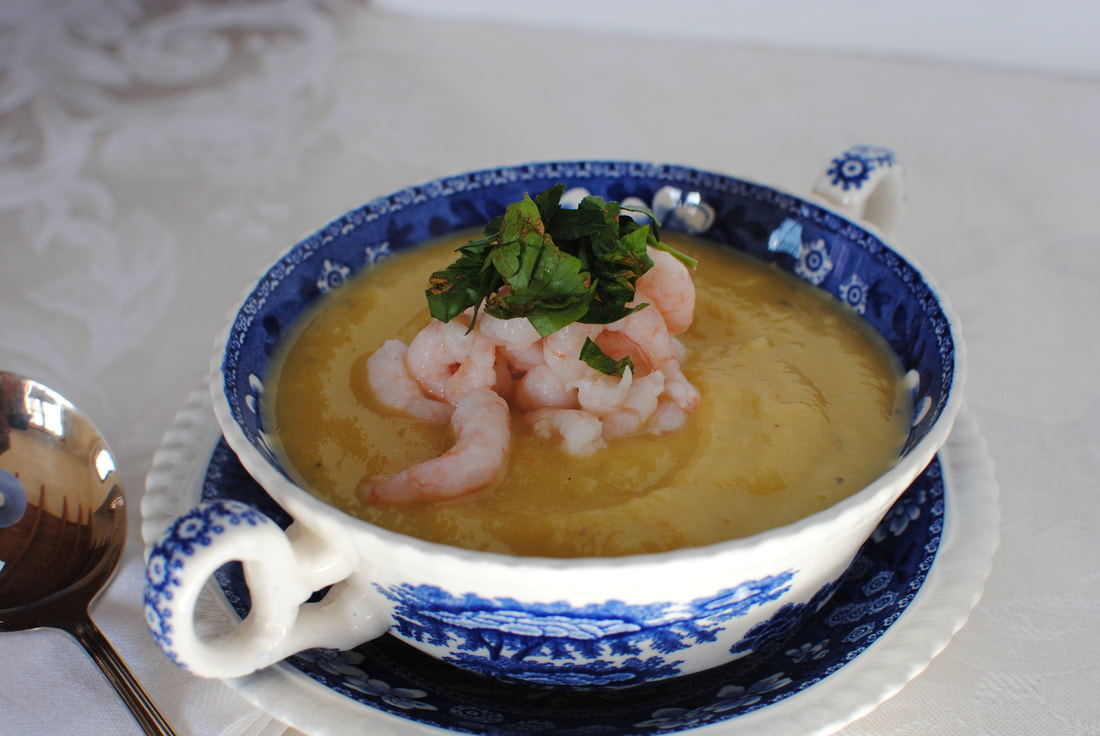
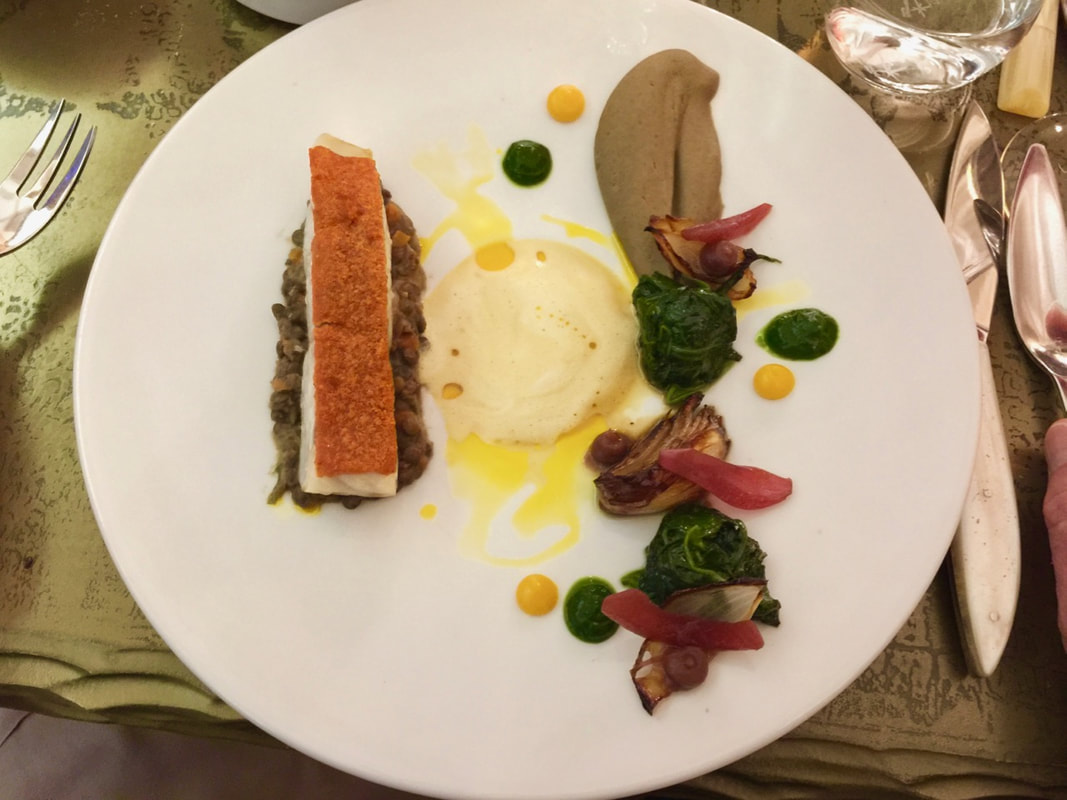 Louis-PhilippeVigilant at Loiseau Des Ducs in Dijon creates exquisite sauces  The romesco sauce makes a delicious and healthy lunch I got the idea for the romesco sauce from my blogger friend, Mary Ann, who writes the thebeachhousekitchen blog. She made her romesco sauce as an appetizer with cruditées. I have made this recipe many times and usually eat it as a sandwich spread or with a salad. It is a healthy substitute for richer foods like mayonnaise or butter. For the salmon, I used a recipe from myrecipe.com. This recipe uses canned tomatoes instead tomato paste and cumin as a spice rather than smoked paprika. I don't purée this sauce as much as Mary Ann’s sauce, leaving it coarser for the salmon. Both sauces are delicious. The inspiration for the sorrel sauce came from the blog, Back Road Journal, and Bon Appetit. I added more sorrel because I have an endless supply of it in my tiny wild garden. Sorrel is a tart, slightly sour herb, oxalis, another common name for this herb means "sour". I think it has a distinct lemony flavor and I find its tartness refreshing. I prefer to purée the sauce in a mixer until smooth. I love the taste of this rich and tangy sauce. It compliments a piece of salmon and other fish. I could eat it on steamed veggies or a chicken breast. It would also taste great with shrimp, chicken or salmon skewers. Here is a link to to Mary Ann’s romesco sauce and Karen’s sorrel sauce. Both sauces can be made a day ahead. I had leftovers and ate them for several days. Romesco Sauce & Sorrel Sauce When I made the sorrel sauce for a large party, I didn't write down the proportions so I tried to reproduce the recipe for this blog post. I got carried away with the amount of sorrel (I added 4 cups which made the sauce quite tart), so next time, I will reduce the amount by half or less. I tasted the sauce the next morning and it had mellowed out somewhat. My romesco sauce is a combination of Mary Ann’s blog post and my recipe.com, which was very well received by my nephew who liked its nutty flavor. I have used hazelnuts instead of almonds.
It has been three years since I started my two blogs. I had no knowledge nor any experience when it came to blogging. With the help of some friends I was able to get started. I have enjoyed the process of embarking on something new where I could share my love of cooking and traveling with others. At the beginning I spent a lot of time in Germany taking care of my ailing mother. Blogging enabled me to have something else to do. I quickly connected with other bloggers around the world who had similar interests and I enjoyed reading their stories. The connections I have made are very important to me. They have become part of my life . The blogging community feels like an extended family to me.
I also wanted to organize my recipes to make them more accessible to my friends and myself. In my Wanderlust blog I share trips and experiences I have encountered. Overall, my blog has provided me with a creative outlet that connects me with people from around the world. I find it fascinating. I am thrilled with the surprising number of people who visit my blog. Thanks to all of you for showing an interest and connecting with me. It is greatly appreciated and I am thankful for the comments and encouragement. You have enriched my life. Hopefully, I can provide you with some interesting and delicious tidbits of life, traveling, and cooking.
Here are some of my posts from the last three years. Click on the picture for the recipe. Tell me which are your favorites?
I get up very early these days since I am recovering from jet lag. I love the early hours because they are quiet and peaceful and I have them all to myself. What a treat! It takes awhile for me to adjust and get back into the groove.  Walking in the high mountains of the Bernese Alps Do you remember when I wrote about packing light? Well, I didn't this time. Whenever we have a car, we seem to overdo it. We took a lot of stuff to the village for the wedding: gifts, dresses and shoes just for the wedding. What can I say? My grand nephew really liked his Hawaiian shirt and the flip flops were also a hit. Originally we had planned on returning with an empty canvas bag. However, both my husband and I managed to fill it up. My husband bought a gargoyle at a garden show in our little town where we stayed for my niece’s wedding. I managed to fill up the rest of the bag. 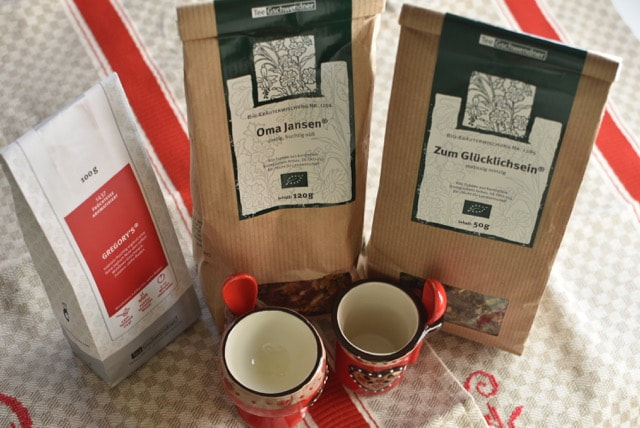 These are different teas I bought, one claims to make you happy. 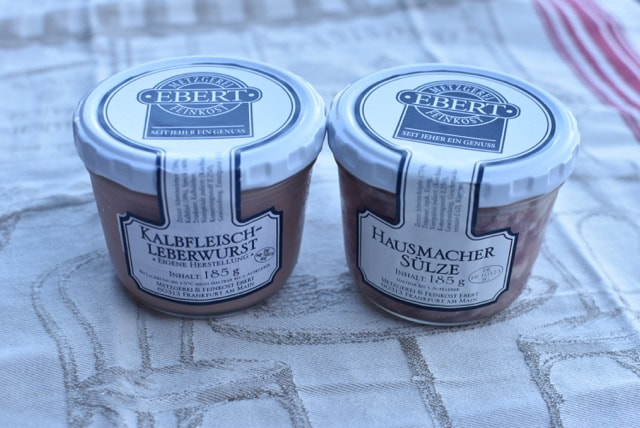 I bought these in my favorite delicatessen store in Frankfurt.  My husband likes gargoyles Continue to read about my trip on myCooking helps me to reconnect and what is better than a good breakfast. 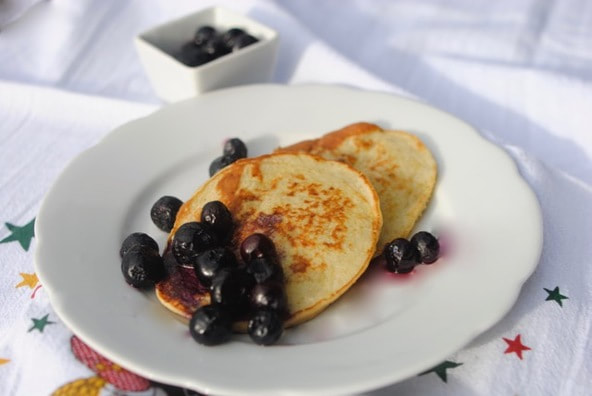 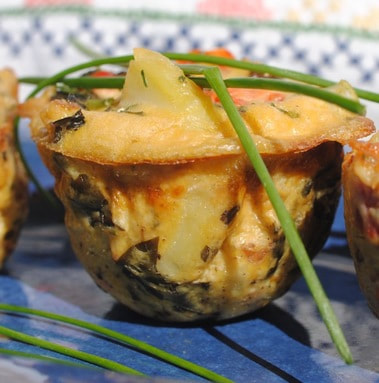 These crustless little mini-quiches or muffins also make a great breakfast, lunch, or dinner. They are filled with vegetables and even taste good cold (klick here for the recipe). I need protein for my morning meal and these delicious pancakes pack in 10 grams of protein and are ready in 10 minutes. They have three ingredients: a ripe banana, one egg, and 2 tablespoon of whole wheat flour.  In general, I am not a pancake person, but when I saw this recipe in Cooking Light I was intrigued. I have made them several times, sprinkled them with some blueberries, roasted nuts and a little bit of maple syrup. I like these pancakes because they are soft and fluffy and only have 228 calories without the toppings. This is important to me right now since I have expanded a bit over the holidays . I don't like to deprive myself of good food—and don't like being hungry.  Sometimes when life has too many hurdles and I don't have the answers or solutions, I go for a ride or a walk into the countryside. Nature gives me a helping hand. It smiles upon me and let's me forget the worries of the world. It calms my fears and reminds me that there is always a new beginning and beauty wherever I am. 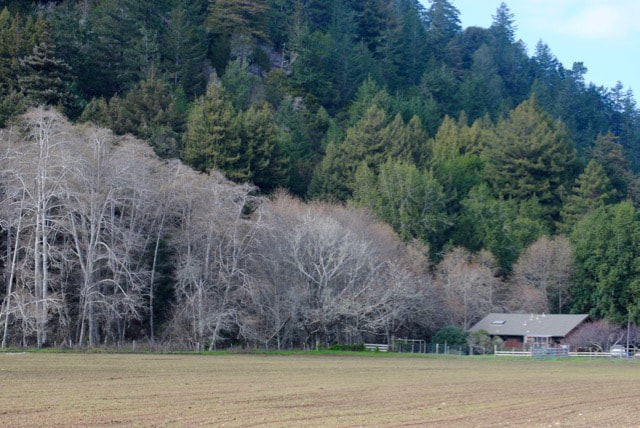 Last week, before New Year’s 2016, my husband and I went on such a ride exploring the country roads off beautiful Highway 1 along our Pacific coast. As an afterthought, I took my camera. This stretch of highway between San Francisco and Santa Cruz is stunning and beautiful—and I can never get enough. But the small roads off Highway One are even better—and not so crowded. One of my favorites is Swanton Road, which parallels Highway One in a horseshoe for about 8 miles. On the way back to Santa Cruz, we stopped at Davenport Landing, another small horseshoe-shaped road on the ocean side of Highway One. There is a place that raises abalone, which I’ve never tasted and hope to get to one day. I have always loved the little town of Davenport, which reminds me of early days of coastal California. Davenport has a great glass studio, Lundberg Studios, where I have gotten several special pieces. They even have a great seconds studio. There is also a wonderful inn and restaurant, called the Davenport Road House, that has live music Tuesdays and Fridays. All the locals seem to like the Whale City bakery, that has a great menu and delicious home-baked treats. Not to mention beer & tacos for $2 each on Thursday nights. With live music..  Highway One leaving Davenport On the ride back to Santa Cruz, I always go along West Cliff Drive. As many times as I have walked along West Cliff Drive, I never tire of the beauty, serenity and ruggedness of the views where the Pacific Ocean meets the land mass of North America. So many many times, I have sat on one of the benches along West Cliff contemplating my life, sometimes with tears, but always soothed by its never-ending beauty. I am so privileged to call this place home.  Natural Bridges at West Cliff Drive in Santa Cruz
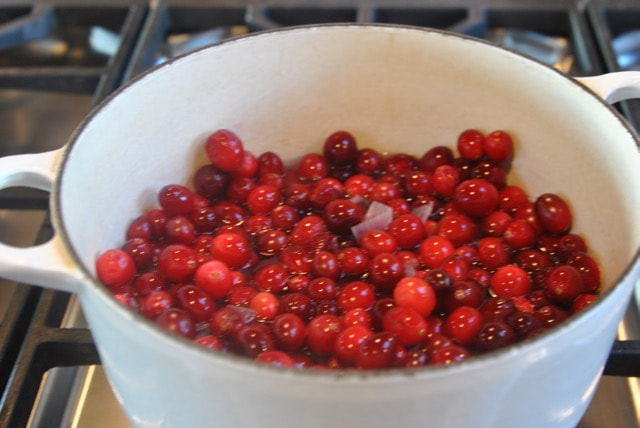
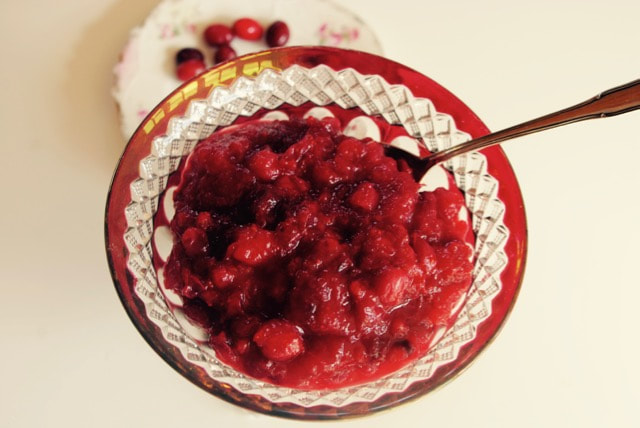
 As the sun sets on our Pacific coast many of you have already started the New Year hoping for peace and new beginnings. No matter where you are I wish you all a happy and peaceful2016filled with love, happiness and renewed hope.I would like to thank all of you for the kind and encouraging comments and for visiting my humble little blog. It means a lot to me to be able to share this part of my life with you.Prost!and cheers to a new year wherever you might be. I hope to be able to share some new adventures and recipes with you and wish you all the very best. This cranberry ketchup and my simple cranberry sauce are a tasty addition to any meal—and not just for the holidays. Freeze some extra bags of cranberries to make throughout the year. 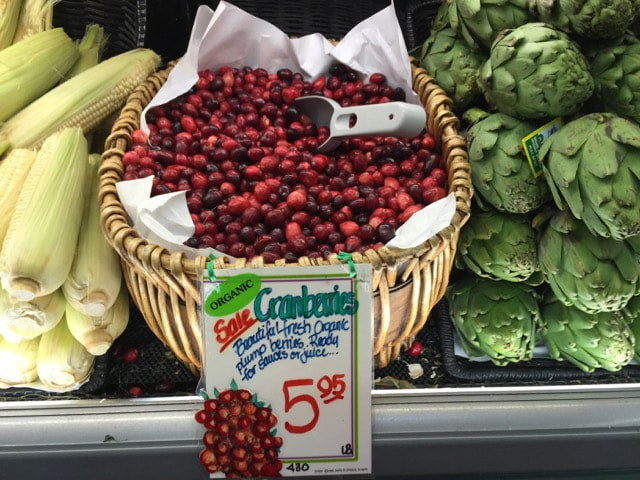 Life is full of surprises with ups and downs like a roller coaster. One moment you are on top of the world (knowing that it won't last), full of anticipation and fear of the unknown as you contemplate the ride down. Personally, I don't like roller coasters, I prefer a gentle ride on a carousel. Last November and December were such roller coaster months for me. I had a wonderful visit with my mom in Germany. Afterwards, my husband and I went to Berlin, Prague, and Nürnberg. I came home and got ready for Christmas in the Sierras, baked cookies, tarts, made cranberry ketchup and cranberry sauce. Two days before Christmas, we loaded all our goodies into the car and left for the mountains. As we began our journey, I got messages from my niece saying that my mom had fallen and broken her hip badly. She was in an ambulance on the way to the hospital. On the first summit, I decided to turn around and go back home to make arrangements to leave for Germany. I was on the plane 24 hours later, and landed in Germany on Christmas Day. By then, my mom had peacefully passed away with my brother's family around her. I am so thankful for their love and care. 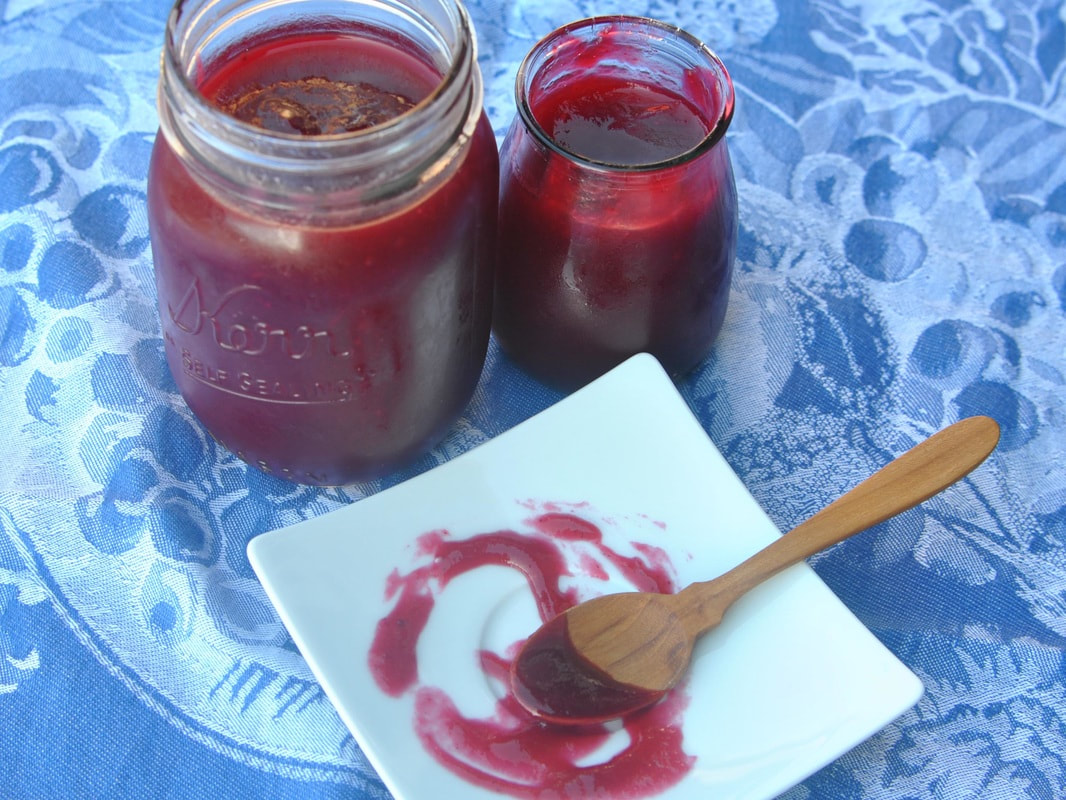 Cranberry Ketchup Last year, while looking through my folders, I came upon a recipe for cranberry ketchup. Since I love cranberries, I decided to make some. It was still in my fridge when I returned from Germany after my mom’s funeral. It was comforting to put on my sandwiches and added flavor and richness to many meals. I promised myself to make it again. This year, I will be in Germany for Thanksgiving to celebrate my brother's birthday. So, I decided to have a pre-Thanksgiving dinner in the Sierras in our cabin with my sister-in-law and her husband. The late fall here is gorgeous. There are very few people there now and we were expecting a dusting of snow for the weekend. I made the cranberry ketchup and cranberry sauce several days before we drove up. The ketchup is fantastic and a spoonful will enhance most any meal. It lasts for a long time in the fridge and needs to sit for a couple of days to develops its full flavor. 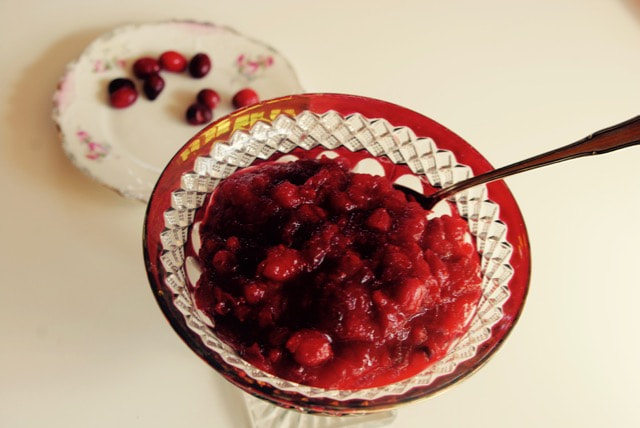 Cranberry Sauce Every time I cook a turkey, I make cranberry sauce. Turkey without cranberry sauce is not an option on my table. For many years, I have made the same recipe—not because it is the best or special—but because it is the one my family and I like the best. It is simple and easy to make. I always make it ahead of time and keep it in the fridge. There have been fleeting moments when I thought about adding ginger or a minced jalapeño, but I haven't. Maybe someday I will. The amount of sugar depends how tart you want it to be: I used ¼ cup this time, but I think I will use ½ cup the next time. The tartness of cranberries has to be balanced with something sweet like orange juice and sugar. All my tasters liked the tartness of the thick sauce. Cranberry Ketchup
Cranberry Sauce
These savory little mini-quiches are just right for my new life as a student. There are easy to carry with you and make a great healthy snack. They taste good, even when they are cold. You can customize them to your own liking and add only those veggies you or your loved ones enjoy.  I would love to make them with young children and have them choose as what vegetables they would like to put in them—a great way to introduce kids to new veggies. I think the potatoes are a necessity, but you could try sweet potatoes. I put in mushrooms because I like them and I had some leftover cooked kale. I think spinach would be just as good, if not better. I added some zucchini and that tasted good too. I would like to experiment with little pieces of ham or bacon to make it like a Quiche Lorraine without the crust. As you see, the possibilities are endless. 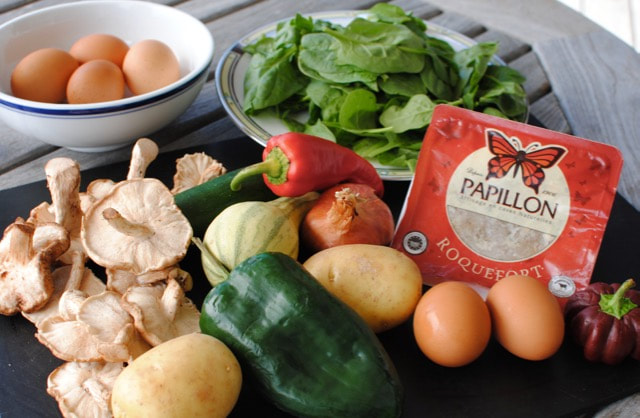 Yes, I enrolled in our local junior college to take a class in digital photography. The junior college gives people the opportunity to go to college and prepare for a job or a four-year university education. It gives people like me a chance to be a life-long learner. I can wholeheartedly support such worthy institutions. When I came to this country many moons ago, a different junior college gave me a chance to get an education, for which I'm forever grateful. 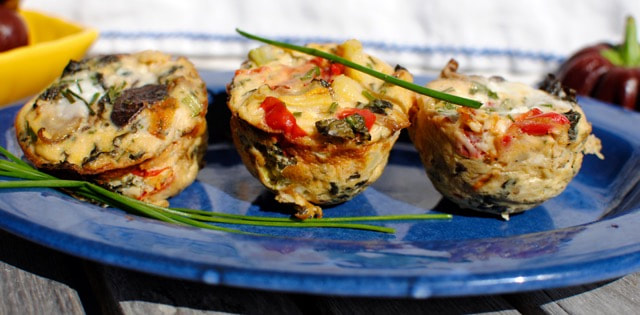 These savory muffins are the perfect snack any time of the day. I like the sharp flavor of Roquefort cheese, but that's an acquired taste. Parmesan or any other cheese will be fine too, although the blue cheese adds some flavor to the muffin. I used leftover cooked kale I had made the day before. The second time I used baby spinach.
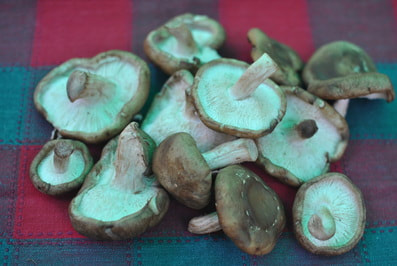
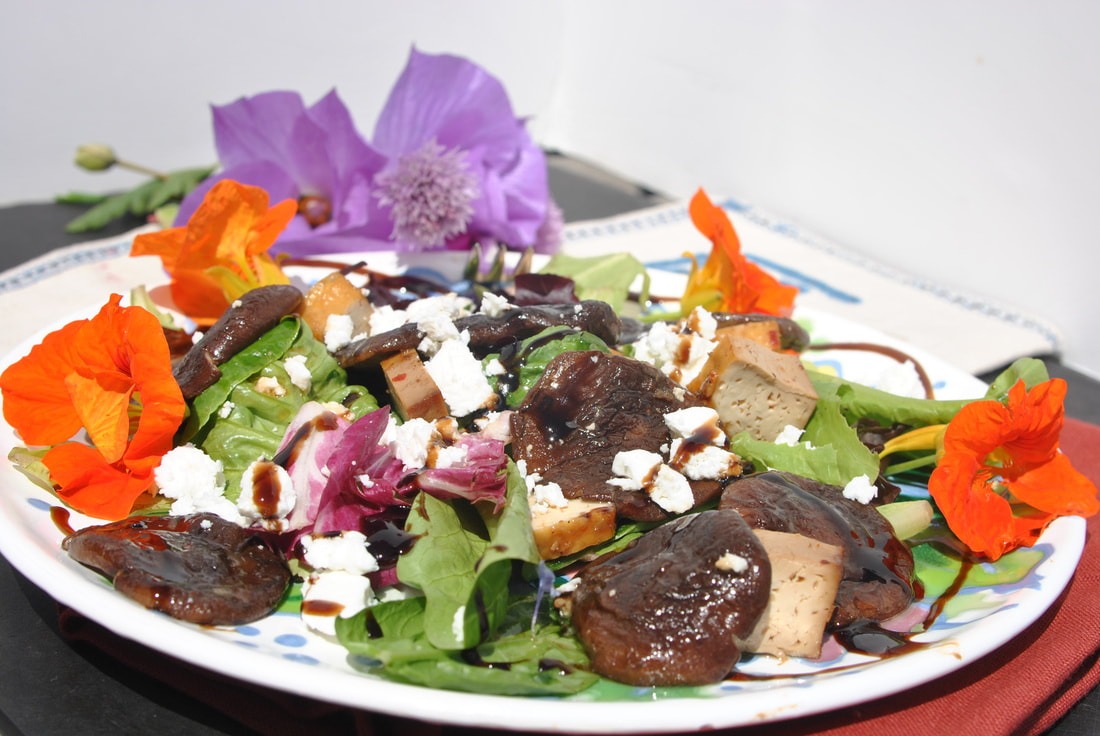
Food is nourishment, it sustains our body and gives us energy. Many of us have made decisions about which foods are best for us. I always love any kind of mushrooms—chanterelles are my favorite, but I think shiitake mushrooms are healthier for me. 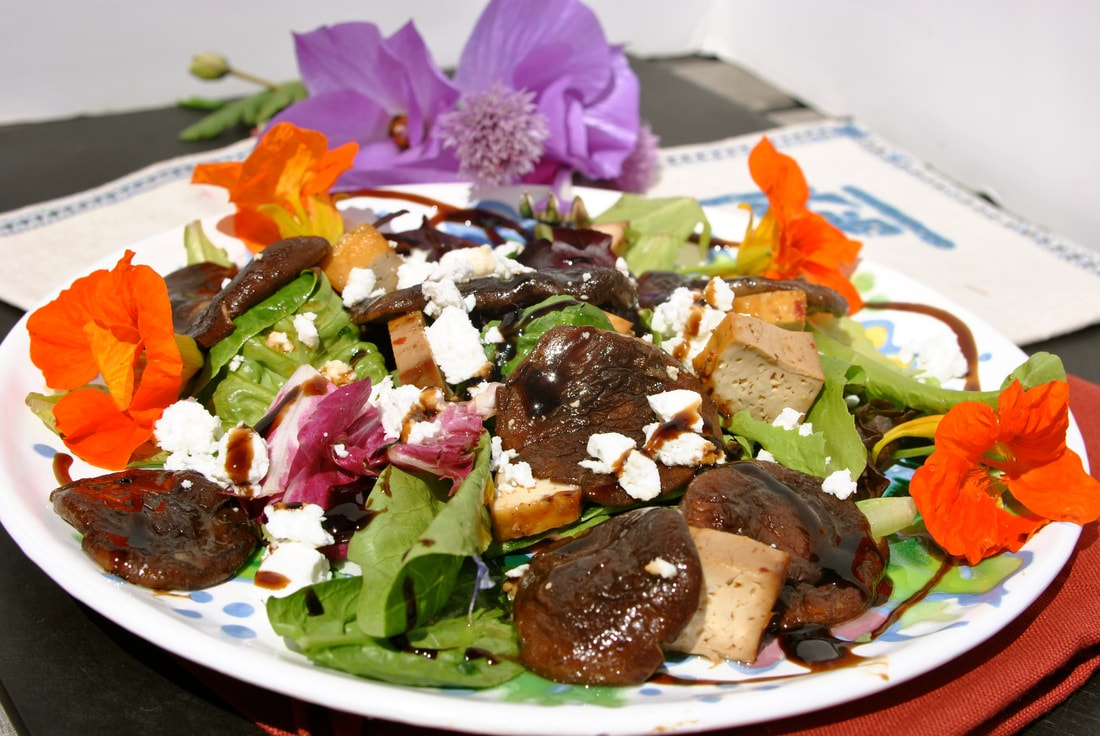 Broiled shiitake salad with baked tofu, mixed greens , and feta cheese. Years ago, I saved this recipe for broiling shiitake mushrooms which was printed in our local newspaper. I have made them many times because I love the meaty, chewy flavor of the broiled mushrooms. They are great to use on salads, especially with arugula. Put the grilled mushrooms on a bed of arugula or mixed greens and use the warm juice as a dressing and you have a delicious salad! When I don't use the mushrooms right away, I keep them in the refrigerator as a healthy snack. Once you make these, trust me, they will be a staple of your diet, if you like mushrooms. 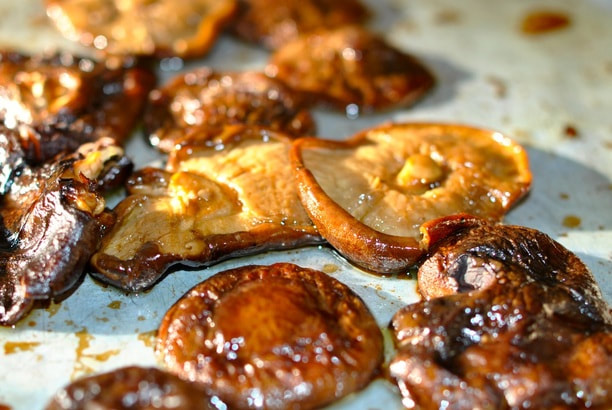 The original recipe calls for roasted sesame seeds as a garnish.
A refreshing crowd-pleaser 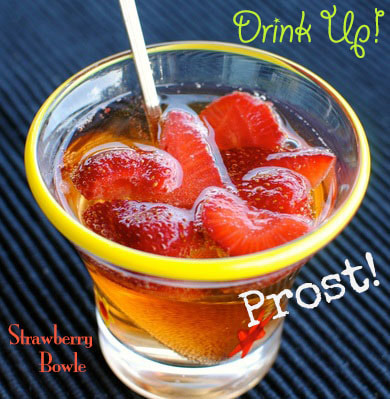 Our little California coastal town had a hot spell for several days. Usually when the central valley heats up, we get fog and the sun often doesn't come out until noon. So, I enjoyed the heat and the sun and decided to make a refreshing German beverage called Erdbeer Bowle for my book club meeting. I had made this once before during one of my summer parties and it was an absolute hit. Everybody loved it. When I was recently in Germany, we celebrated May Day in our village with May wine (Mai Bowle). Read more about my trip on Wanderlust. May wine is an old, traditional beverage brewed with Sweet Woodruff (Waldmeister). Another one of my favorites when in Germany is Berliner Weiße, beer mixed with Waldmeister syrup. It's absolutely delightful when sitting in an outdoor cafe on a hot day. Having never come across Sweet Woodruff here in the US, I made strawberry punch (Erdbeer Bowle) instead. It is also very refreshing and sets a festive mood for an enjoyable gathering. There were six in our book club and we drank it all! I had started with only one bottle of wine, but added another later. To keep it cold, I freeze a large block of ice. Be creative when choosing a container. I used a large flower vase. Enjoy! This punch is refreshing, easy to drink , and everybody loves it You can easily increase the yield by adding an additional bottle of wine for 16 servings, or double the amounts (use two bottles each of wine and sparkling wine) for 24 servings. Adding Grand Marnier or orange flavored liqueur is a matter of taste. For an alcohol-free version substitute white grape juice or apple juice for the wine, and sparkling water for the sparkling wine. Adding lemon verbena or mint will also add some different flavors. Try making this punch with peaches or raspberries. 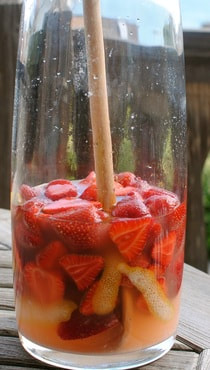
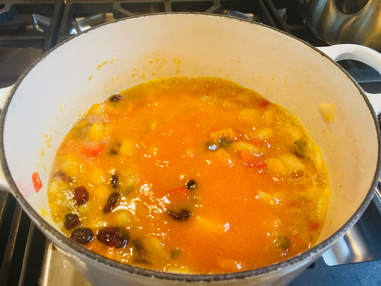
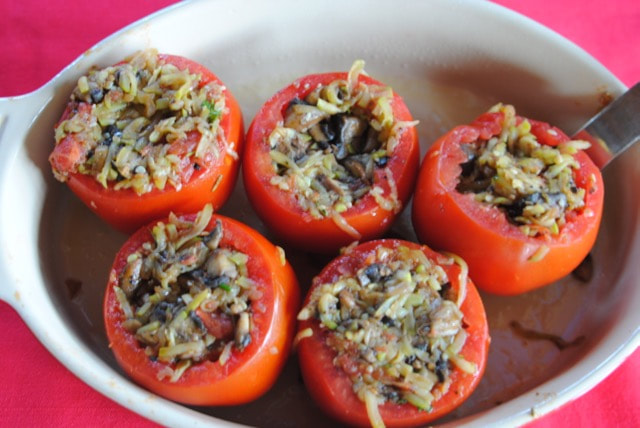
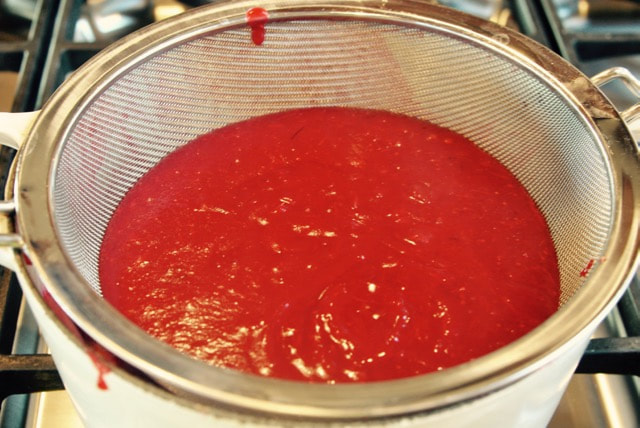
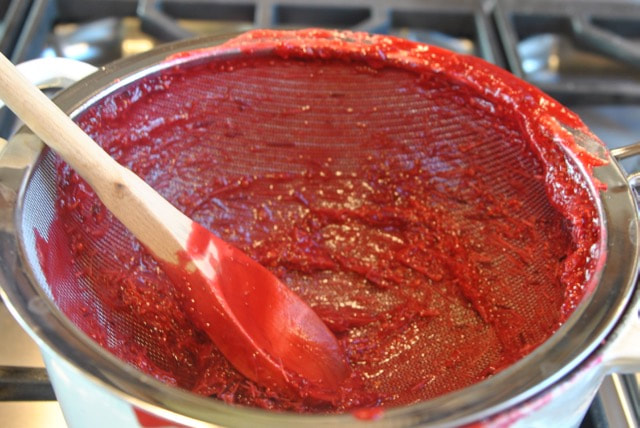
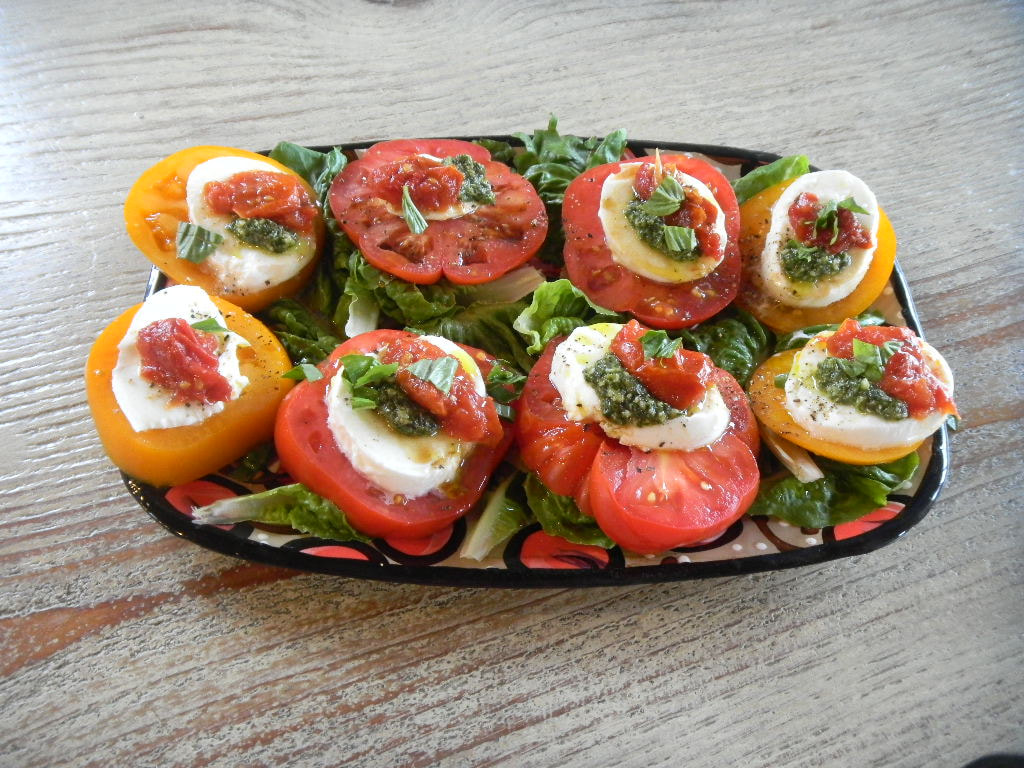
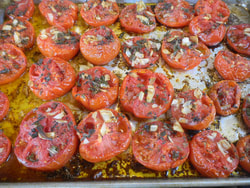
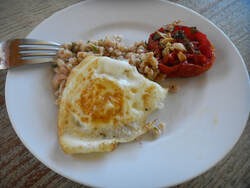
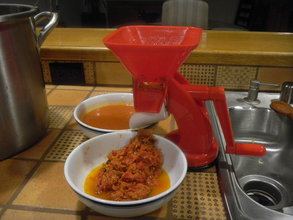
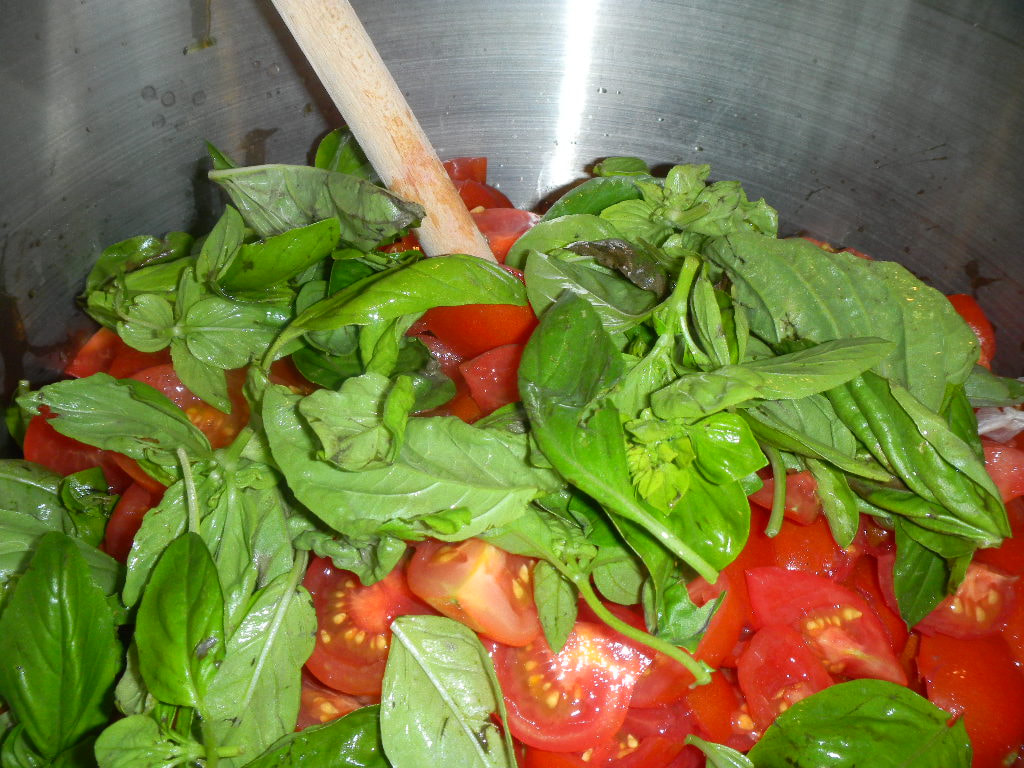
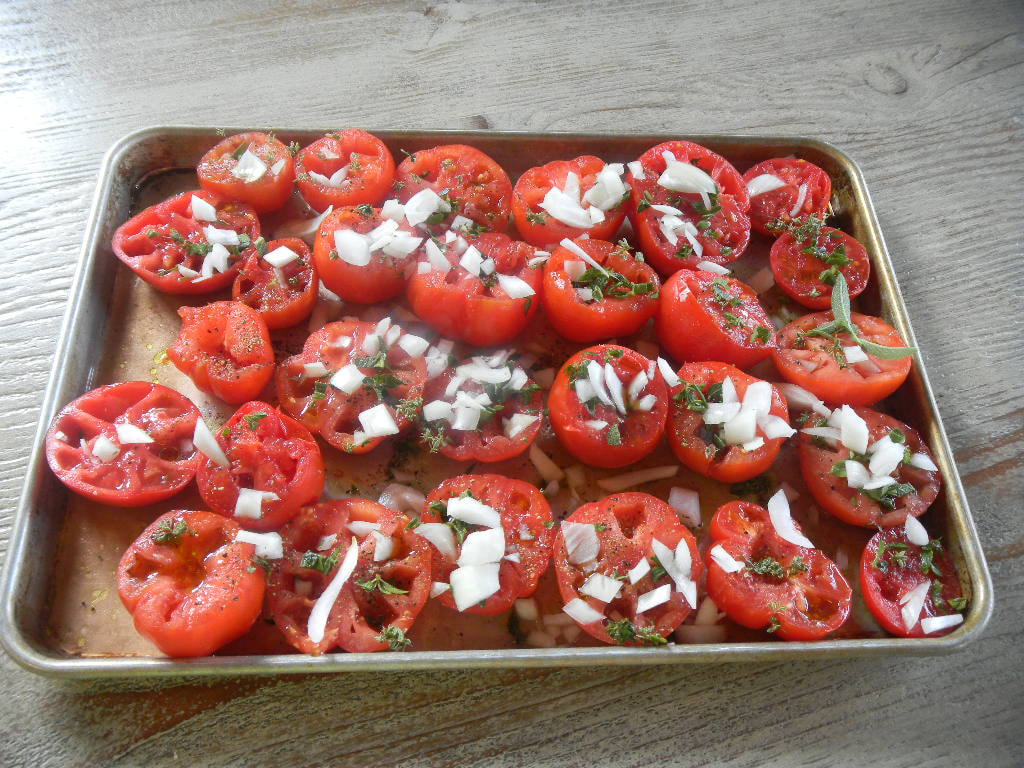
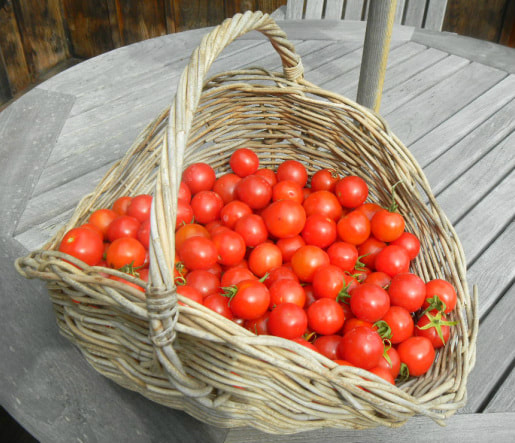 Last week, Robert and I decided to tackle some tomatoes from his garden. He came over with a variety of ripe, just-picked heirloom and smaller tomatoes We decided to make two different kinds of tomato sauce. One of the recipes had been in my canning folder for years. It came from a 2006 Gourmet magazine article named "Grandma’s Tomato Sauce" and was edited by Edith Guerino. I changed the recipe a bit by adding more sugar and a large carrot to offset the acidity. It turned into a wonderful creamy sauce. For the second sauce recipe, I used Alton Brown’s recipe but changed several ingredients and how the sauce was roasted and completed. The roasted sauce has a tart flavor but a rich tomato taste and is great to put over fish. Robert brought his tomato device that separates the seeds and the skin from the fruit, a clever machine that saved us time and aggravation. I made a large faro salad with tomatoes and herbs using Giada De Laurentis' recipe. For over a week, I kept the tomatoes on a cookie sheet in my cold downstairs office. One night I made a platter of tomato slices with mozzarella and another night we had lamb chops with Julia Child’s "Tomates A La Provençal." Absolutely delicious! A Wonderful AppetizerHere are some thick sliced tomatoes on a bed of lettuce, topped with fresh mozzarella, pesto, slow -baked tomatoes, and sprinkled with fresh basil, balsamic vinegar, olive oil, and salt and pepper. I have been slow roasting tomatoes for several years. I use them like a marmalade on different appetizers. They taste great just by themselves and keep in the refrigerator for about a week .
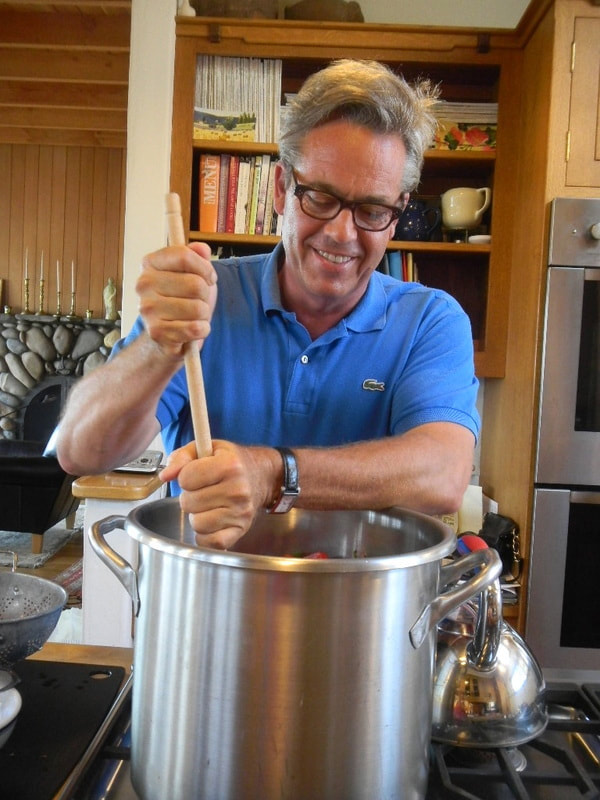 Robert is making sauce from his homegrown tomatoes. Grandma's Tomato Sauce 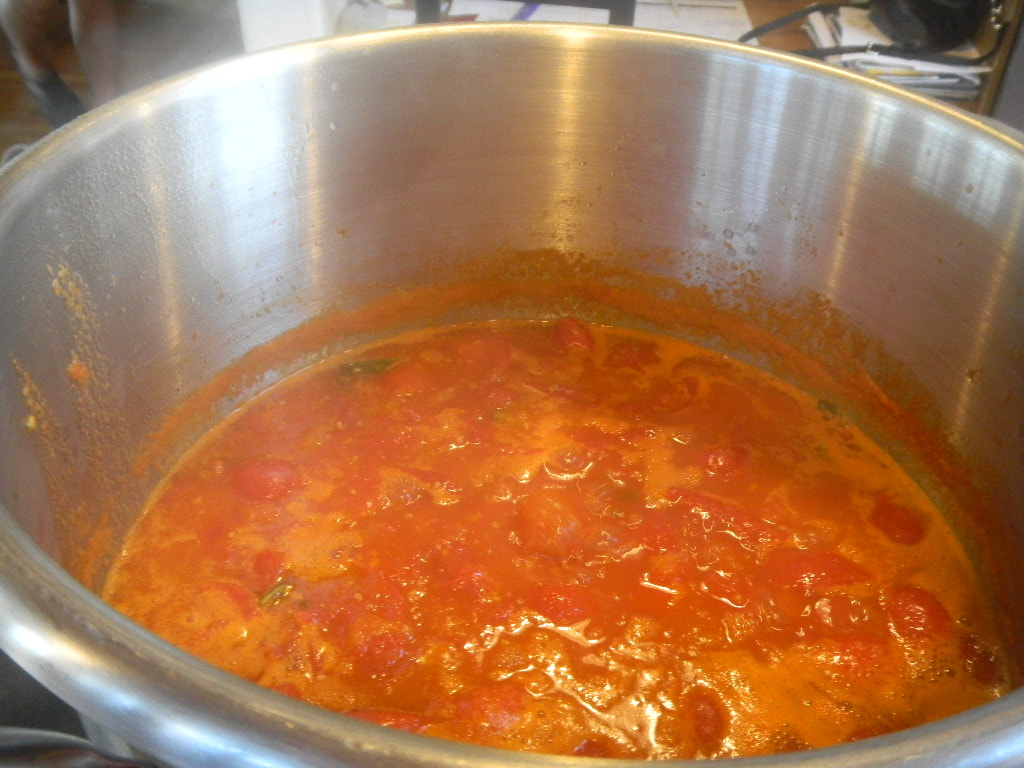 This is a rich delicious sauce, perfect on pasta. I had it with eggplant ravioli, it was superb. I spooned every last drop from my plate. One could make a soup out of it. This sauce brings out the ripe flavorful taste of tomatoes.
Roasted Tomato Sauce 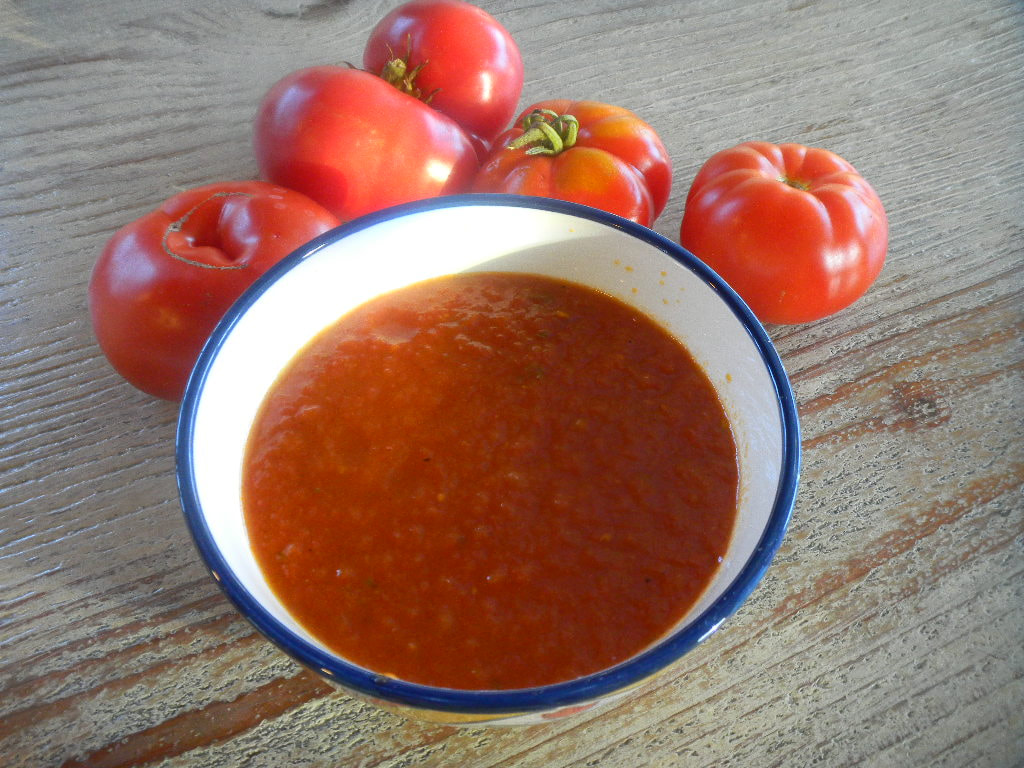 This is a tart, hearty sauce. We doubled the recipe and later in the week I made another batch. I kept some of the roasted tomatoes in a container and used them throughout the week. Yummy and easy to make.
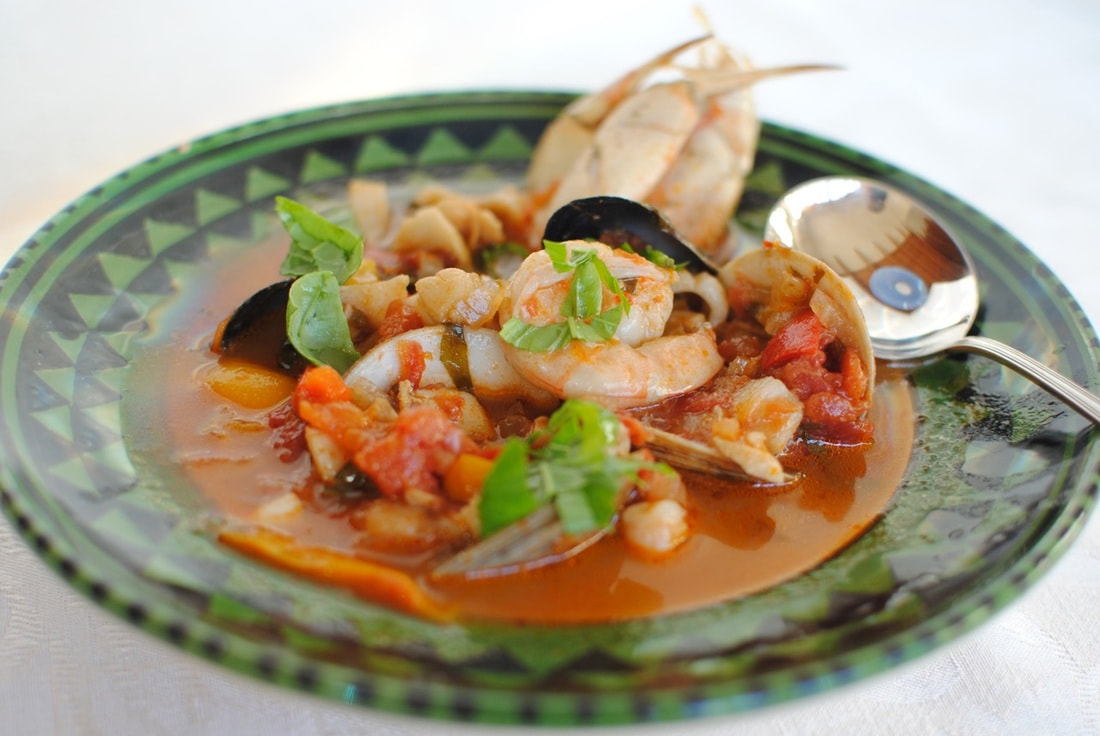
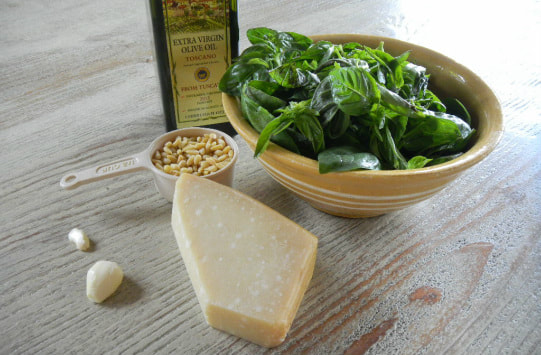 I am not a big pesto fan, but I love using it in my seafood pasta dish—and basil is abundant in the summer. I make a batch and freeze whatever is leftover.
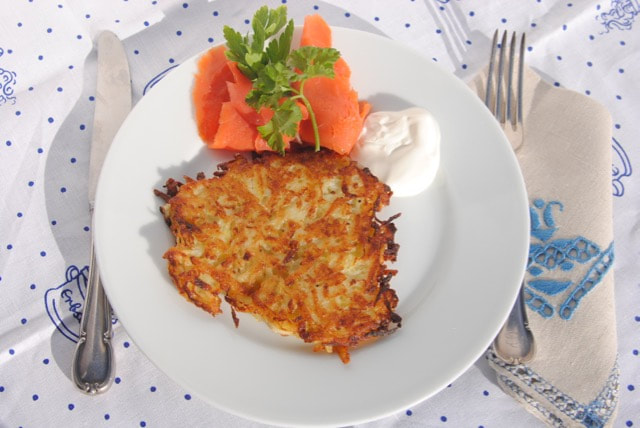
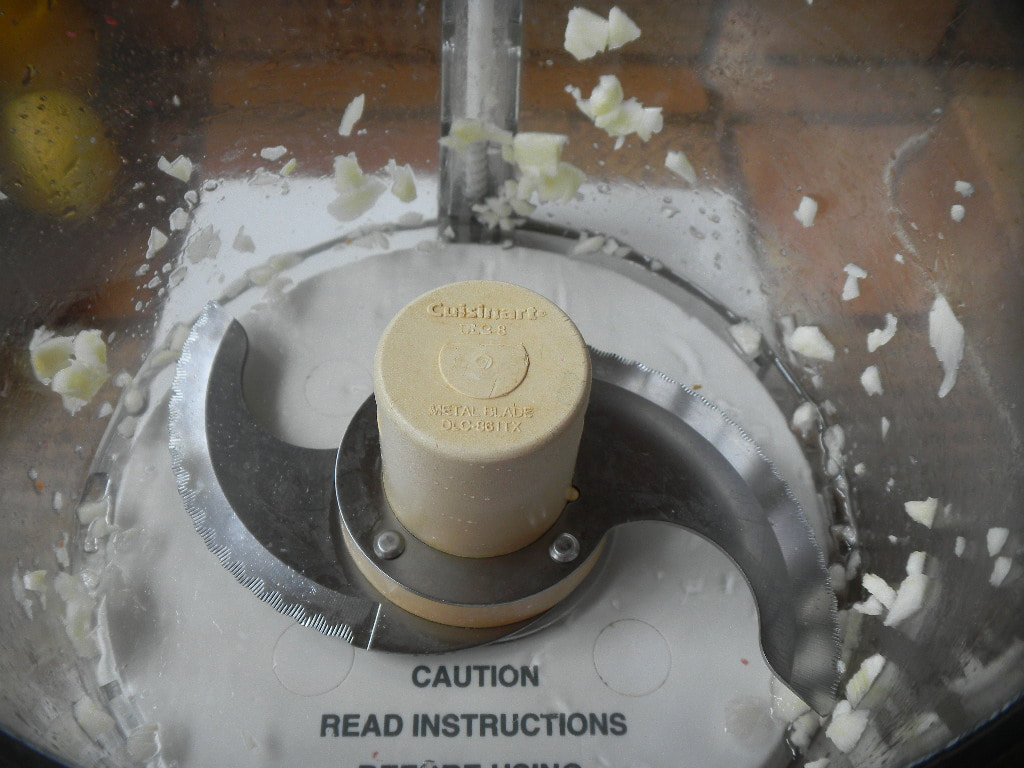
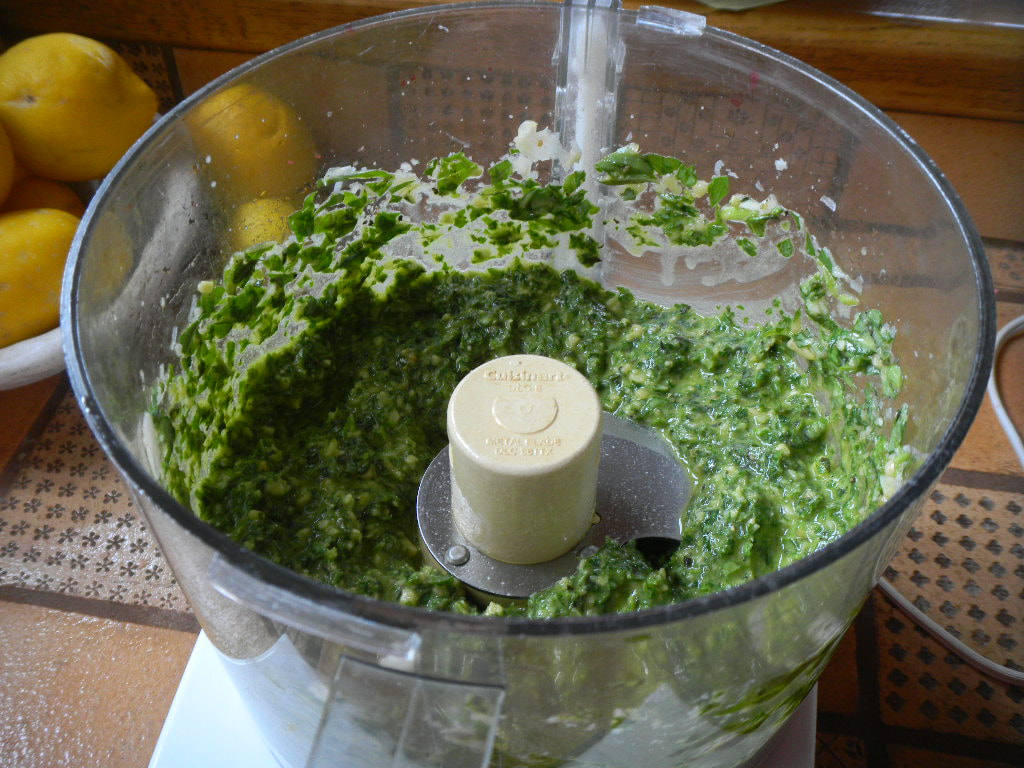
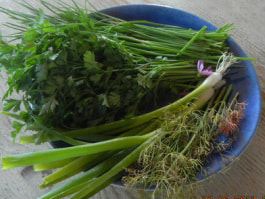
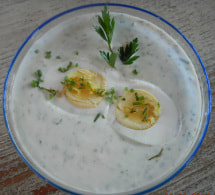
This topping or sauce is one of my favorite dishes In Germany this sauce is called "Grüne Soße". I love this dish and have made it many times with different ingredients and in different variations. I sometimes use quark, a German soft cheese, similar to ricotta, but creamier. When quark is not available Greek yogurt is just as good. The same goes for the herbs, I use parsley, green onions, chives, dill, and sometimes I use sorrel and a little bit of tarragon. The idea is to have about a cup of green herbs. Adding a clove of garlic will make the sauce pungent. In Germany it is traditionally eaten with hard boiled eggs and boiled potatoes. It tastes great with salmon cakes. This sauce has a very nice, fresh, herby taste, and a creamy texture that goes well with my salmon cakes, boiled vegetables and fish. It tastes great over a baked potato. You can make it a richer sauce by adding more sour cream or mayonnaise.
|
WELCOME TO SUNNY COVE CHEFThank you for visiting my blog. My two passions are cooking and traveling. Traveling exposes me to a wide variety of food and experiences. I walk around cities looking for markets, restaurants, bakeries, shops, you name it, and if it is related to food you will find me there, tasting, smelling, talking to vendors, and having a great time. Categories
All
Archives
February 2024
|


 RSS Feed