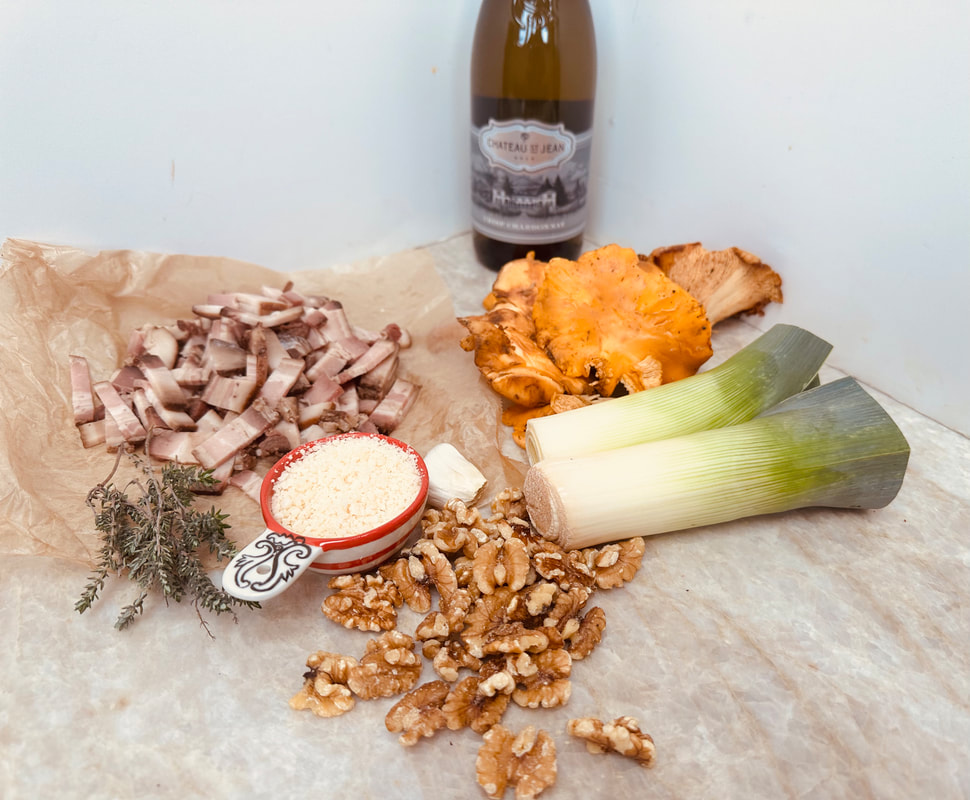
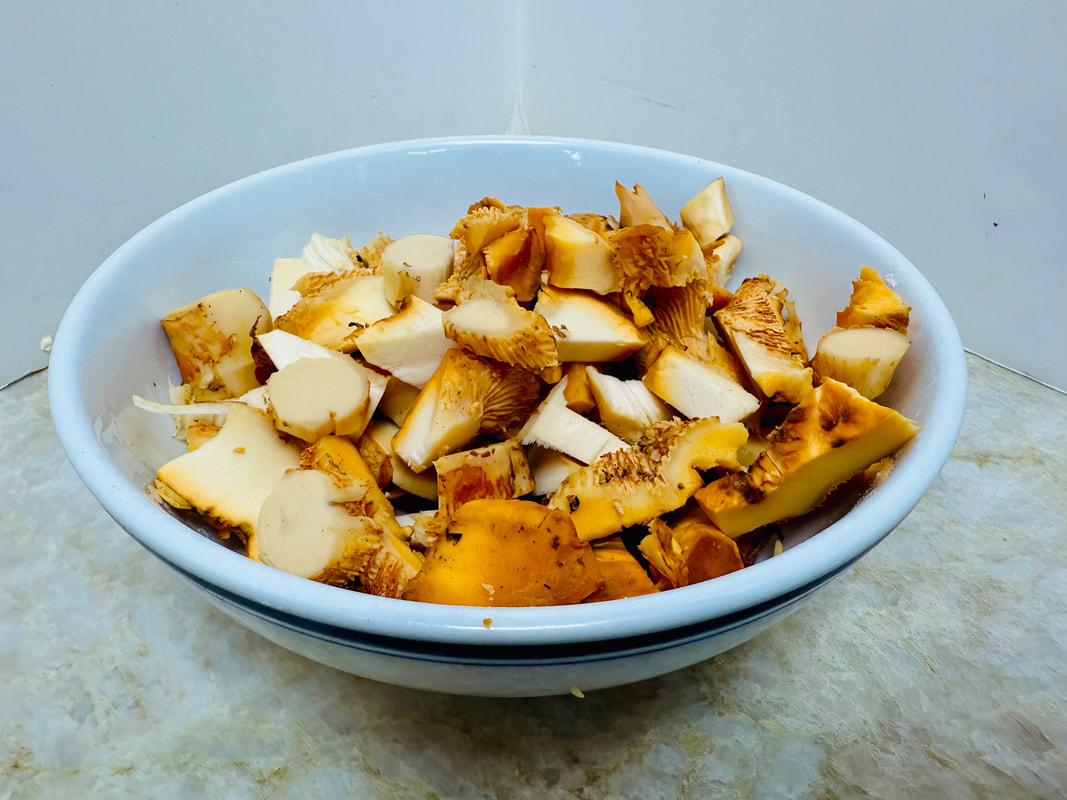
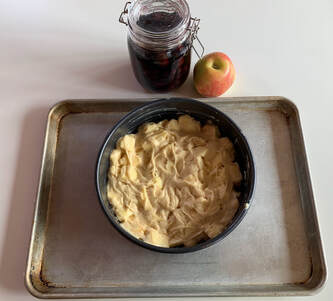
 Last week, my girlfriend Diane surprised me with a bag of chanterelles she found on her mountain in Corralitos. Corralitos is in Santa Cruz County’s southern region. It is an idyllic area known for its orchards and redwood-covered hillsides, a tranquil place to enjoy the countryside. 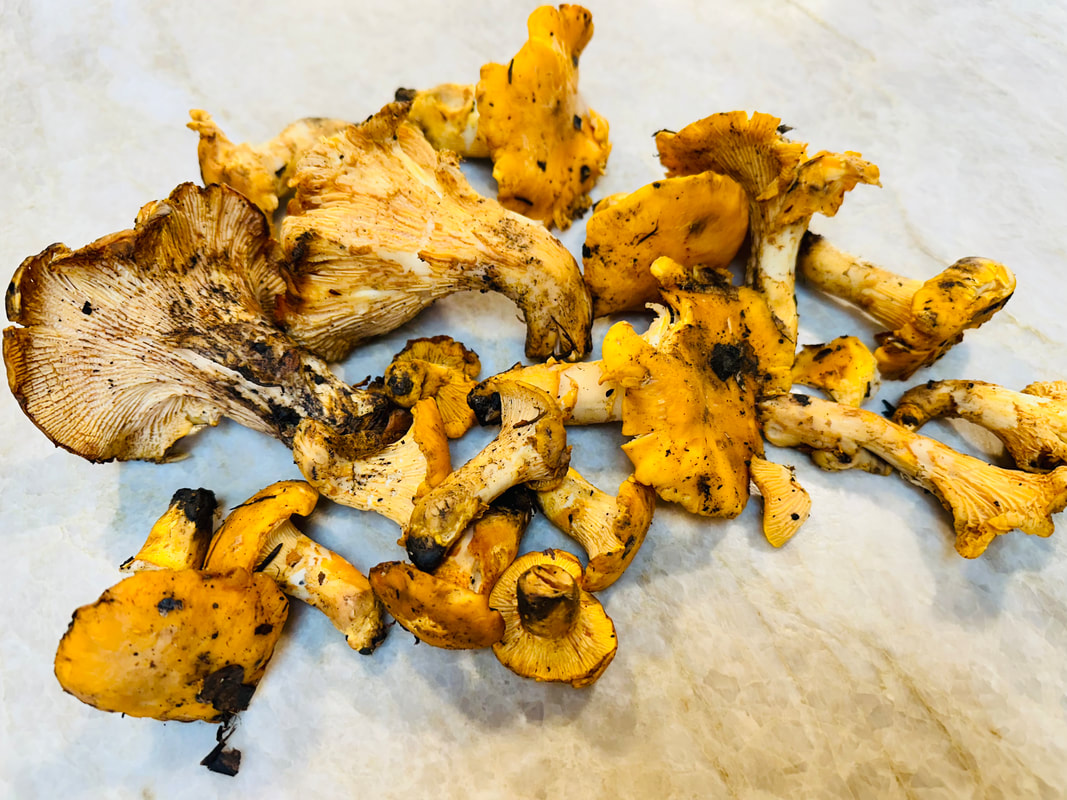 I was in cook’s heaven when I saw these freshly picked chanterelles. I thought about sautéeing them in a little butter with shallots and cream, and have them with a crusty sourdough bread. What a treat! Chanterelles are great in a creamy pasta dish or in an omelet for breakfast. There are so many possibilities to create a dish with these beautiful and delicious mushrooms. I chose a galette from Dorie Greenspan’s cookbook Everyday Dorie. I have used this book for several recipes and have not been disappointed yet. 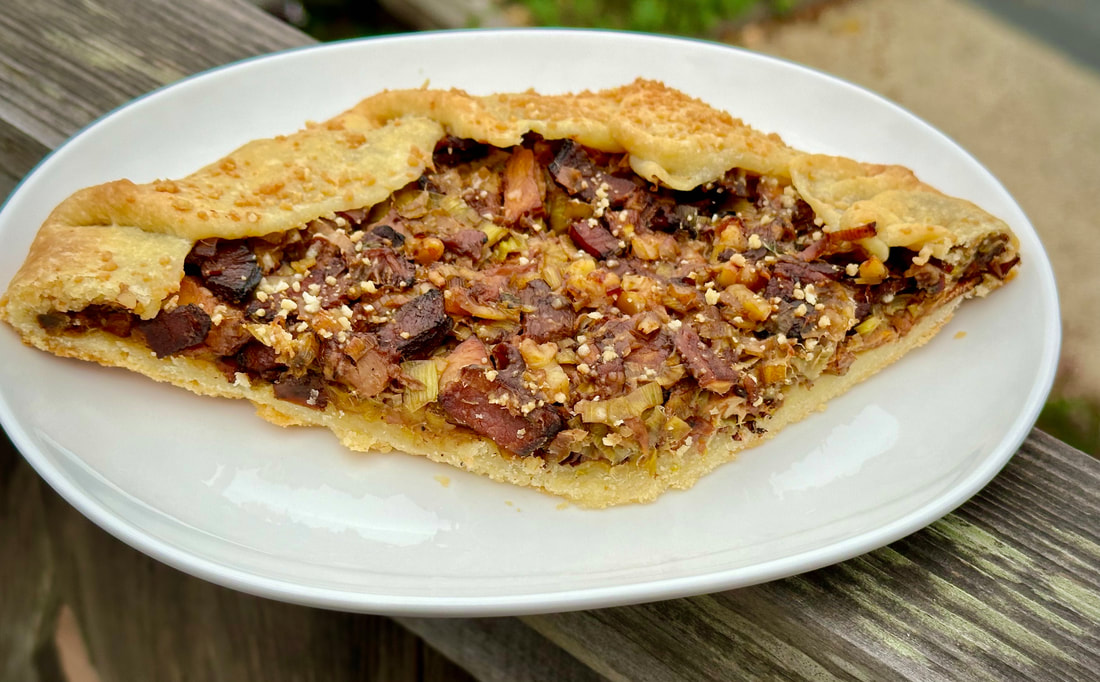 The galette was a culinary treat with the filling full of different flavors complemented by a flaky crust. It is an all-butter crust which I like and comes together quickly in a food processor. Of course, it can also be made by hand. I put the butter in the freezer for about 25 minutes. Instead of chanterelles, you can substitute other mushrooms. When the chanterelles are no longer available, I might try a mixture of shiitake and button mushrooms. The galette is delicious warm or at room temperature. Serve it with a salad and you have delicious lunch, dinner or snack. 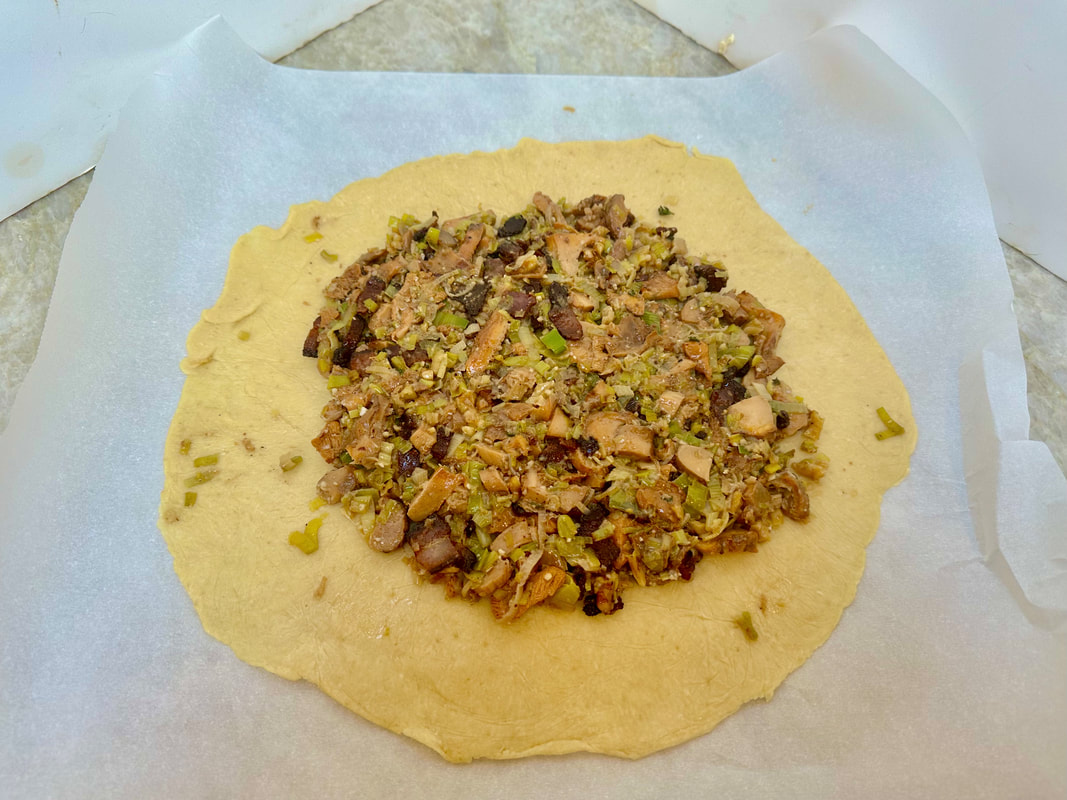 Life on Sunny Cove has been good. We have been busy with visitors and enjoyed reminiscing about old times and contemplating whatever future we have left. It has been raining on and off, so it's time to curl up in front of a fire and slow down.
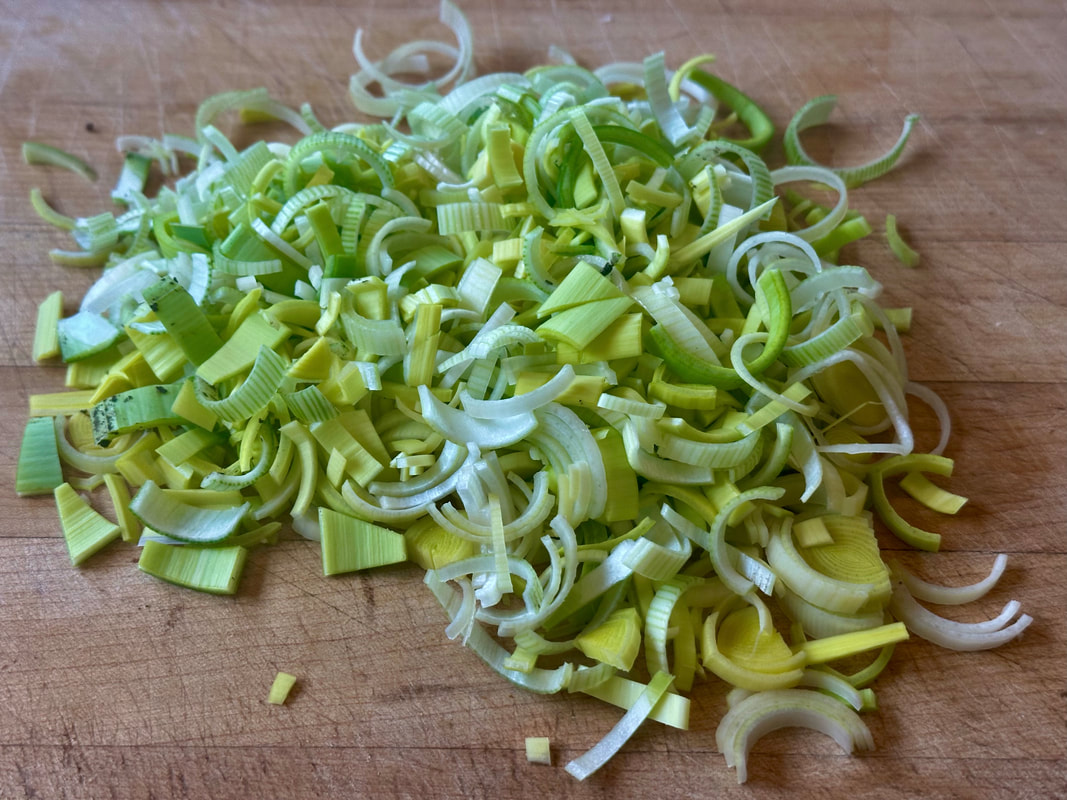
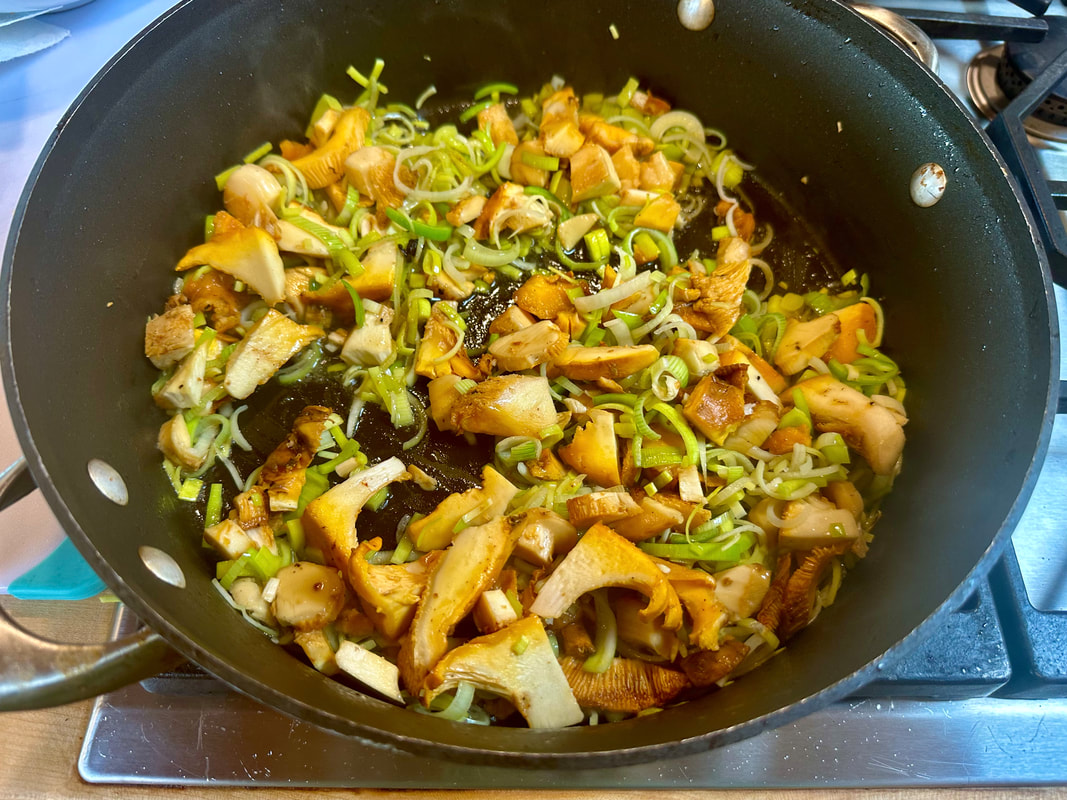
Don't omit any of the ingredients, Dorie Greenspan did a wonderful job creating this dish. The walnuts add an extra crunch to the galette. Ingredients: The crust: 1 ½ cup ( 240 grams ) all-purpose flour ½ tsp. fine sea salt 2 TBS sugar 8 TBS (4 ounces, 113 grams ) cold (almost frozen) butter, cut into 16 pieces ¼ cup (60ml) ice water Directions for the crust: Put flour, salt and sugar in a food processor and pulse a few times to blend the ingredients. Scatter the pieces of butter over the mixture and pulse until you have small-sized pieces with some larger ones. Add more of the water and pulse again, continuing with more water scraping down the sides of the food processor. Pulse until the dough comes together. Turn the dough onto a piece of plastic food wrap, flatten it to a disc and roll the dough into a 12-inch circle between two pieces plastic food wrap. Refrigerate for at least two hours. The filling: 1 TBS olive oil ½ pound (227 grams) mushrooms 4 slices bacon 2 leeks, white and light green part only 1 garlic clove finely chopped fine sea salt 3 TBS dry white wine 2 TBS heavy cream 3 TBS walnuts ¼ cup (24 grams) finely grated parmesan 1 tsp. fresh thyme leaves Freshly ground pepper Directions: Preheat the oven to 400 degrees Fahrenheit. Center the oven rack in the middle. Roast the walnuts for about 10 minutes. Cut the leeks in half and thinly slice them. Wash them and let them drip dry in a sieve. My chanterelles were very dirty, so I rinsed them quickly under cold running water and patted them dry with a paper towel. Cut off the bottom of the stem and slice the rest of the chanterelles into bite-sized pieces. Cut the bacon into ¾-inch slices and sauté over medium heat until crisp. Transfer the bacon to a platter covered with a paper towel. Pour off all but 1 TBS of bacon fat from the pan. Pour the olive oil into the frying pan with the bacon fat. Heat on medium, toss in the leeks and fry for a few minutes. Add the mushrooms and garlic and cook for about five minutes, or until the vegetables are softened. The mushrooms will release water but it will evaporate as you continue to cook. Season with salt and add the wine, stirring and scraping the pan until the wine has evaporated, about two minutes. Pour in the cream and cook until it is mostly absorbed. Remove the pan from the heat and add the bacon, walnuts, 2 TBS parmesan, thyme and pepper. Taste for seasoning. You can make the filling ahead and keep it in the fridge for a couple of days. Take the dough out of the fridge and let it sit for a few minutes. Peel off the plastic wrap and put the dough on a piece of wax paper on a cookie sheet. Scrape the filling into the middle of the dough, and spread into a 9-inch circle. Fold the bare border over the filling. As you fold the dough it will pleat on itself. Bake the galette for about 30 minutes until golden brown. Sprinkle the remaining parmesan over the galette and enjoy this special treat. Guten Appetit! Recipe from Dorie Greenspan’s cookbook Everyday Dorie Posted by the ©Sunnycovechef 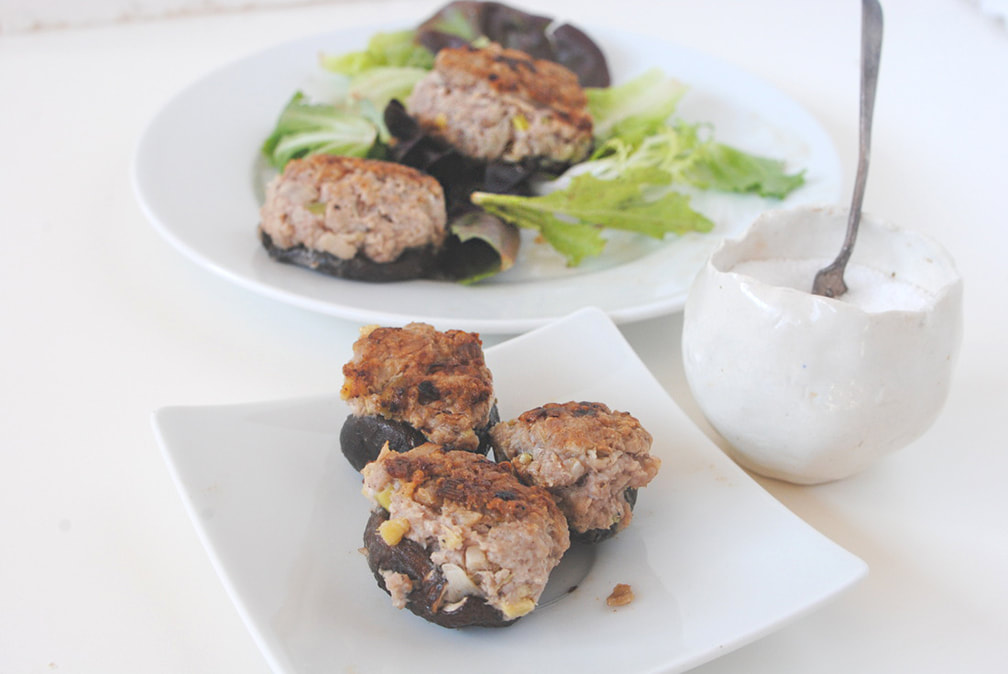 Think stuffed mushrooms with an Asian twist. The shiitake mushrooms are stuffed with ground pork, water, chestnuts and ginger. Your football fans might like these little morsels. Click here for the recipe. 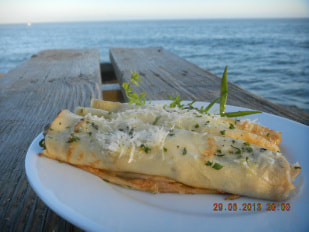 This is one of the first recipes I posted on my blog. It could be a special treat for Valentine's Day if you have a vegetarian sweetie. The crepes are filled with shiitake mushrooms and goat cheese. Click here for the recipe. 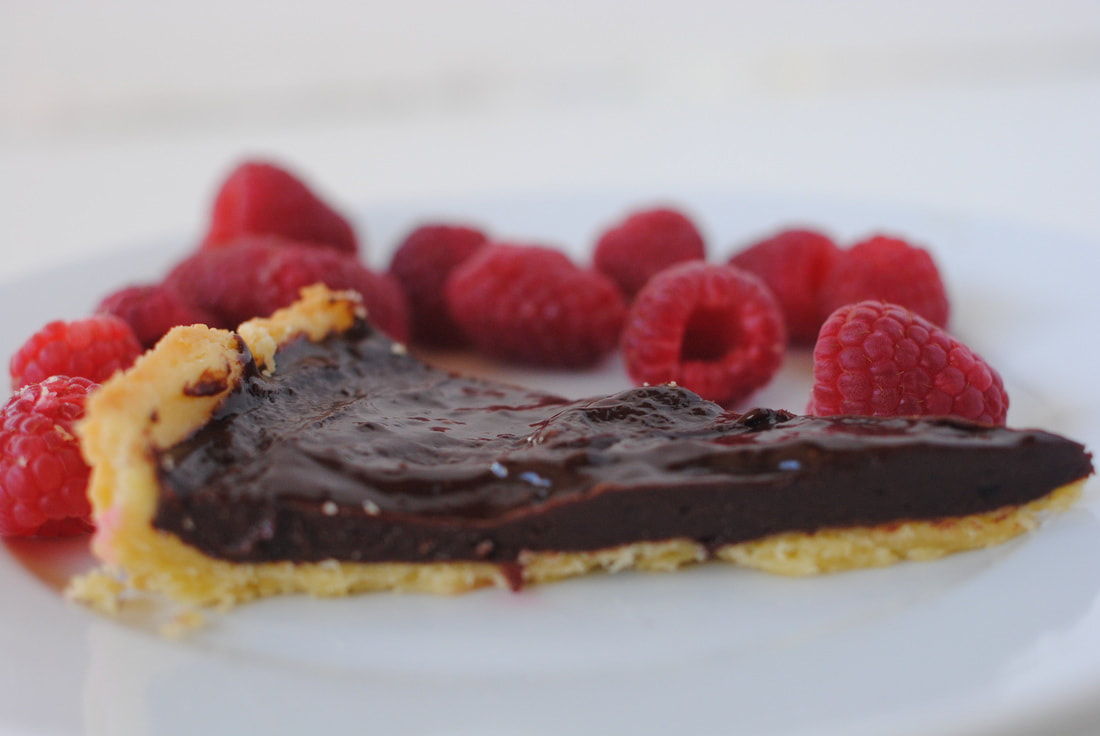 I have always loved this chocolate tart. It doesn't have a lot of sugar and the chocolate and crust complement each other nicely. Click here for the recipe
16 Comments
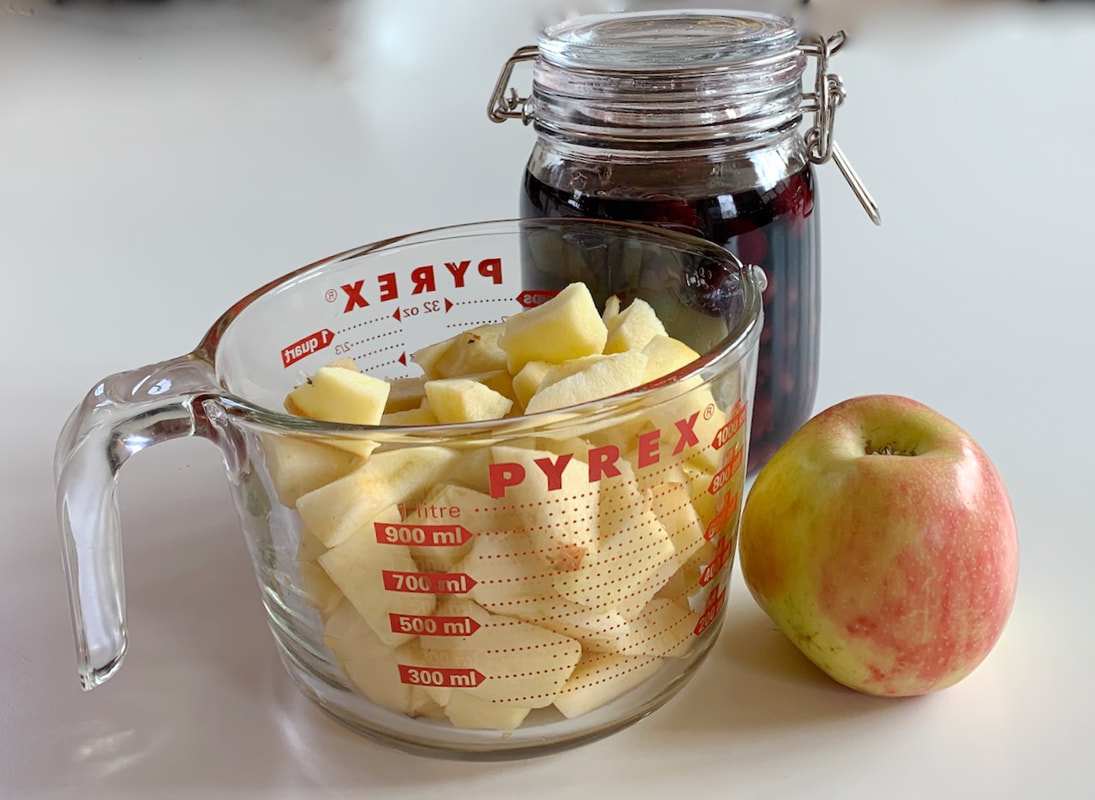
I know I’m overdue to write a new post for my blog. I have many excuses why it has taken me so long: the California wildfires, an unexpected medical diagnosis, as well as my friends, house, and garden all needing attention. What it really boils down to is major procrastination. It’s not that I haven’t anything to post, as I have cooked many meals in my partially remodeled kitchen. I love my new countertops, my new sink, and my pull-out drawers.  I made some delicious beef short ribs with cauliflower gratin for a friend who just moved back into her house after evacuating from the Bonny Doon wildfire. The fire had burned her fence and woodpile, but left her house intact. She had hitched her horse trailer in the middle of the night to save her horse and donkey. I had several other friends who had to evacuate, but luckily nobody lost their homes. 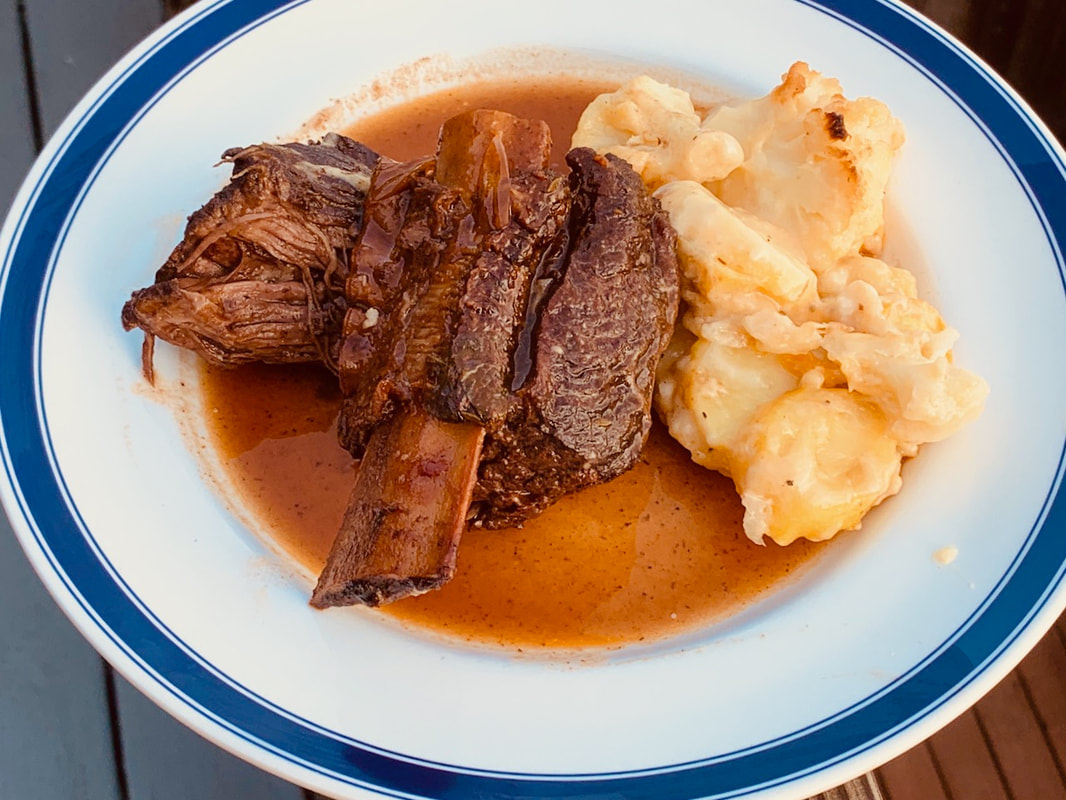 So, let’s get back to my kitchen and cooking. I made different recipes with zucchinis and yellow squash from my garden. My favorites are zucchini cakes and zucchini carpaccio. The recipe for the cakes are here and the carpaccio is easy to make. Slice a small yellow squash with a mandoline, put them on a plate, sprinkle some raspberry vinegar and good olive oil over the squash. Put it on a bed of lettuce if you like. Season with coarse salt, pepper, and some fresh thyme and you have a great salad. Now you can add whatever you want. 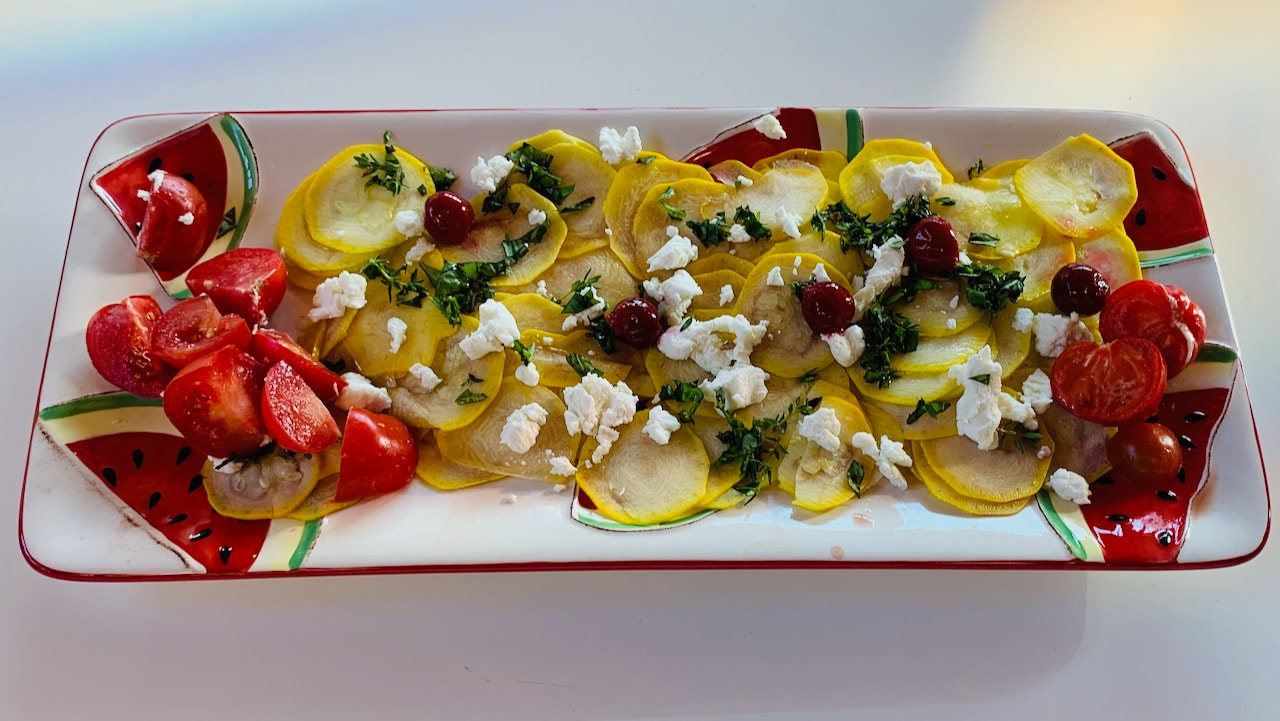 For my book club dinner, I went all out. I served my over-the-top crepes filled with salmon and fennel. It was delicious and everybody enjoyed the alfresco dining on my outdoor deck. It was a gorgeous evening and we didn’t talk a lot about books. We just enjoyed each other’s company, one of those rare treats in these times of COVID. There were only five of us, which made it easier to keep the 6-foot distance.  For dessert, I decided to make a French apple cake by Dorie Greenspan from her book Around My French Table. David Lebovitz adopted and posted the recipe on his blog, which I really enjoy reading. He now lives in Paris but used to be the baker for Chez Panisse in Berkley. It's a delicious and easy-to-make recipe. I have made it several times and everybody sees to enjoy it. Please do not omit the rum in this recipe, as it what really makes the cake. Because I didn’t have any rum, I used some of the liquid from my Rumtopf (fruit preserved in rum). In my humble opinion, this cake needs to be served with some whipped cream. Click here for the recipe 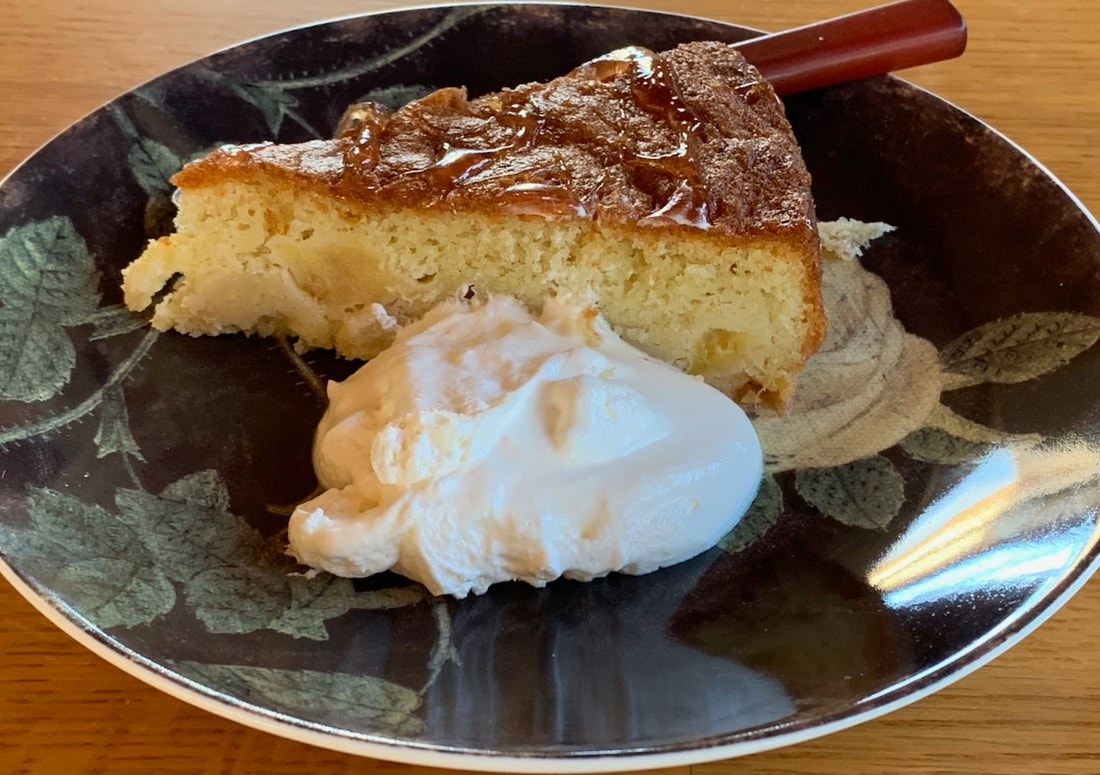 Of course, there is always my German Apple cake which I have baked for decades. Click here for the recipe. 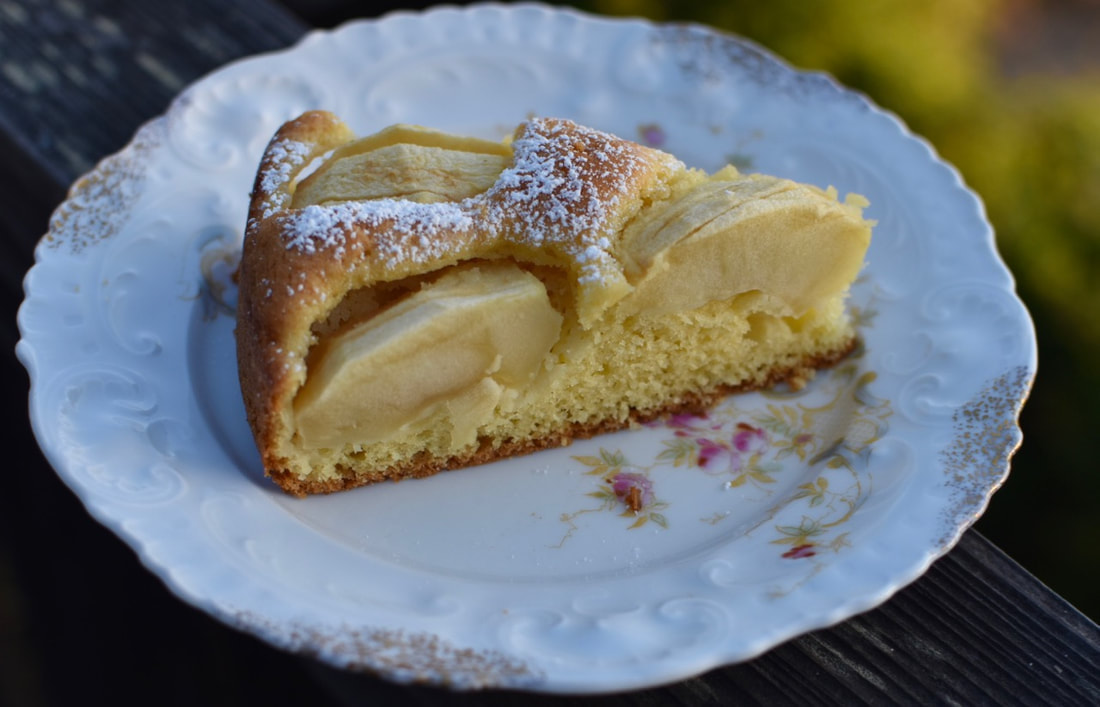 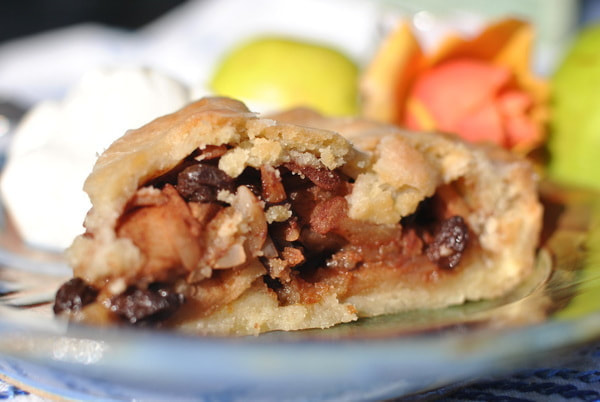 Do not omit the rum, as it adds richness and flavor to the cake. But if you do not want to bake with alcohol, double the amount of vanilla. Epicurious is posting the same recipe calling it Marie-Hélène’s Apple Cake. There are many helpful comments on the post like substituting calvados for rum. I am going to stick with the rum but it would be interesting to find out. This is a beginners cake, so anyone can bake it and it is done in no time—perfect for the home cook. It is important to use a variety of apples for flavor and taste. I like playing with recipes, so I added my own twist. I used the apple peels to make a thick syrup that I added to the cake after it was baked, which is totally optional. Recipe for French Apple cake
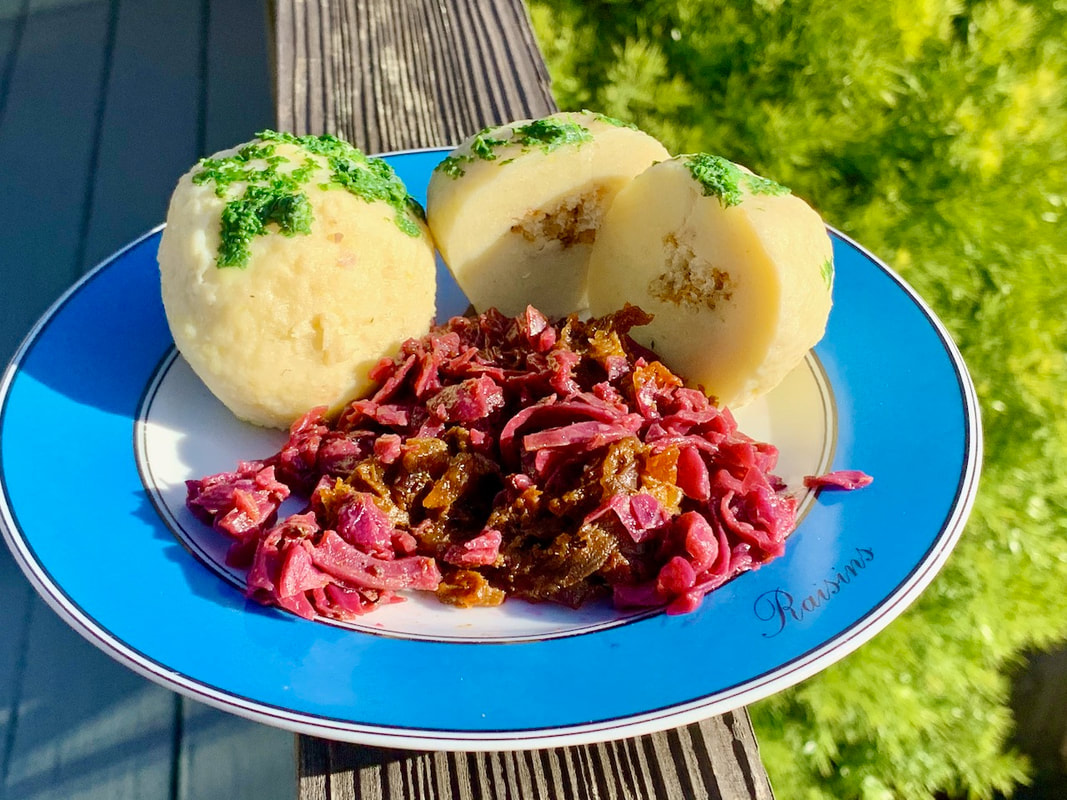
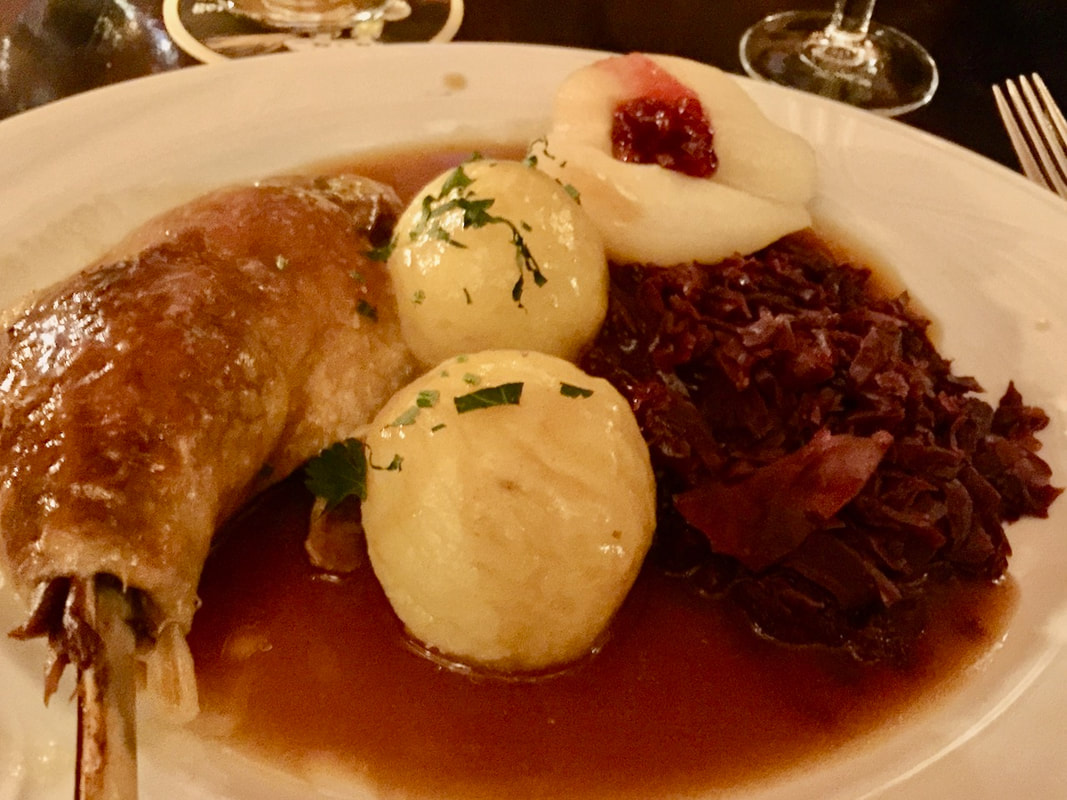
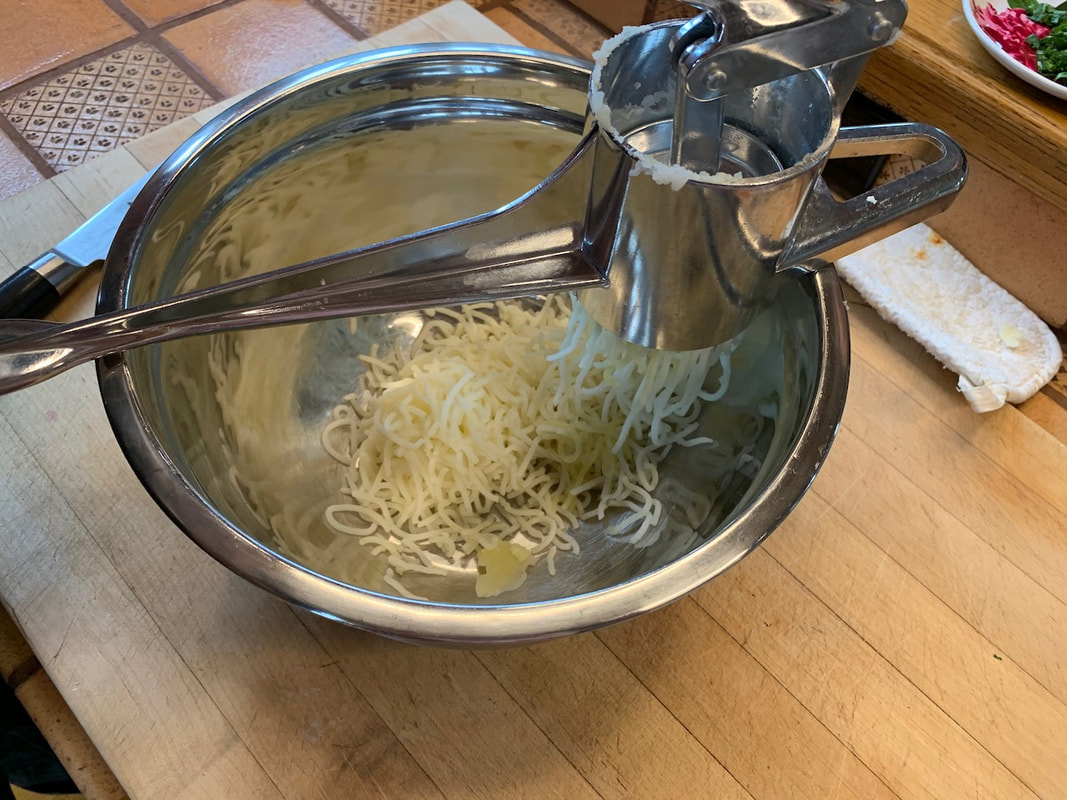
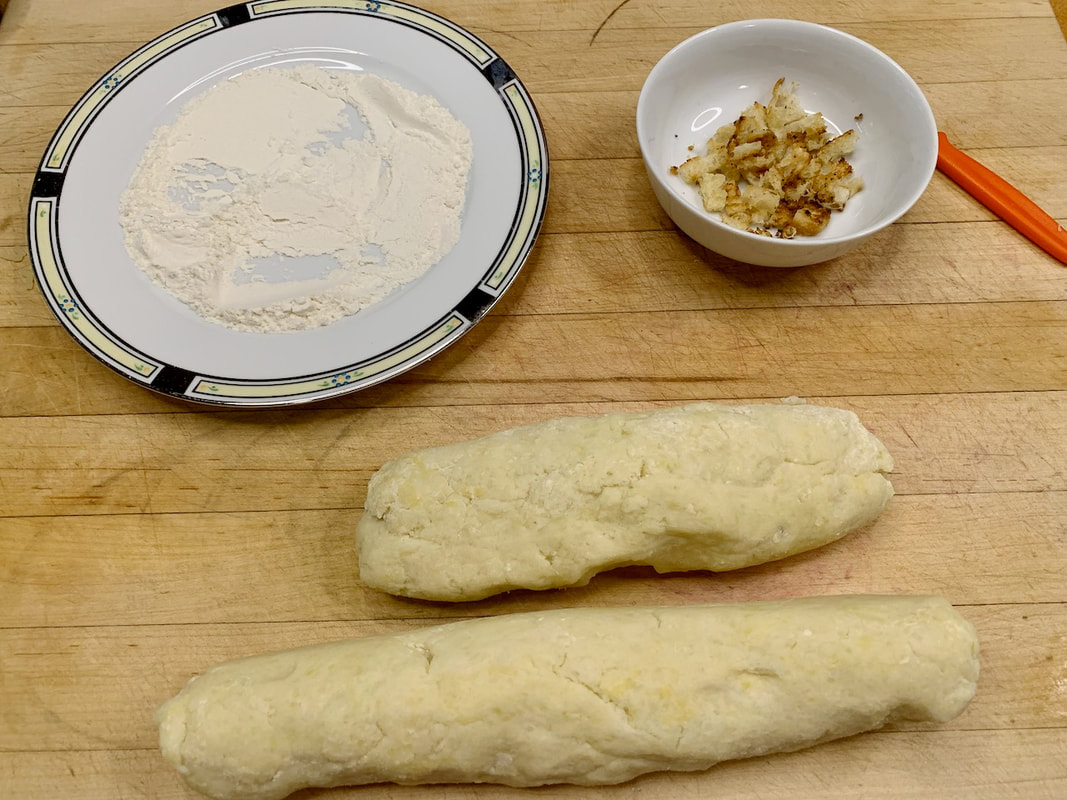
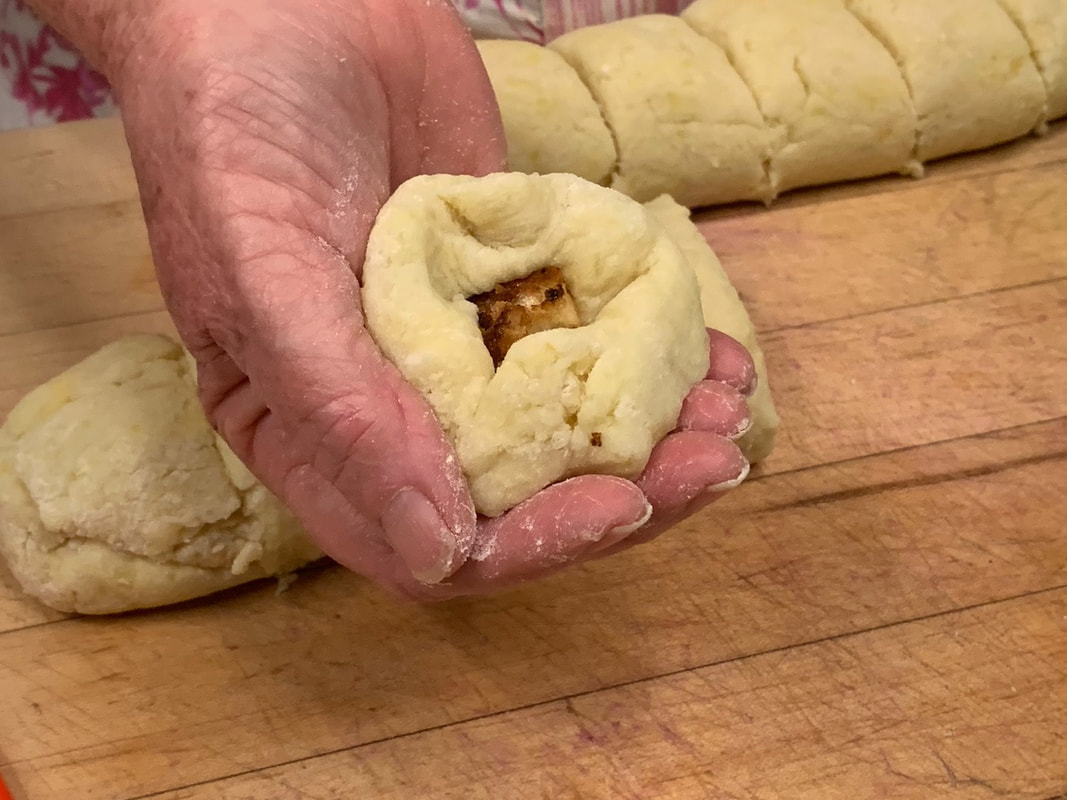
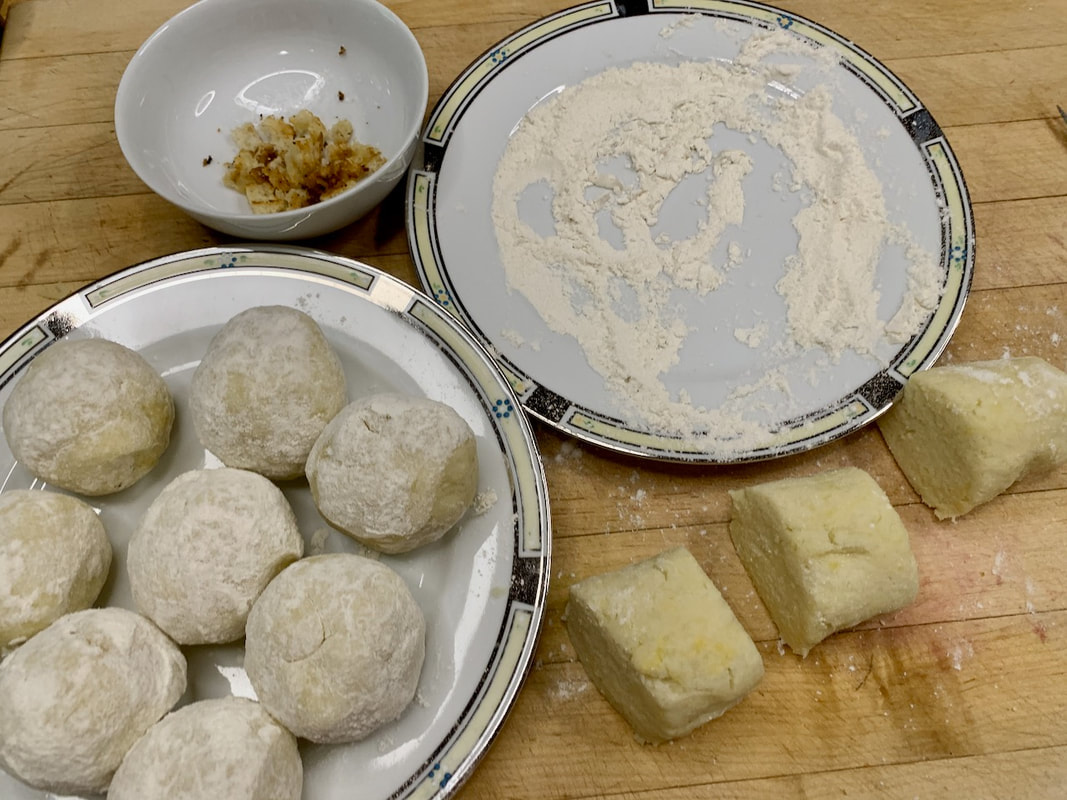
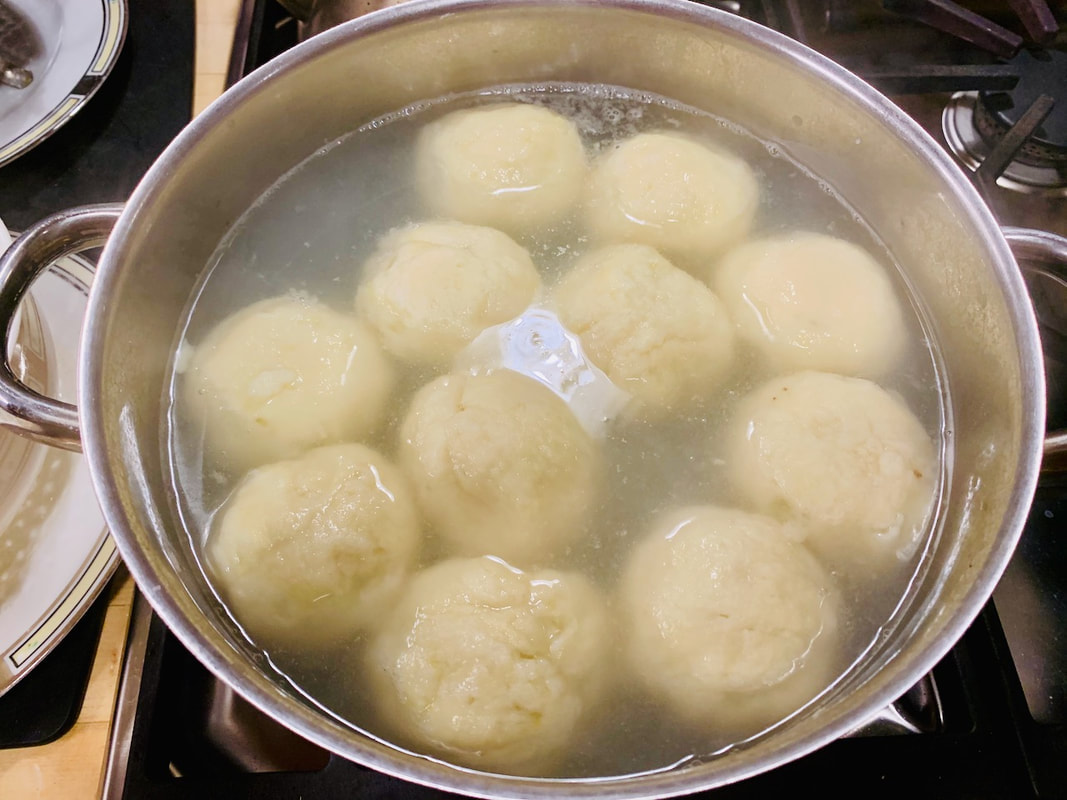
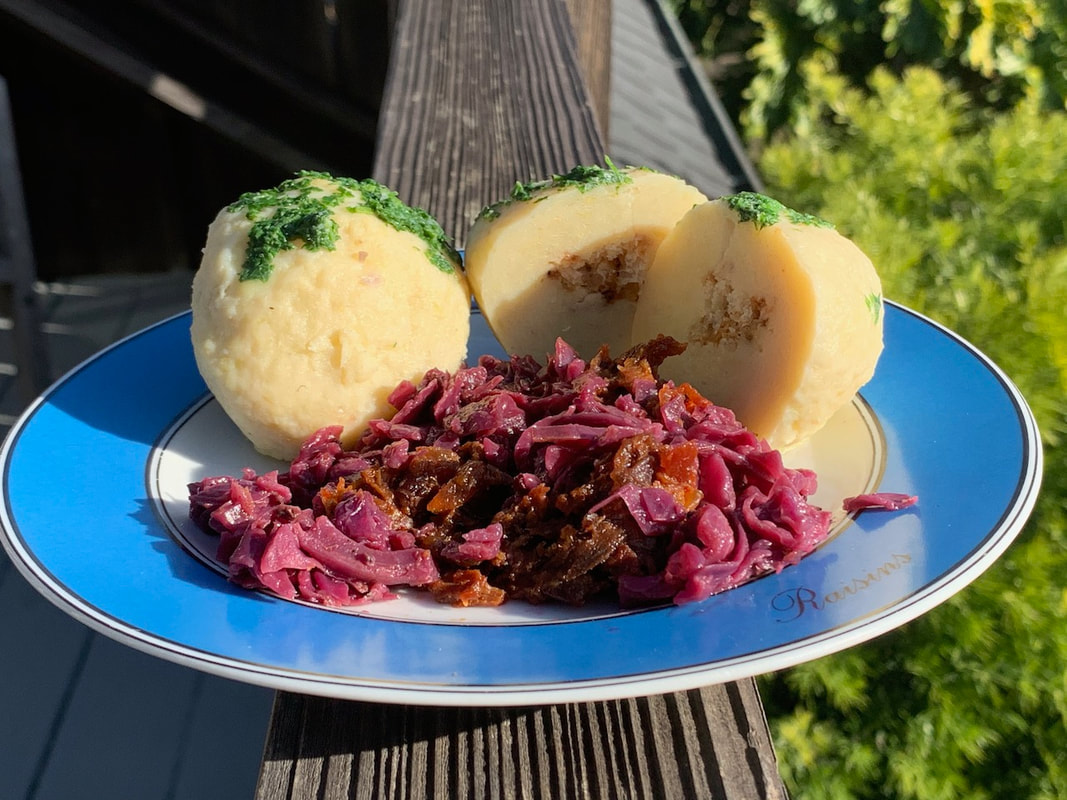 Its been a while since I posted and I do apologize. After breaking my ankle in Budapest, my spunk and motivation left me. During my recovery, I was entertained by your blogs and reading them helped me a great deal. Speaking of recovery, I am walking again and I am thankful for every tiny step I take. The last part of my recovery seems to be the hardest, as I am impatient by nature and eager to move on. But I can’t. I have to take it easy, because if I don’t, I am back in bed with my foot elevated, watching Netflix or YouTube. I also had some emotional issues to deal with, like a post-dramatic depression, upon realizing the danger I had been in and its possible consequences. 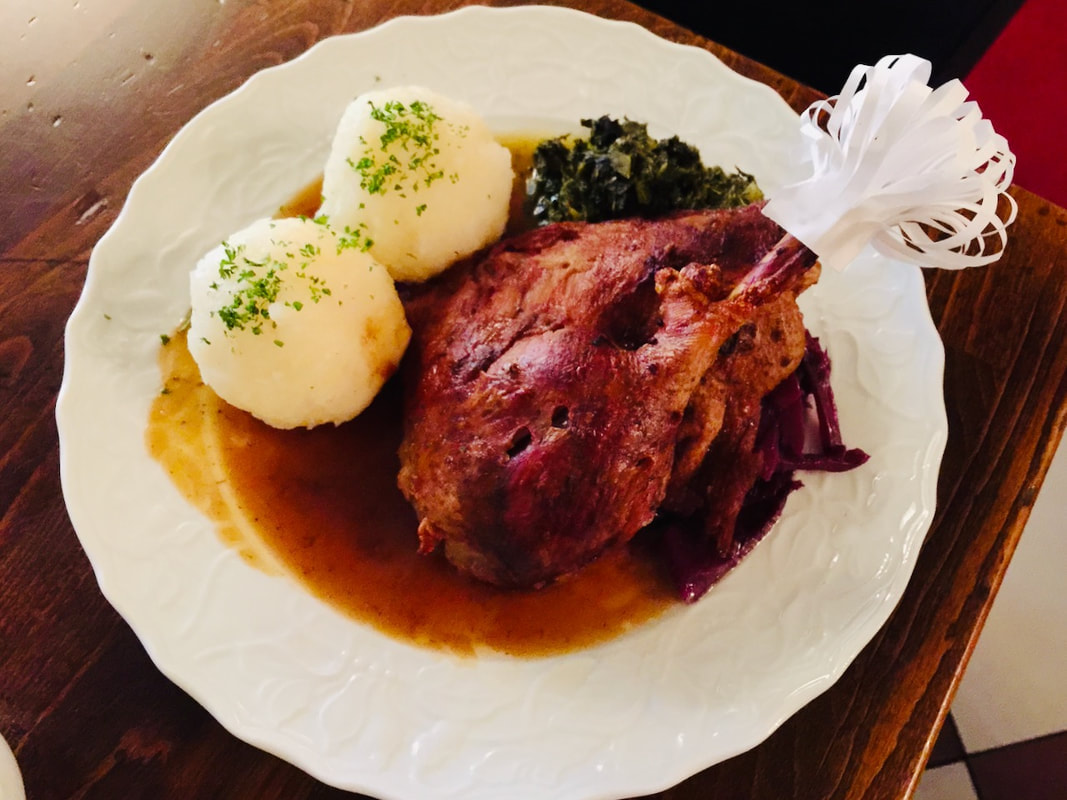 Goose and dumplings, a lunch I had in Potsdam a couple of years ago But it is a new year, a new decade, and with it comes new beginnings. I am ready to move on. I am starting to cook again and I am enjoying it. I had planned to make a goose for the holidays, but instead my dear friend and neighbor, Susanne, invited me for Christmas dinner. She made her famous Rouladen (stuffed rolled beef), a German tradition for the holidays. I was in culinary heaven. 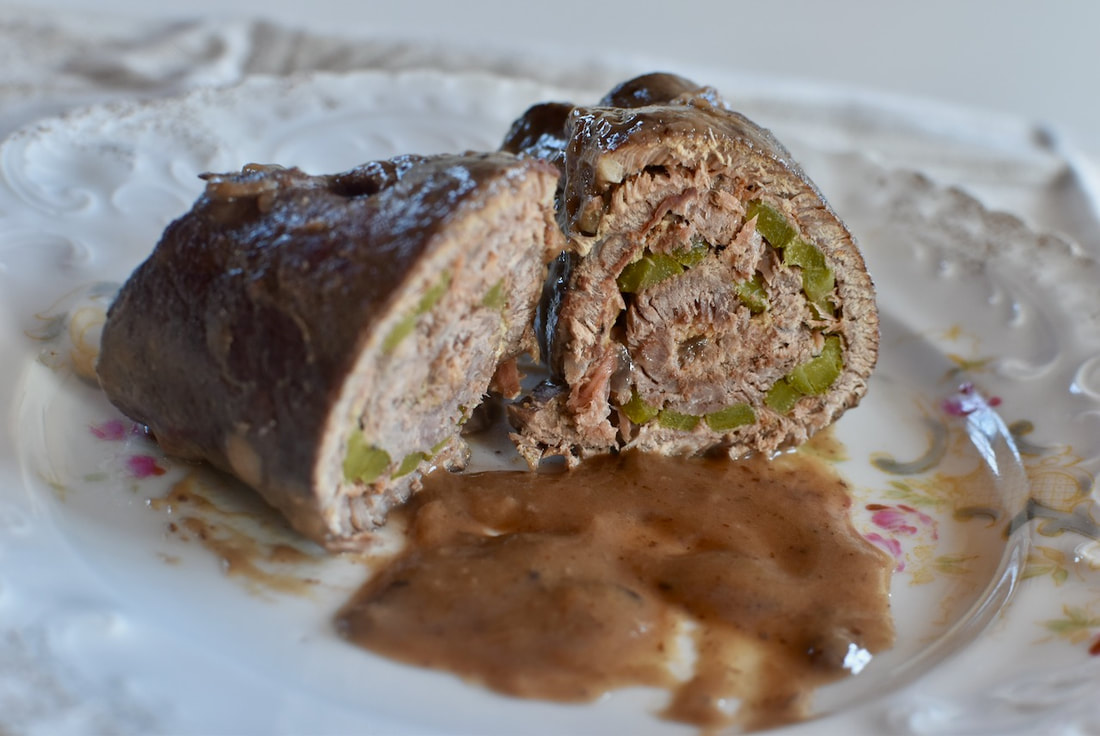 I have wanted to make homemade potato dumplings for years, but have always opted for the pre-made packaged ones. The one time I tried, when I prepared a goose years ago, it turned into an inedible potato soup. So this year, it was a project I wanted to tackle, so I started to watch German YouTube videos and tried one recipe. I didn’t like them—honestly the pre-packed ones made by Pfanni were better. But I didn’t give up. My girlfriend, Monika, from Germany makes them every year with her goose for Christmas. She uses a recipe from an old German cookbook from Schlesien (or Silesia) that is now in southwestern Poland. Both she and her husband came from this region. I love the quote in the cookbook saying that a Sunday dinner without dumplings is like a sky without stars. They were served with every roast, cooked cabbage or any other vegetable. In the cookbook, they are described as an easy-to-make recipe, but there are tricks to follow to avoid the dumplings falling apart or being hard as a rock.  I made them twice now and both times they got the approval from my friend, Susanne. Each region in Europe has their own version of potato dumplings. The Bavarian ones are made with half-raw and half-cooked potatoes. Leftover dumplings are perfect sliced and then fried in butter, the ultimate German comfort food. When making the dumplings, you can stuff them with small croutons. I think they need some kind of sauce to be truly enjoyed—like a mushroom sauce or gravy from a roast. I don’t have any photos of our Christmas dinner, but a week later, I served my second batch of potato dumplings with some of my friend’s leftover beef brisket from Hanukkah.
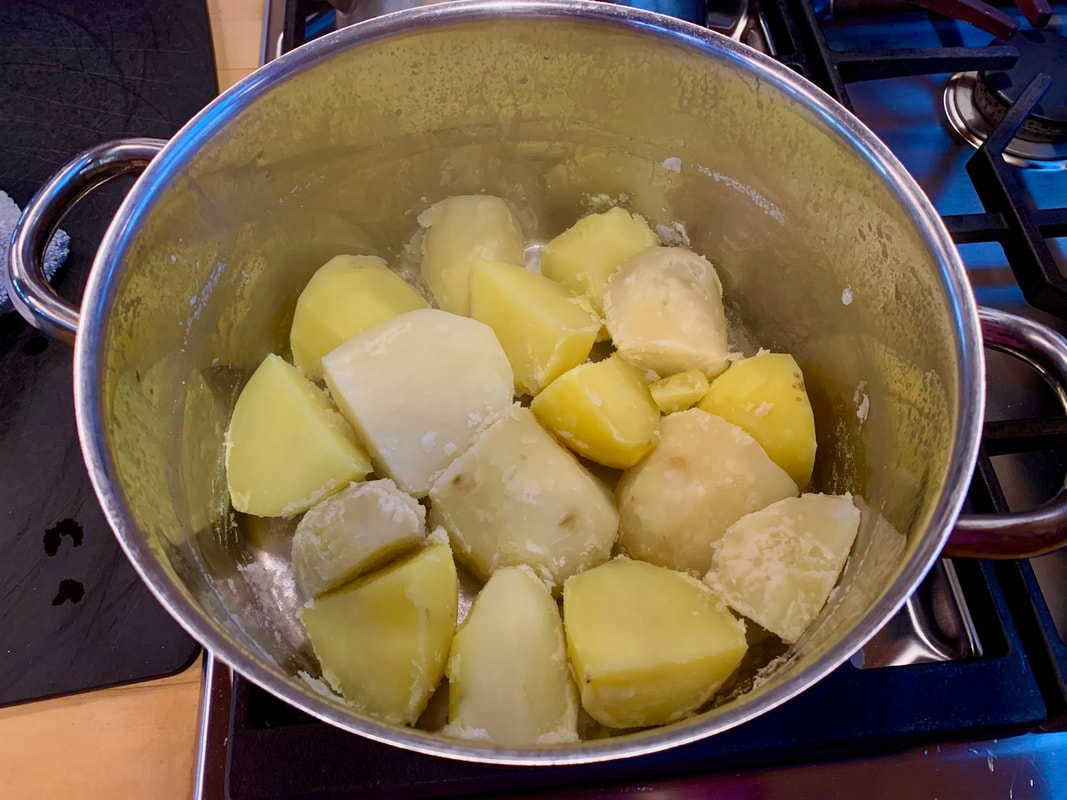
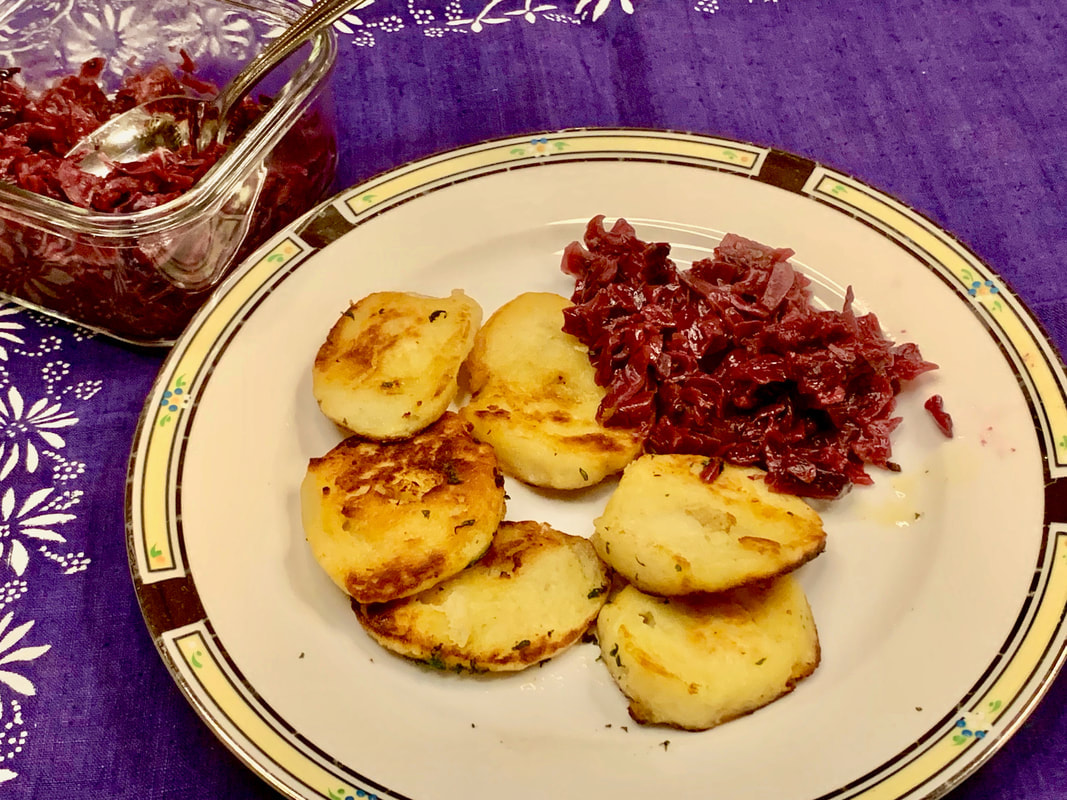 Leftover dumplings, fried and sliced I recommend that you follow the recipe and make no modifications. Or you will end up with potato soup. I used two russets and two yellow fin potatoes. It is also important to make a test dumpling before cooking the rest. I made a small one and tasted it, and both times it was okay. To avoid bland-tasting dumplings, don’t reduce the salt. If the dough is sticky, add some more flour. Don’t over mix the potatoes. If you don’t have a potato press, you can use a potato masher. Don’t skimp on the salt because you are flavoring the water—first to boil the potatoes and then to cook the dumplings.
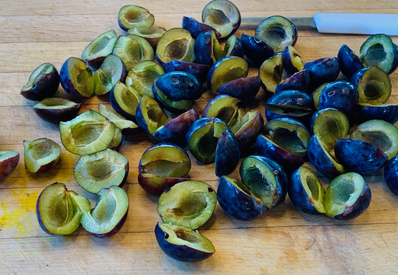
When I see plums I always think of the Italian prune plum tree we had at our farm in Germany where these plums are called Zwetschgen. When the fruit ripened in mid September we would make Zwetschgenmus (plum jam) and everybody baked Zwetschgenkuchen on large trays. They dough was usually a yeast dough with different toppings for the plums. My favorite was a custard topping which is called Schmandkuchen. One day I would like to bake it in my village and get advice from all those old cooks and bakery friends. In the meantime I found this wonderful recipe on YouTube that is easy to make and all my American friends liked it. The shortbread dough is used for the crust and the streusel. 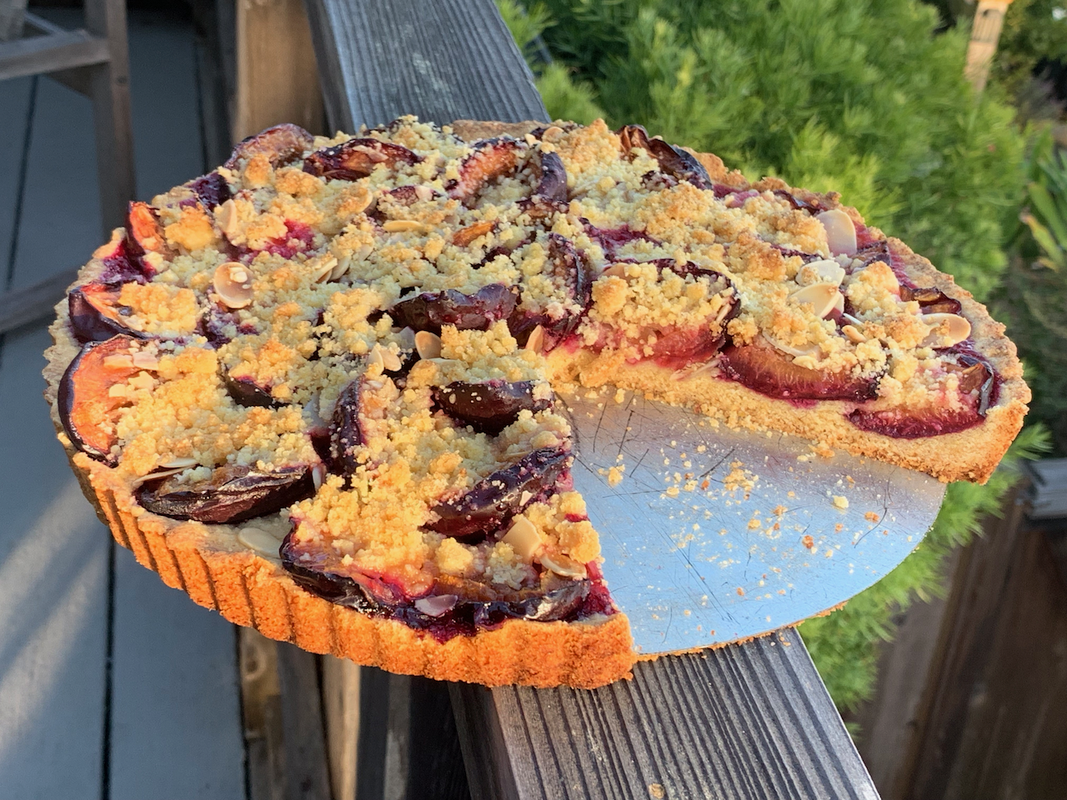 The Zwetsche , a European plum ( Prunus domestica) has many different names, in France it is called quetsche, here in the US they are called Italian Prune Plums and sometime Empress Plums. These plums are small and dense with purple skin, easy to pit (freestone pits) and have yellow flesh. There is something magical that happens to this egg shaped, somewhat bland tasting Italian plum when you bake it, it becomes a sweet gooey delight, in cakes, in jams, and dumplings. As was the case with my cake. 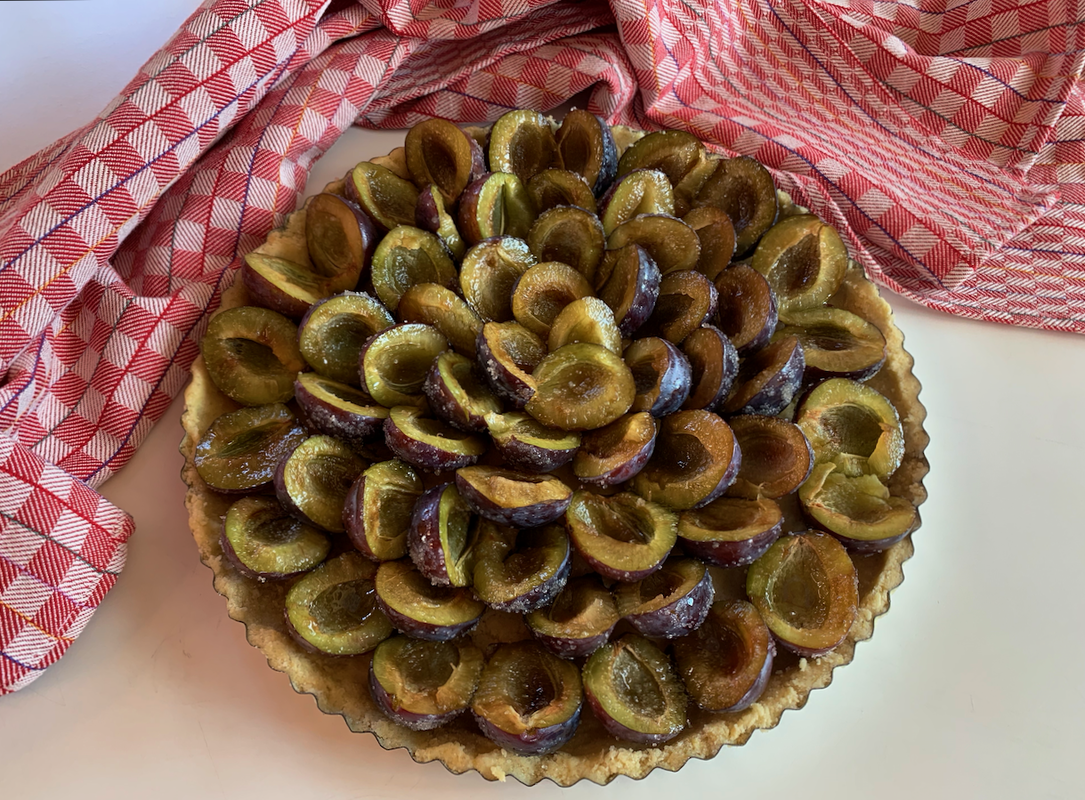 I am writing this while eating small slivers of this tasty treat. My doctor tells me to stay away from sweets and I do most of the time but there are times when these rules don’t apply. This cake brings back memories from my childhood in Germany, where Zwetschgenkuchen was a seasonal treat . My mother liked the simple version, adding plums with a little bit of sugar to a sheet yeast cake. Sometimes she splurged and put a custard on top of the cake. I remember stuffing myself and being told to share. My friend, aunt Frieda, that lived on the next farm made the best sheet cakes ever in a wooden pizza oven where she also baked her bread. I would sit on her wood box watching her cook. Oh, those childhood memories.  Some more of my recipes using plums. The plum jam is tart but full of flavor. It's baked in the oven so you don't have to sweat over a hot stove and there is no stirring. Click on the photos below for the recipe.
Here is the link to the YouTube video where I found this recipe. It's in German but Thomas speaks very slowly and it is fun to watch him make the tart. I think this would be a great project for young cooks. When buying Italian Prune Plums get the hard ones, some of the soft ones will be rotten inside and always buy more, just in case. These plums don’t have a long shelf life, that’s why a lot of stores don’t carry them.You can use another variety of plums if you are unable to get Italian plums.
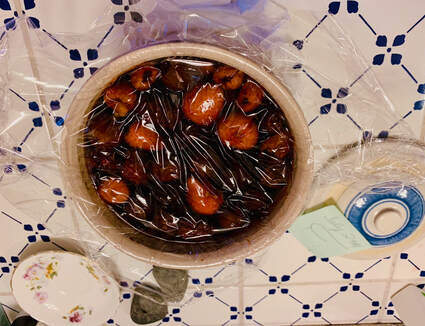
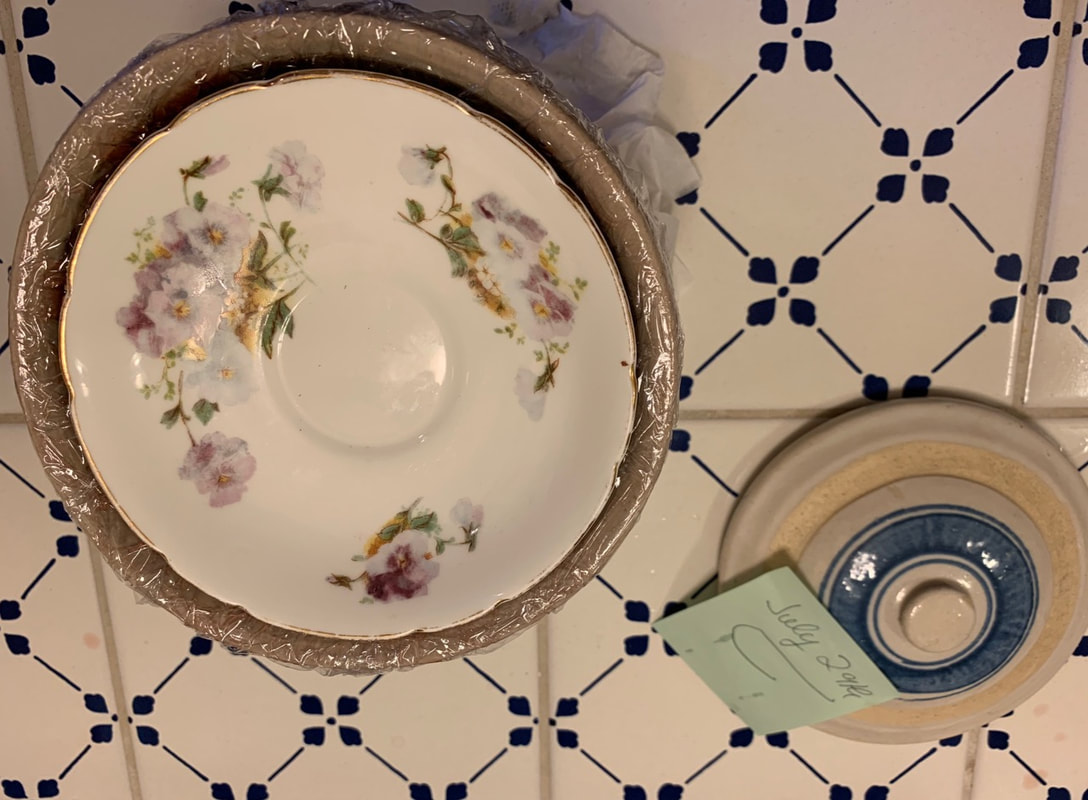
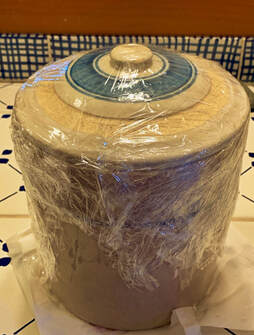
Yum, yum, it’s soaked in rum! If you are looking for an easy way to preserve the taste of summer for a cold winter night, look no further. Make an old-fashioned rum pot with the tastiest strawberries, cherries, raspberries (or any other fruit), add sugar and rum, then let it sit for at least two months. You will end up with a boozy delicacy, which is perfect on pudding, ice cream, flan, cheesecake, almond cake and in drinks. You only need three ingredients and a non-corrosive container with a lid for this classic German condiment. 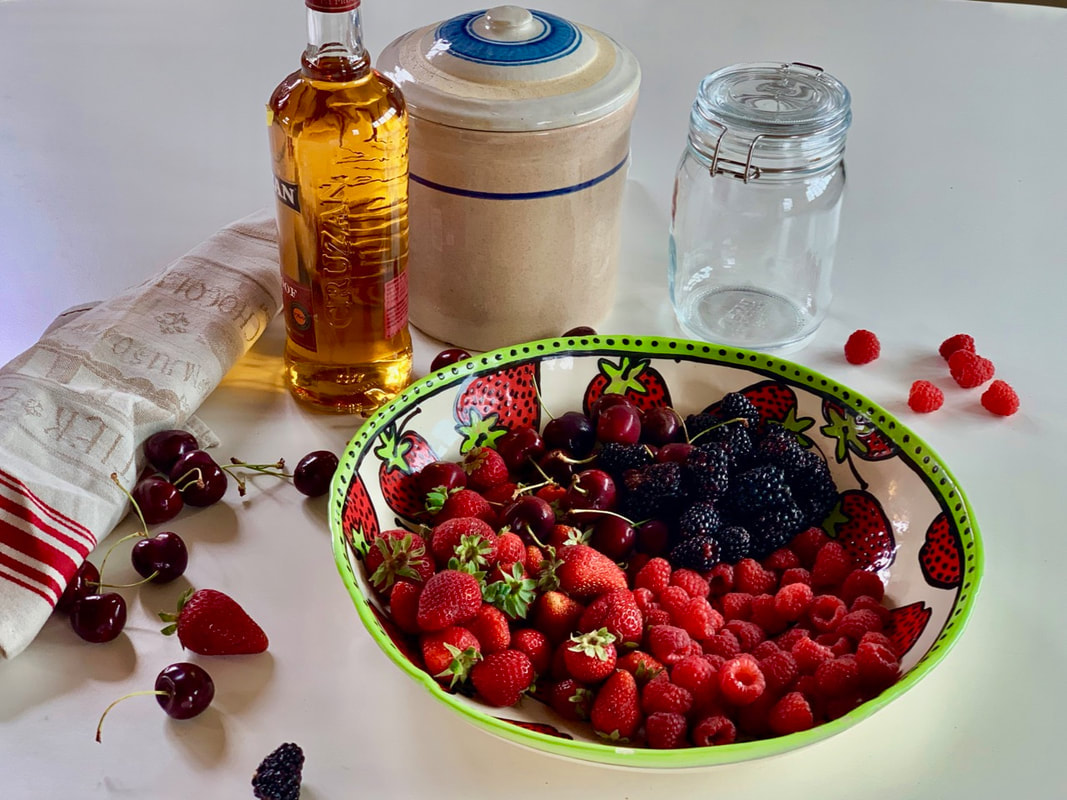 This German tradition of making a rum pot goes back to 18th century, when rum was imported from the Caribbean to the northern Hanseatic towns. Legend has it that some tropical fruit accidentally ended up in a rum barrel. Whether it’s true or not, it’s a good story. My story goes back to my gentle, caring and loving father who wasn’t a cook. How could he be when he worked from dawn to dusk on the farm seven days a week? But he managed somehow to make a rum pot, which he loved to pour over ice cream. 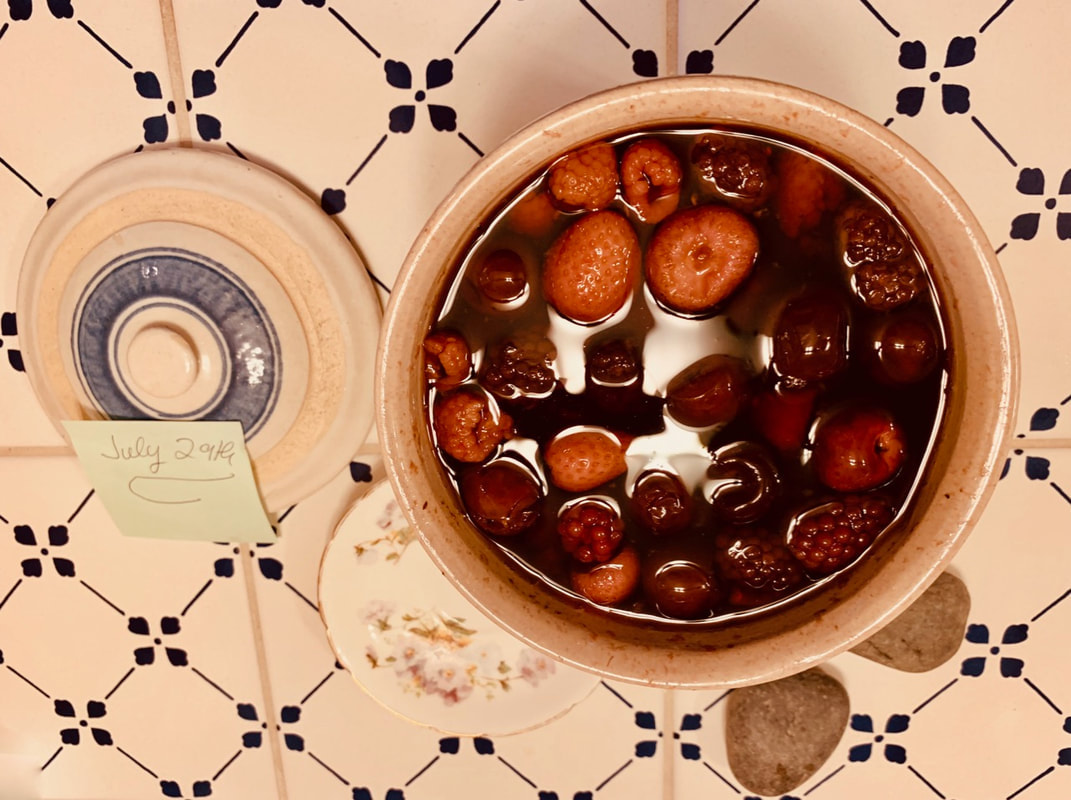 A traditional Rumtopf is done in a special crock pot ( see the photo below) . My father just used a regular crock pot, but a mason jar will do. The fruit is added when it is ripe—strawberries in June, followed by raspberries, apricots, blueberries, cherries, plums (or any other fruit) in July and August. Sugar and rum is added for each addition. The beauty of the Rumtopf is that you can use almost any fruit you have available as long as you top it with rum that is 54% or higher (108 proof). It will put hair on your chest, so be careful and eat responsibly. 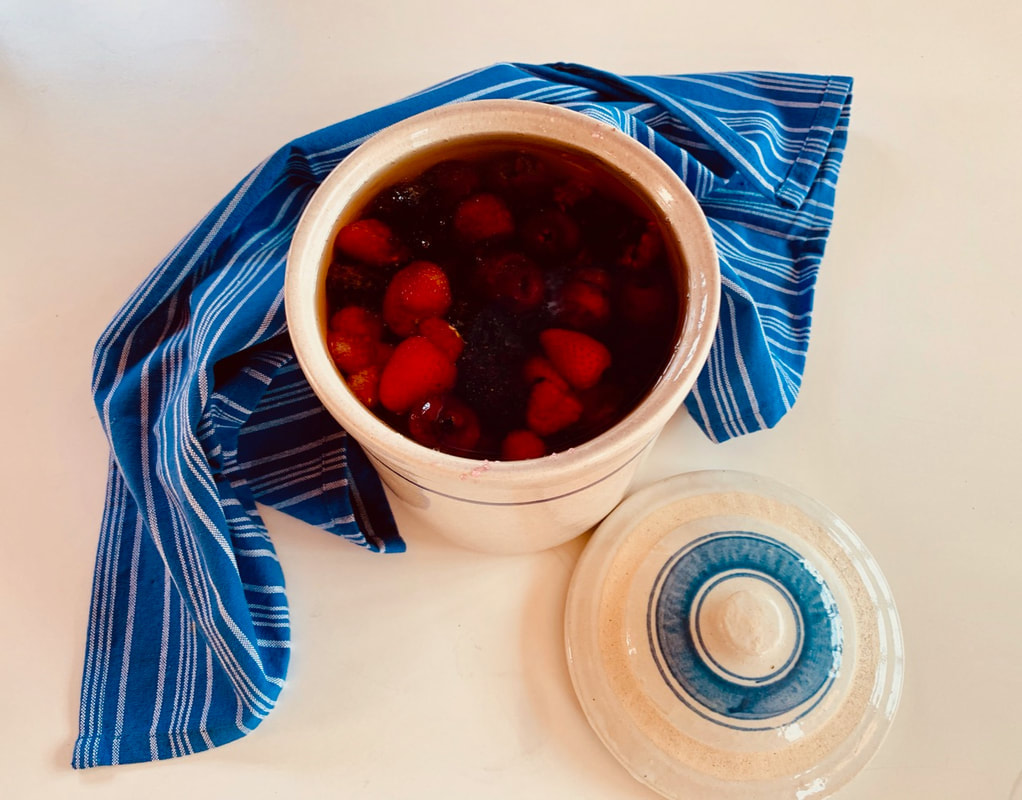 I live in California and only harvest a handful of berries from my garden, but fresh delicious fruit is everywhere else, especially at the farmers markets. I am found of cherries and love to eat them. I ended up with a refrigerator full of fresh fruit and had to do something with it, so the idea of a Rumtopf was born. All I had to do was find was a bottle of rum that was more than 54% alcohol. I am thinking of starting another Rumtopf the traditional way, by adding fruit and sugar and topping it with rum. Layering my Rumptopf with different fruits as time goes by, which keeps the pot going indefinitely. 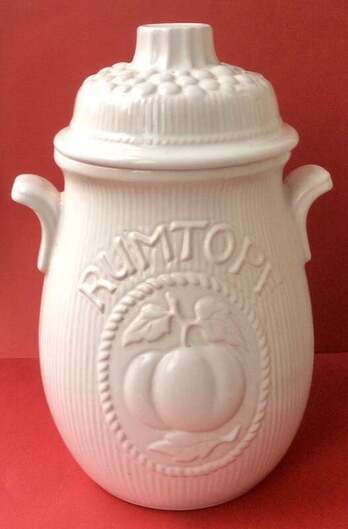 This is a photo of a Rumtopf that is for sale at ETSY. Before you click on the recipe, please understand that this is an experiment , I usually taste my recipes before I post them, so please keep in mind that this is not one of them. If it turns out (and I don’t see why not), I will fill some small mason jars with my Rumtopf and give them to my friends for Christmas. We’ll see! Your container can be a crockpot or a mason jar that has been cleaned thoroughly. I mixed the stronger rum with regular 40% (80 proof) rum. But make sure to use 54% (108 proof ), otherwise your Rumtopf will get moldy. Be careful, because the rum is flammable. It is important that the fruit is covered with rum. You might have to top it off while you are aging it. I loosely put some plastic wrap on top of my pot and and then add a saucer on top of that to make sure that the fruit is immersed in the rum. After I put the lid on, I wrap the top again in plastic wrap. According to all recipes I found, the Rumtopf needs to age at least two months so that the special flavors can develop. Some Rumtopf have been nurtured for years. The Rumtopf is like a perpetual jar, much like sourdough starter that can be kept alive for years
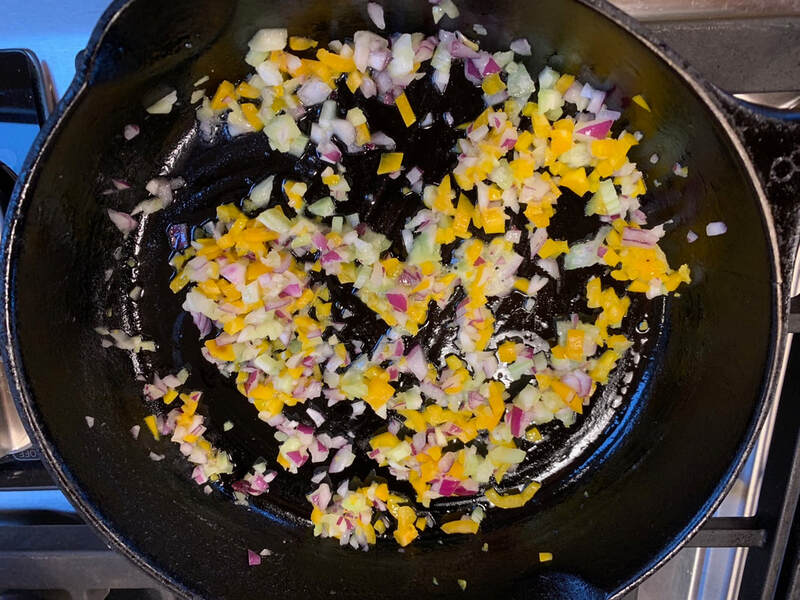
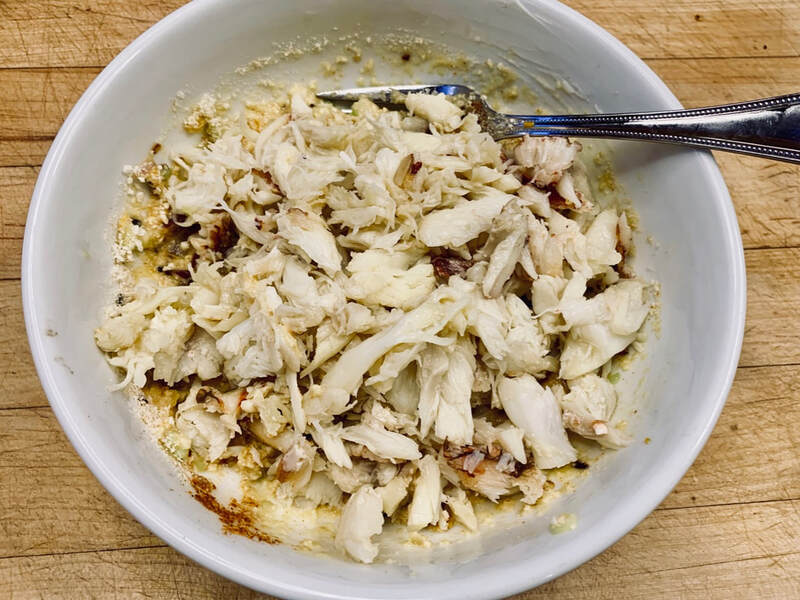
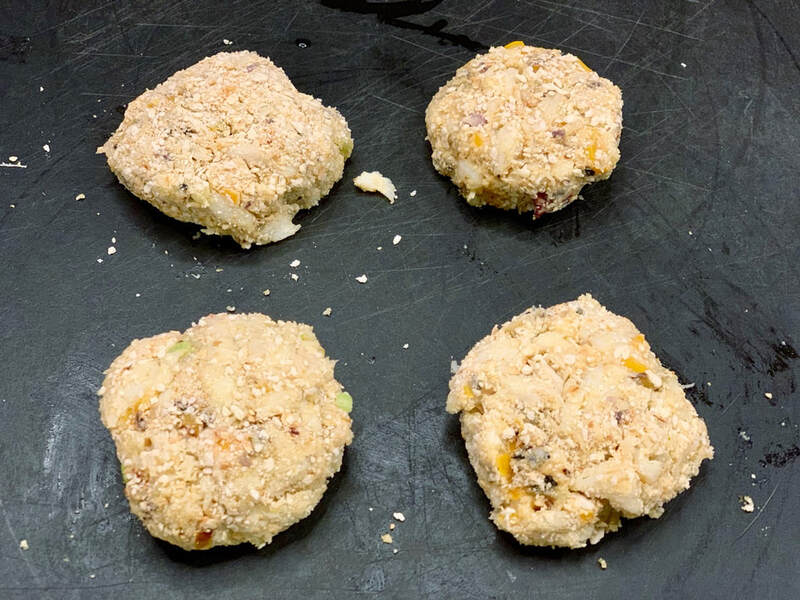
Do you want a fruity drink tonight, try out my recipe for a light Strawberry Punch. Click on the photo for the recipe.  A personal note to followers of my blog: For those of you who been wondering about me, life has had its challenges this year for my family. But we survived and I had to become stronger because of it. It’s been difficult, but the outcome is good for better days ahead. Thank you to all my friends and family for your support and love. I am respecting my husband’s request for privacy to not share more on the worldwide web. These crab cakes have a little spice with a kick and are a delicacy, especially when they are made with our local Dungeness crab. I usually buy one or two freshly cooked crabs and my husband cleans them meticulously, pulling out every little tidbit of crabmeat he can find. What a nice guy. Normally, we have crab with a salad and some fresh crusty bread. It is the perfect meal with a glass of Chardonnay. Life during crab season is good. 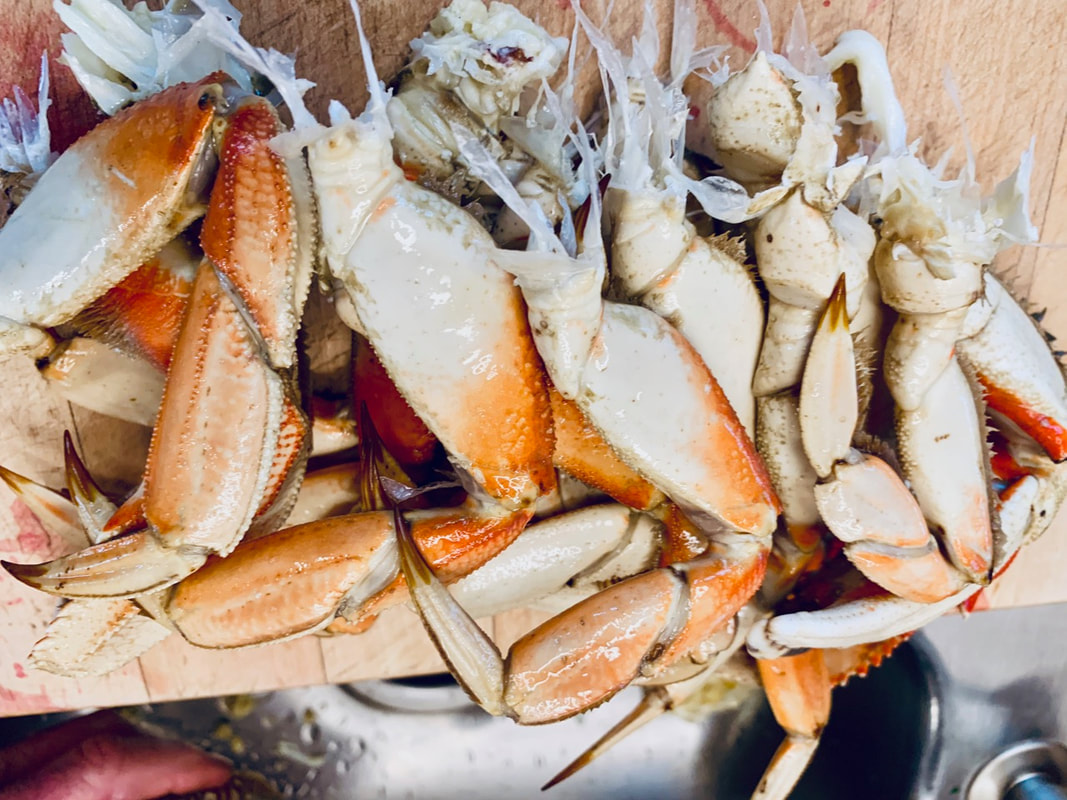 Then I came across an old page from my beloved Gourmet magazine that had a recipe for Louisiana-style crab cakes. Of course, I had to make it. Crab cakes are a real treat for me and I often order them in restaurants. There are many varieties, as each region has its own way of making crab cakes and using their own local crab. I am still dreaming of Maryland crab cakes made with Maryland blue crab. The secret to any good crab cake is using big lumps of crabmeat that retain its form through the cooking process. That way, you will bite into mostly crabmeat with some added flavor. 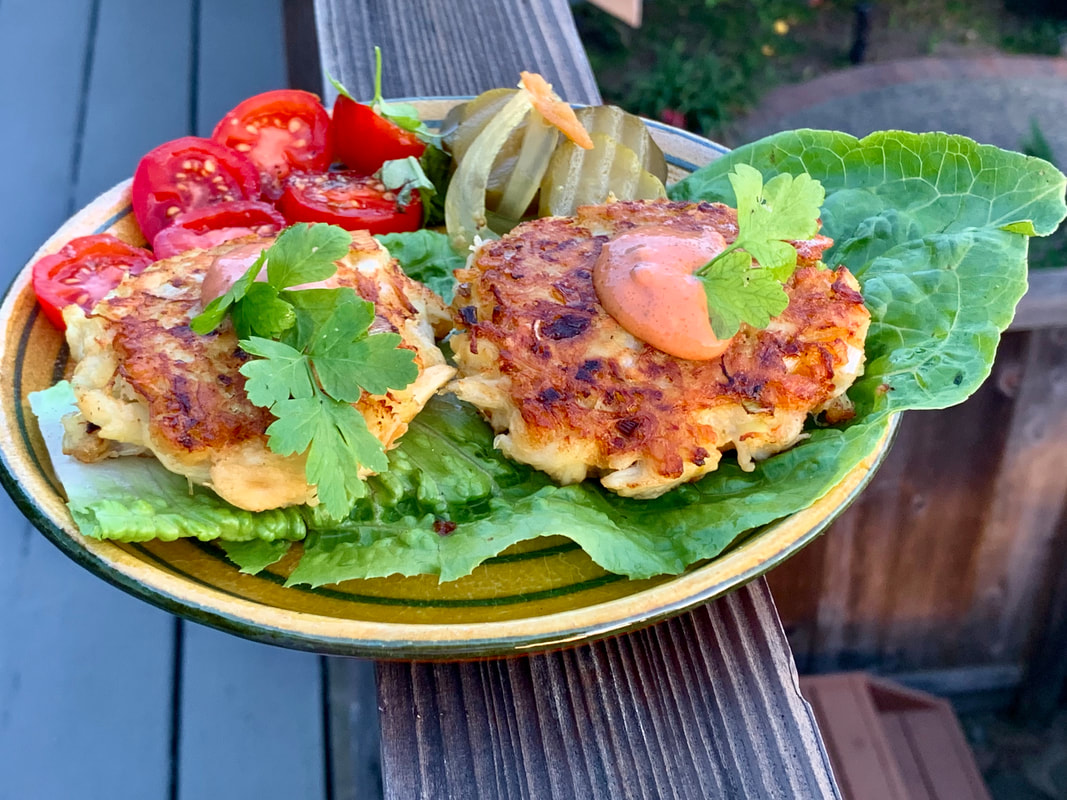 There are all kind of sauces that are served with crab cakes. I like a good tartar sauce or a remoulade. This time, I choose to make crab cakes for dinner with creamed leeks, so I didn't need any extra sauce. There is nothing wrong with a citrusy green salad and a crab cake. I can envision making mini-crab cakes, served on lettuce with a dollop of tartar sauce. What is your favorite way to eat crab cakes?  If you are looking for another special dish to prepare, try my crepes with salmon and fennel filling. In Italy, this dish is called Cannelloni Ripieni di Salmone and the crepes are called crespelle. This could be an elegant dish to celebrate the arrival of spring especially when served with fresh asparagus. 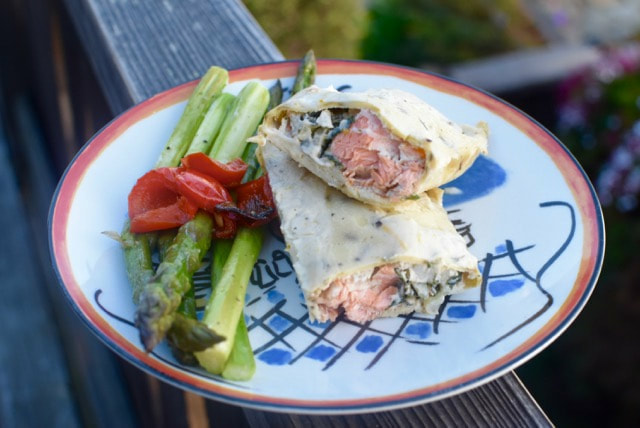 How about something sweet that is easy to make and tastes good? Try this Italian shortbread tart called Fregolotta. Pretend you are eating a slice in a little cafe somewhere in Italy.  This recipe makes 4 crab cakes and it doesn’t take more than 30 minutes to make if you buy the fresh crabmeat. Make sure your crabmeat has large pieces in it. Carefully pick over the crabmeat to remove any small pieces of shells. I finely grind the saltine crackers in my blender
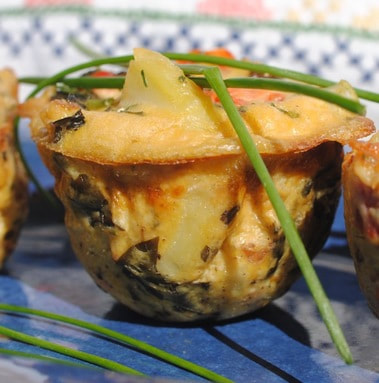
Every year, I eagerly await the time when the persimmons ripen in our little town of Santa Cruz. They are a sure sign that fall has arrived. I don’t have a tree myself, but friends and locals are willing to share their bounty. Hachiya persimmons are the ones I get most of the time. They are teardrop-shaped and have to soften before you can use them. Fuyu persimmons are the flat-looking ones that are great sliced in salads and other dishes. Persimmon trees can grow up to 70 feet tall, and one of these wonderful trees grows in my girlfriend’s son’s garden. 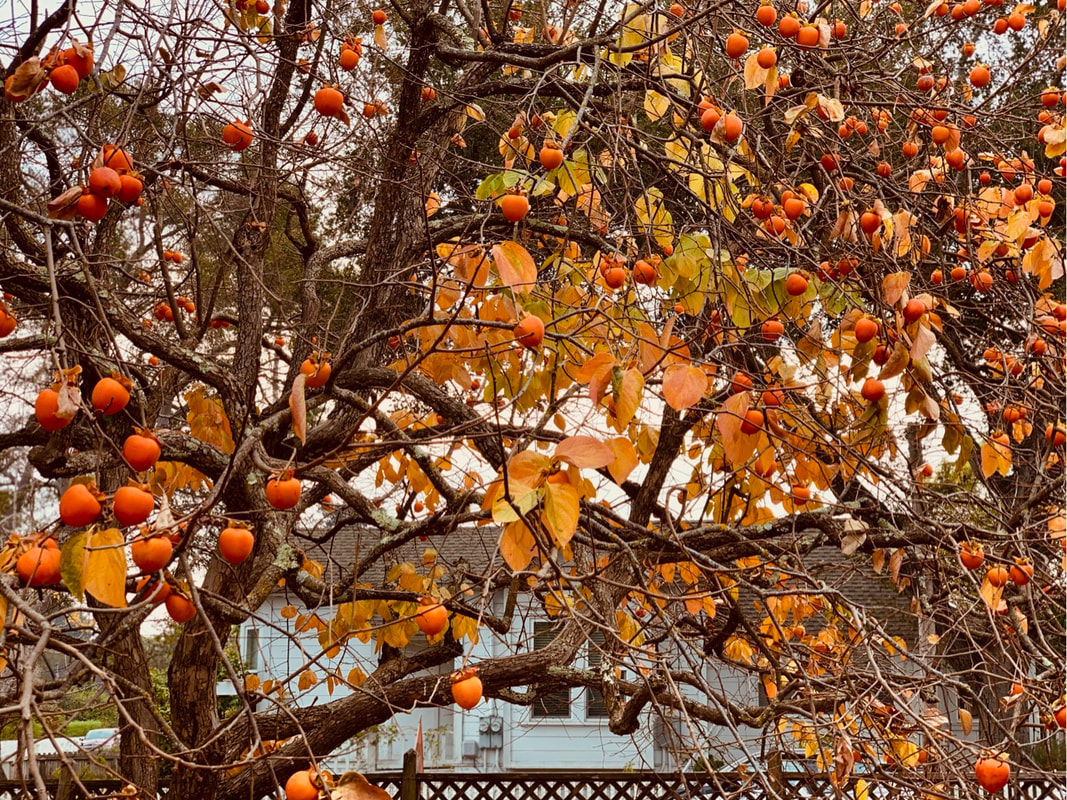 I have been cooking and baking with persimmons for years. Read more about persimmons and the recipe for my persimmon bread on a previous post (click here). 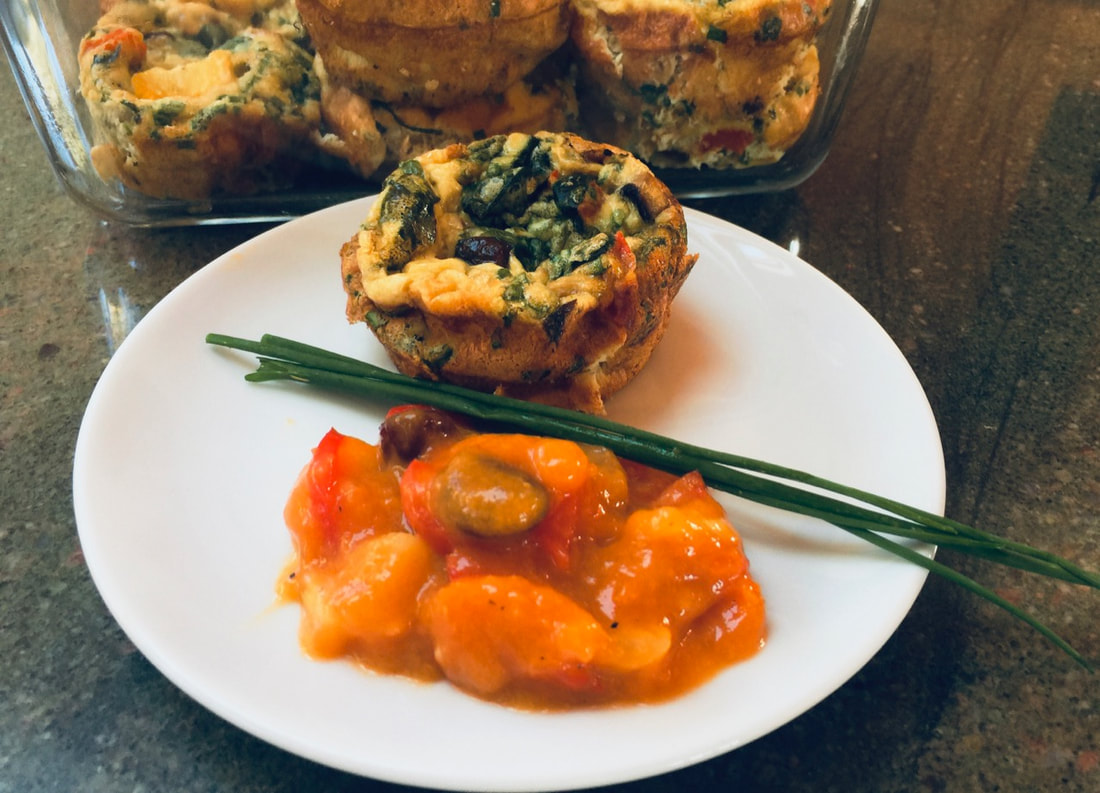 Each year, I can't wait to make this chutney. The recipe comes from a twenty-year-old local newspaper clipping. The chutney is great with a variety of different foods. This year, I am going to make it part of my Christmas cheese board. It is also great with fish, on duck breasts, or with any food you can think of. In the photo above, I am serving it with my muffin quiches without a crust . These quiches make a healthy snack. (click here to get the recipe) 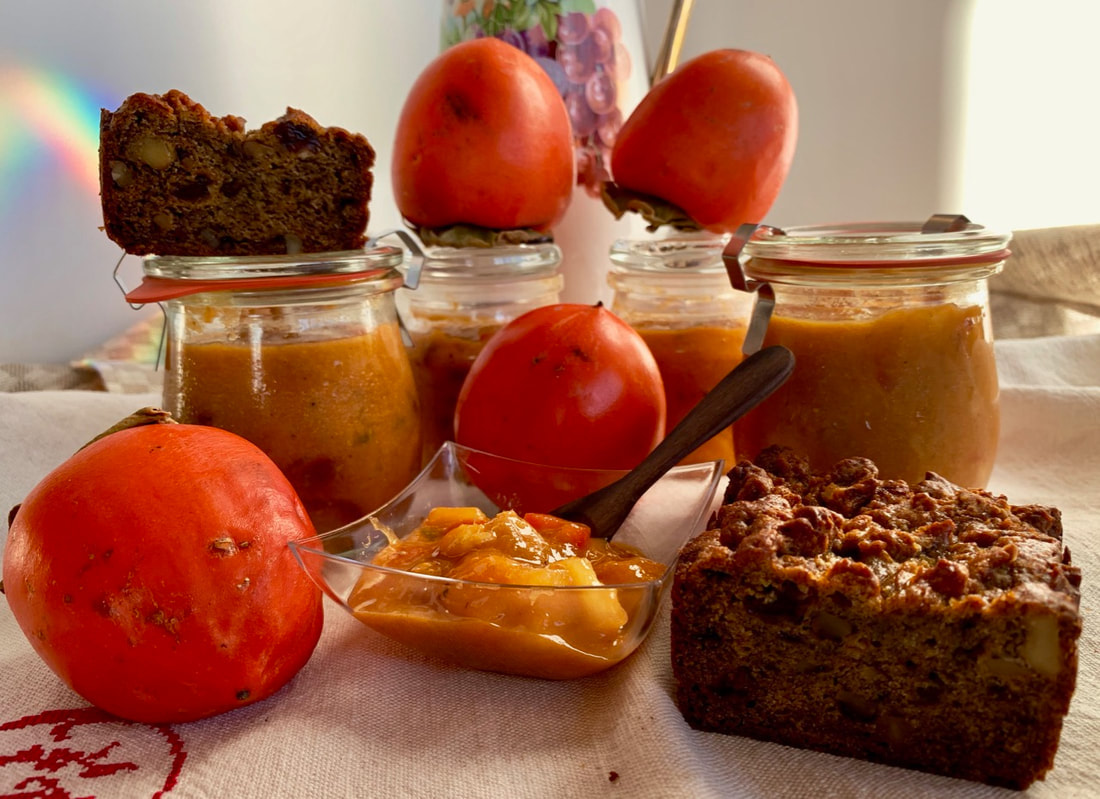 My chutney is rather mild and not overly sweet. The fresh ginger gives it a great flavor. Since I am hosting our book club next week, I am giving each member a jar of my chutney and persimmon bread as a gift. I have also made this persimmon chutney with apples or pears using lemon or lime juice. Personally, I prefer lime juice. The jury is out on whether to use apples or pears, so it is really a matter of your taste. The pears should be firm. For my last batch, I used golden delicious apples. Instead of dried cranberries, you can substitute dried blueberries. The chutney develops its full flavor after a couple of days in the fridge.
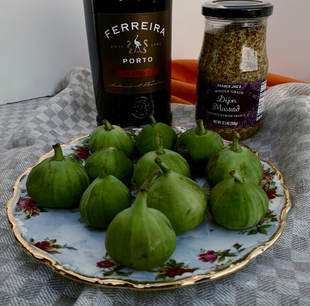
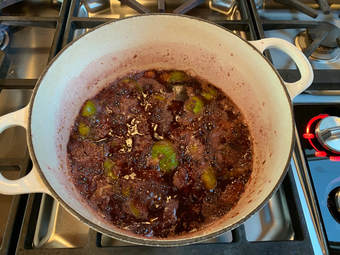
I really shouldn't do this, instead I should go for a walk to give my old body some exercise before a very long flight. But I just have to share this because fig season is almost over and I love this mustard. Have you noticed that I am running a little behind when it comes to seasonal cooking? Later on, I will try making this recipe using dried figs and add it here. 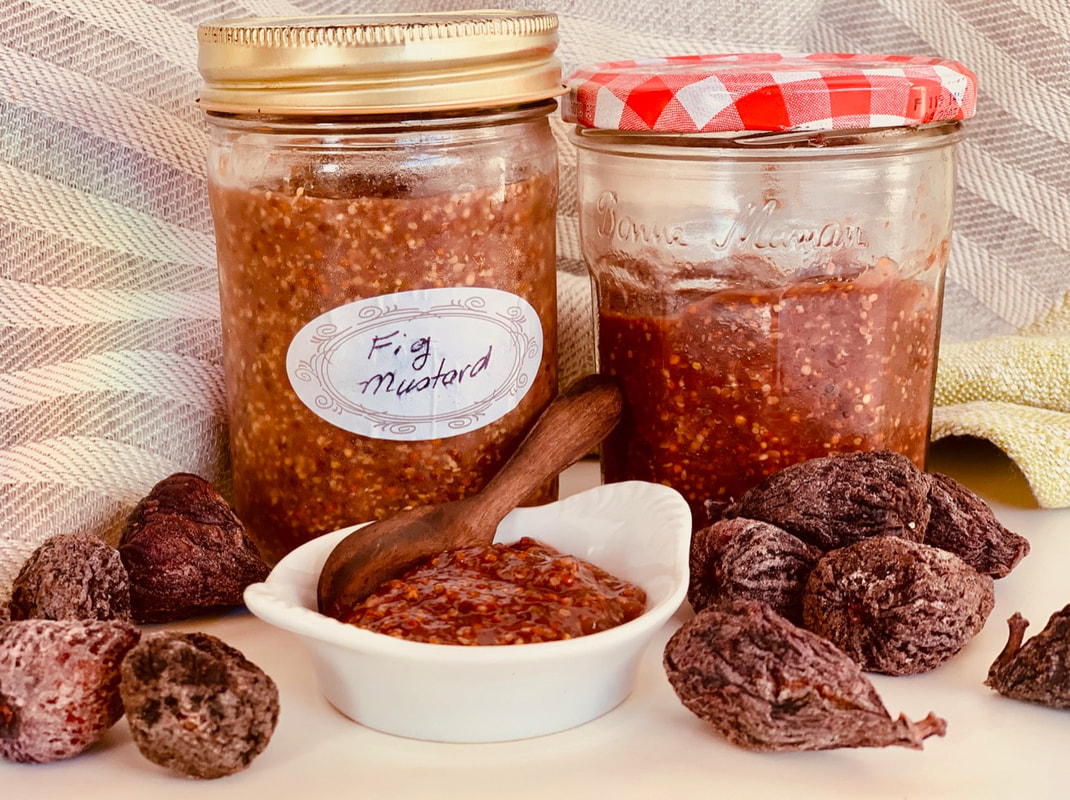 The figs in this photo are dried mission figs It all began with a basket of Italian figs that my girlfriend Diane gave me. 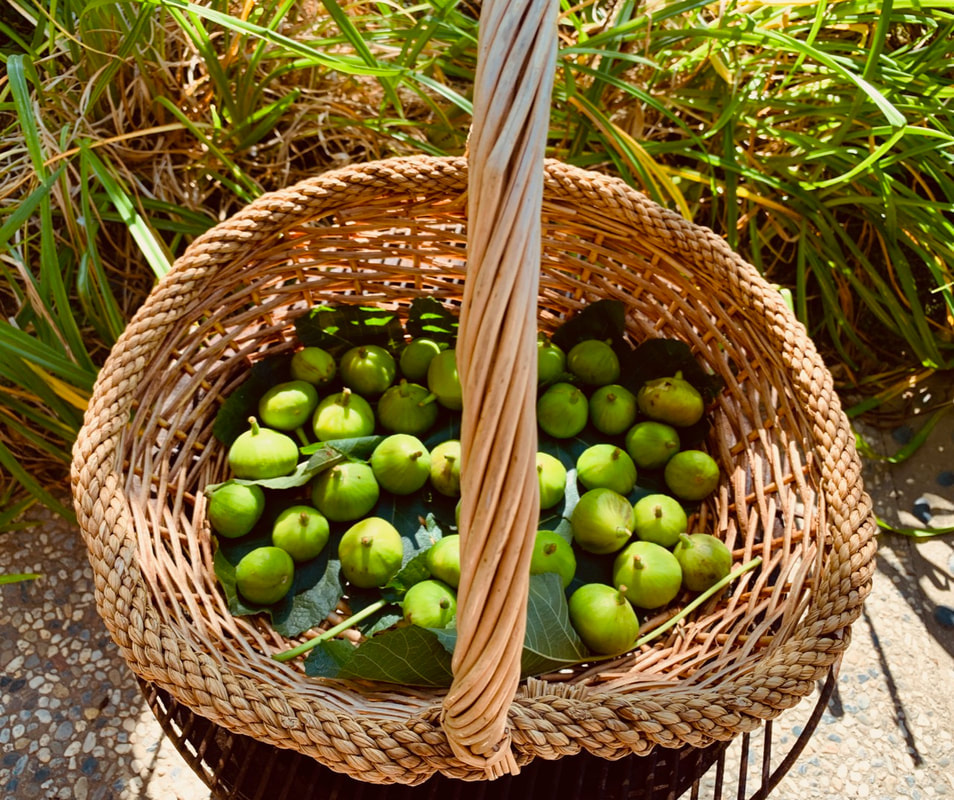 This mustard would be great on a cheese plate or on a turkey sandwich. In France, figs and fig mustard is often served with foie gras, and in Germany it is served with a Weißwurst (veal sausage). This is not a sweet mustard, but it is full of flavor with the taste of the figs and a hint of vinegar. 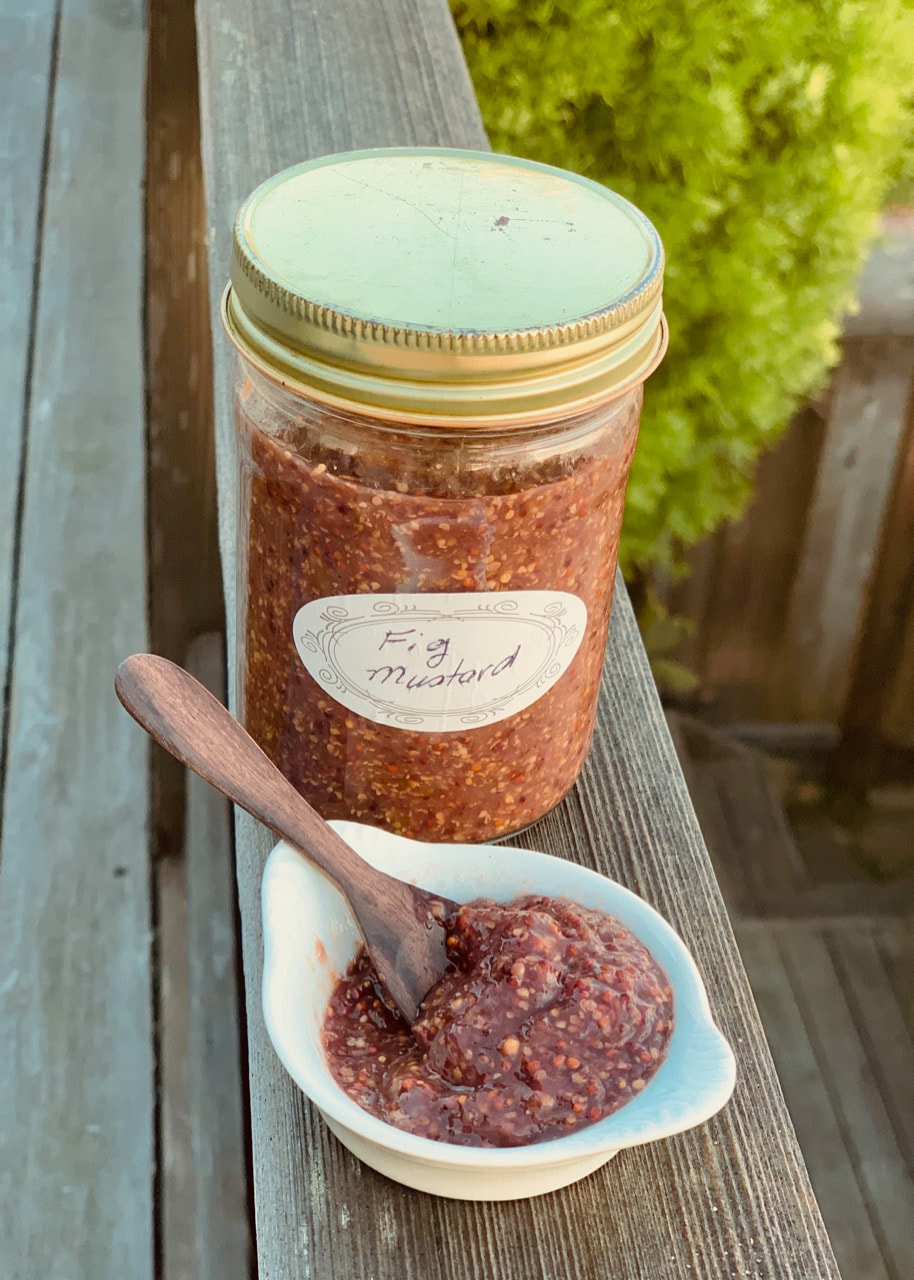 I used Italian figs but mission figs or any other figs can be substituted.
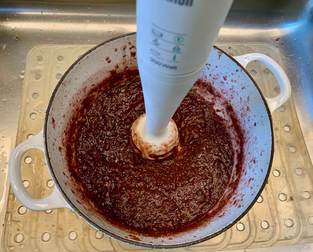
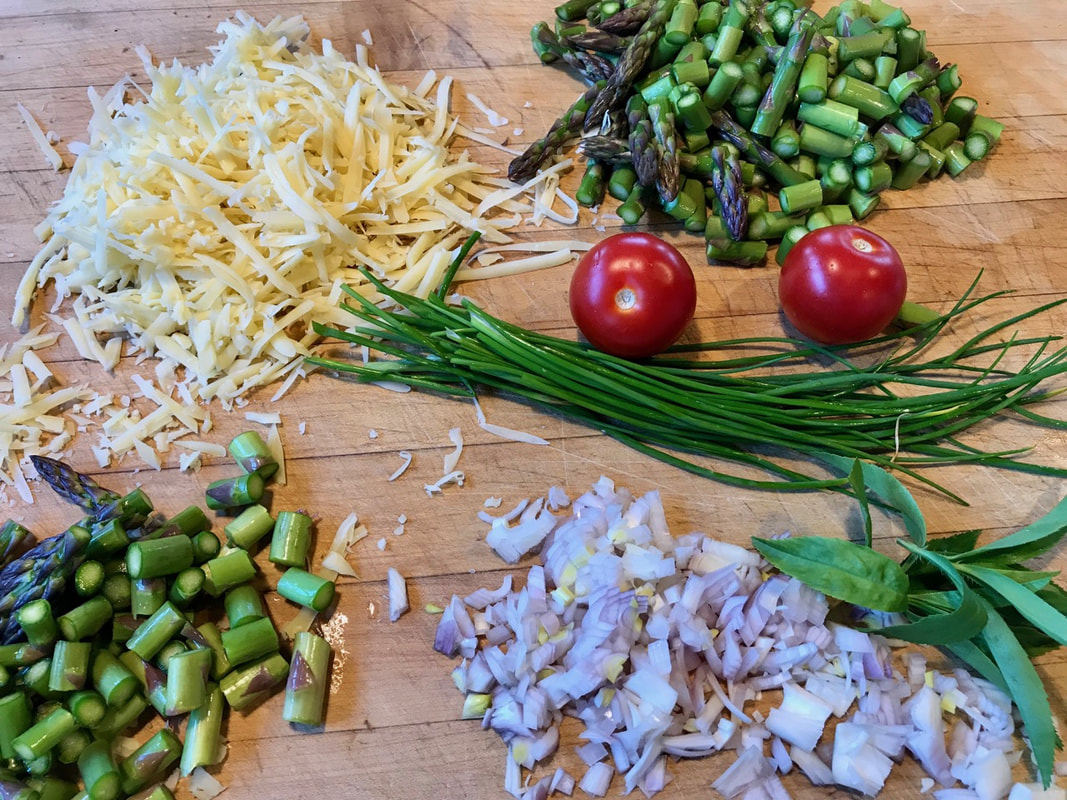
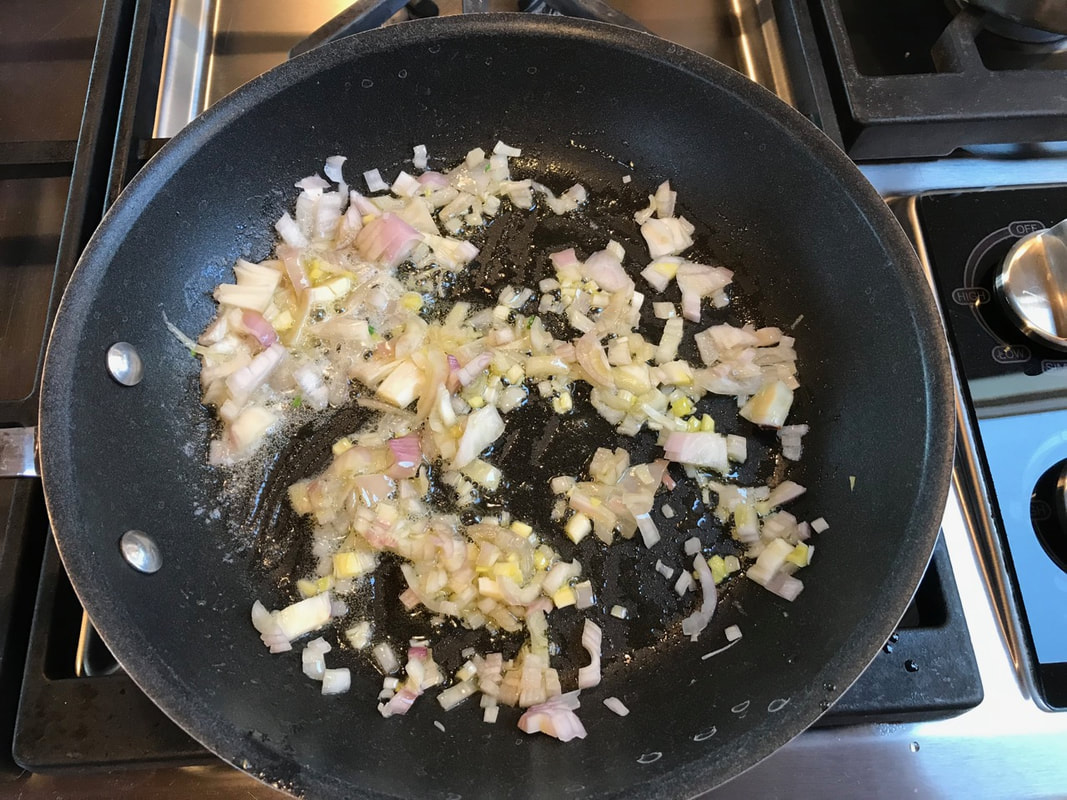
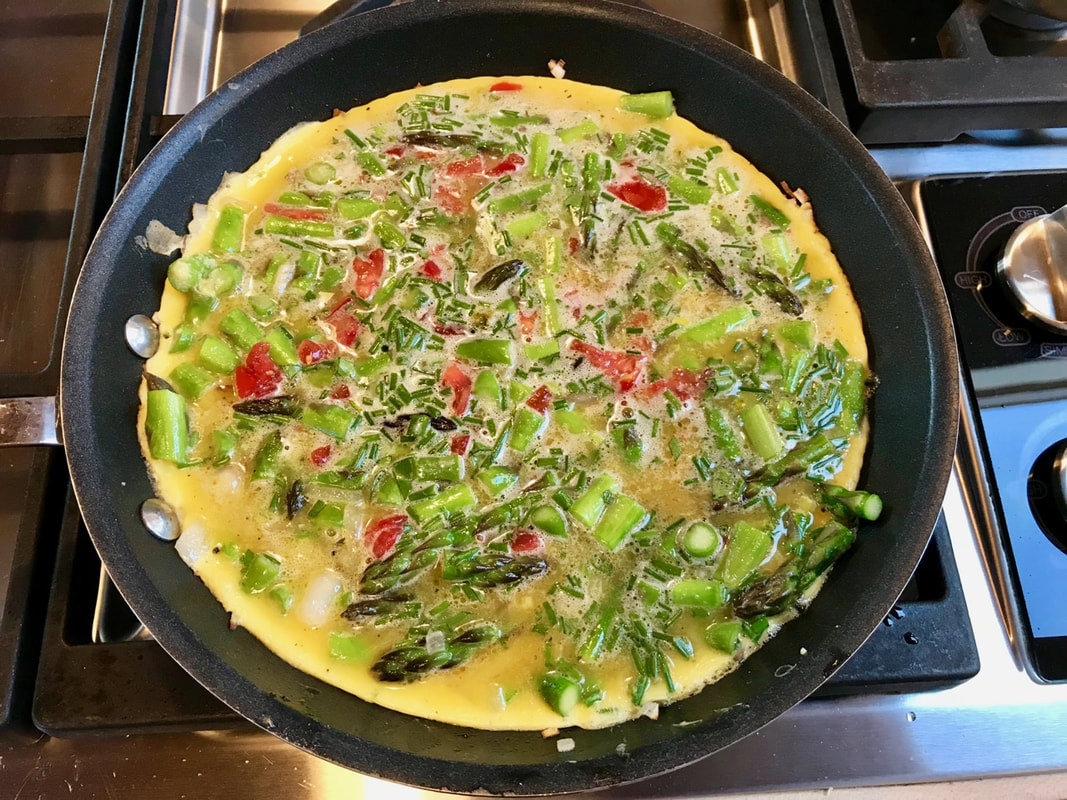
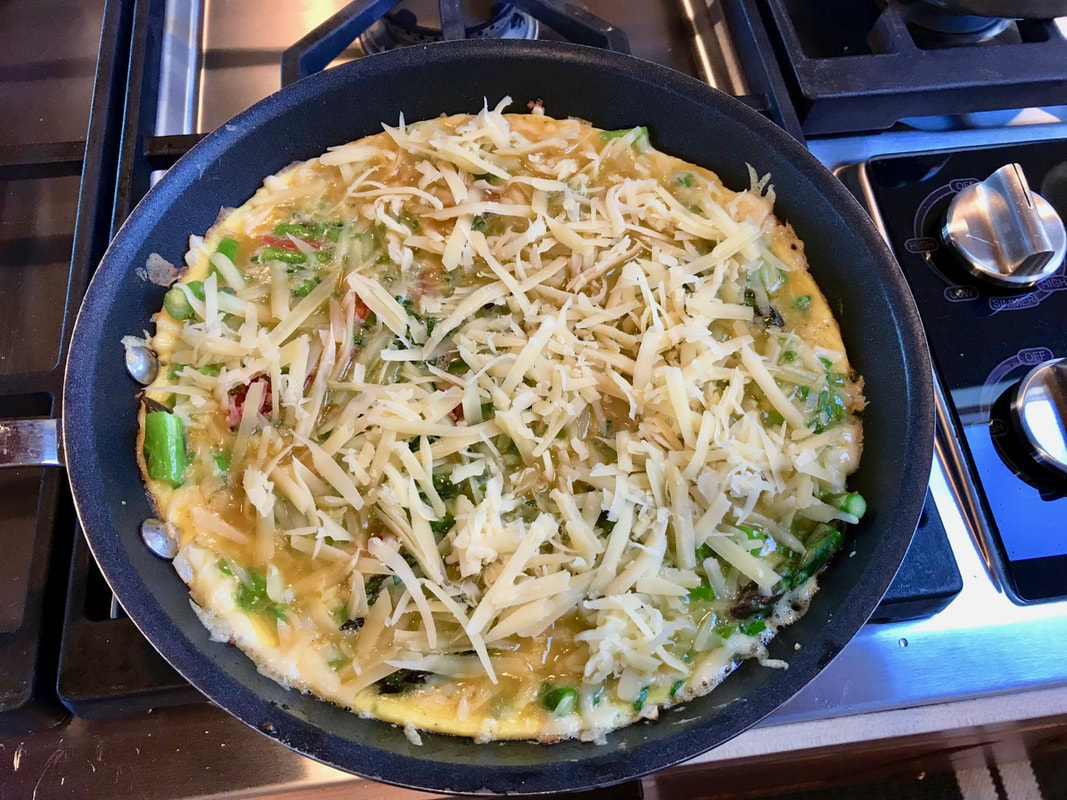
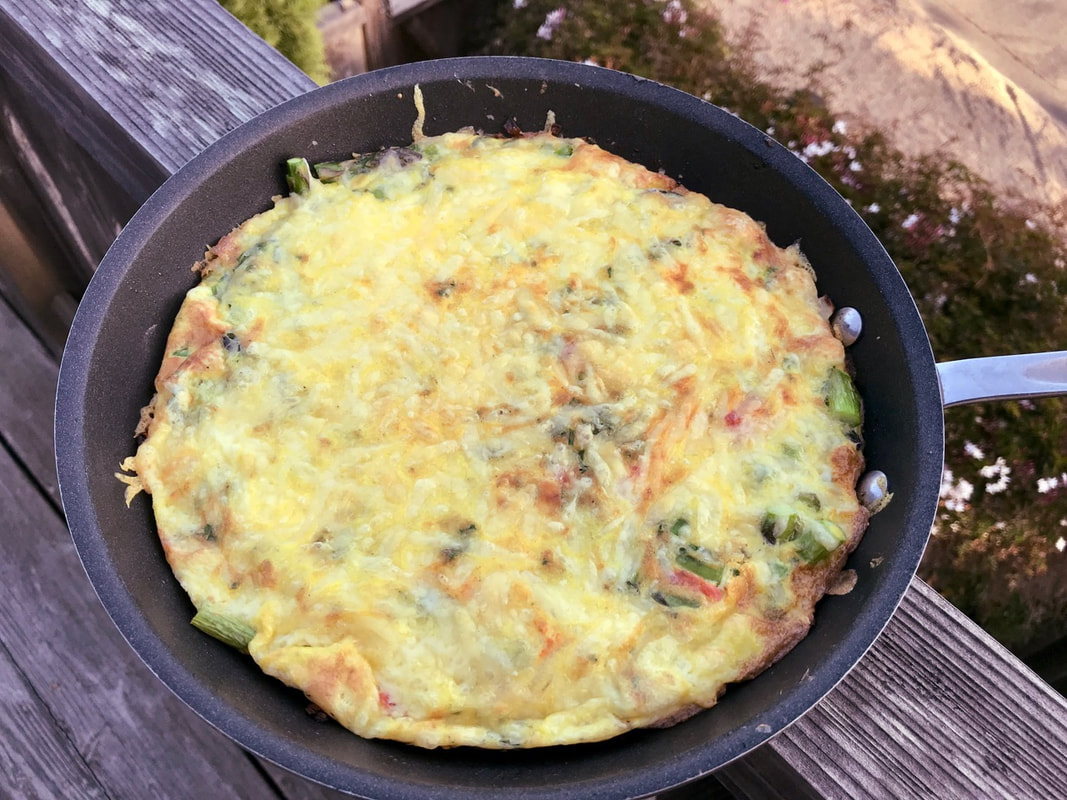
If you want a meal that is ready in 20 minutes, this frittata is it. It’s a simple dish, yet full of flavor and somewhat elegant. Serve this with your favorite salad and you have a light, healthy meal for brunch, lunch or dinner. It makes a great leftover to take to work, as you don’t even have to heat it up. Frittata is arguably better at room temperature or cold. I just had the last piece for breakfast. 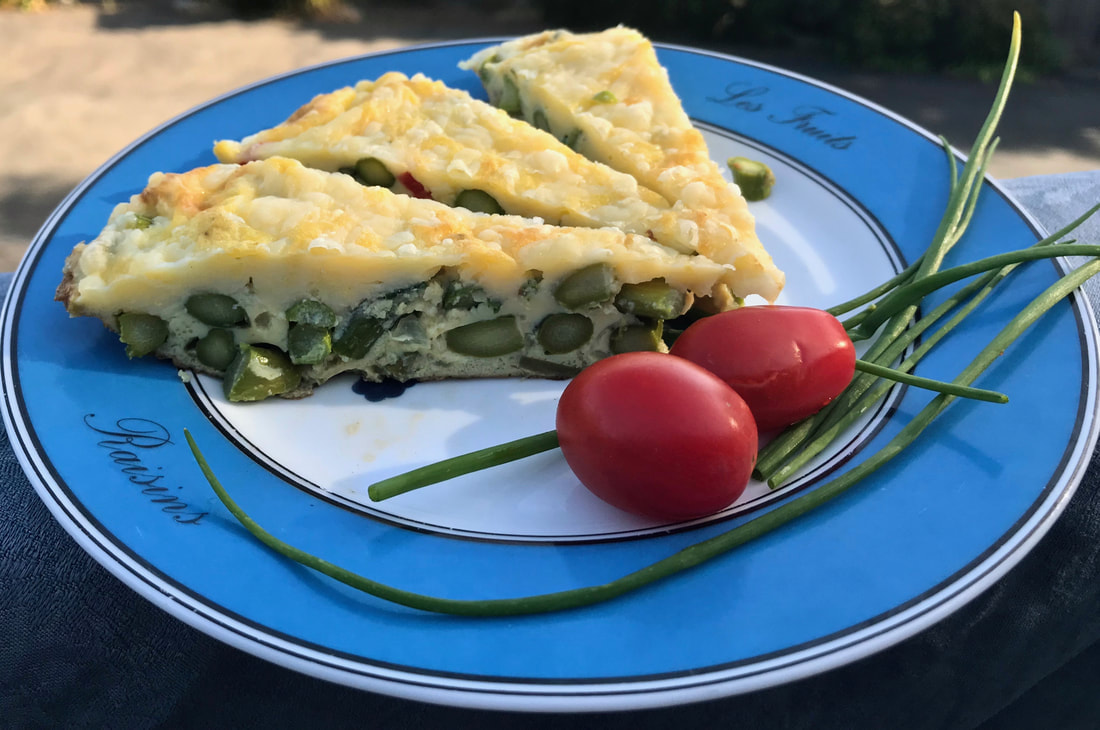 Think of a frittata as an Italian version of an an open-face omelette, a crustless quiche or scrambled eggs. Wikipedia tells me that frittata roughly translates to “fried”. 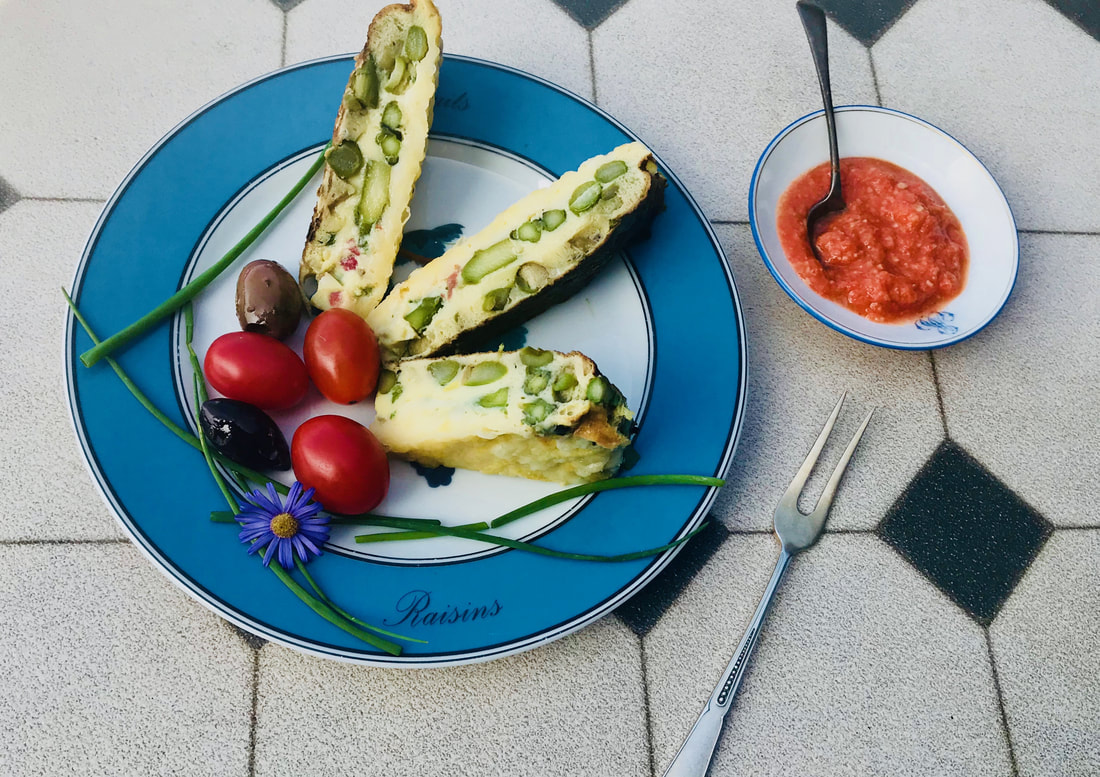 We have beautiful, fresh asparagus at our farmer’s market and I have been eating it roasted, steamed, and in salads. I also made a soup, but the recipe needs more work before I'll post it. 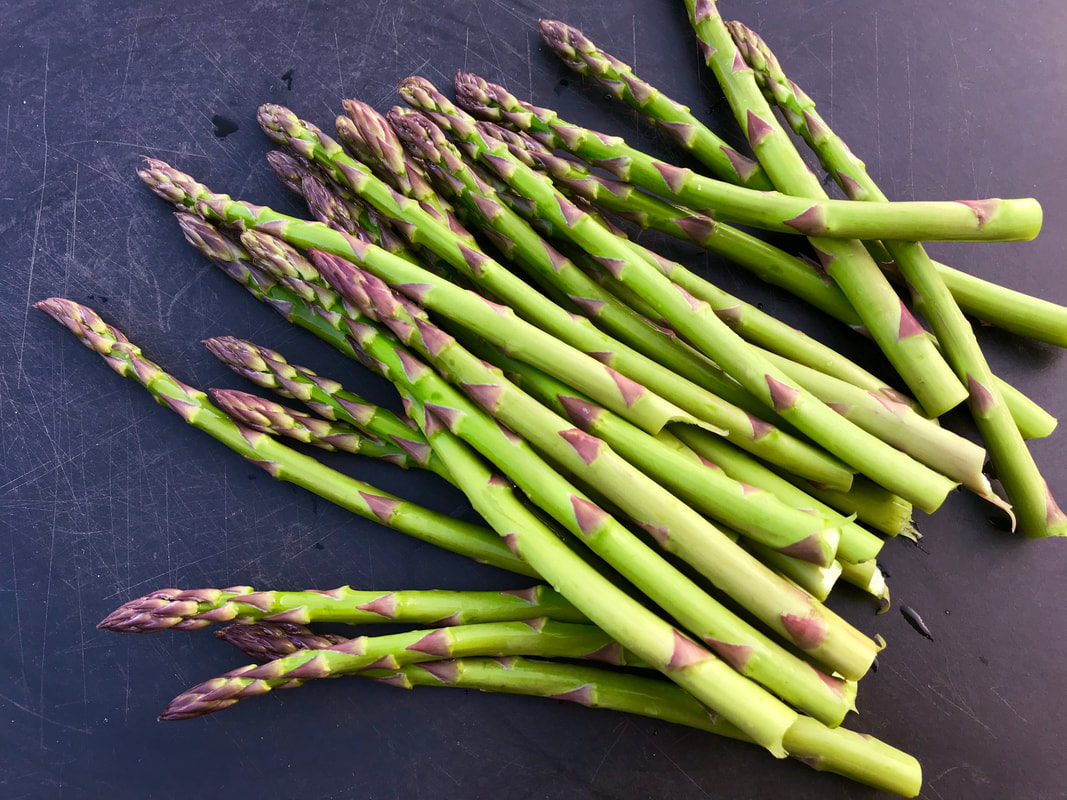 I love to talk about food wherever I am and am blown away by how many people tell me that they don’t cook. Maybe that’s why so many younger people have food allergies and digestive problems. I am not a scientist, so I don’t know, but it wouldn’t surprise me if there is a correlation between the two. Today's world is so hectic, and who knows, maybe I wouldn’t cook either if I had children, a full-time job, and a long commute every day. So for all you hard-working people out there, this is a recipe you can make. Follow the steps to cook this frittata and it will come out perfect. You can add ham, pancetta or other veggies. You can also substitute Gruyere, Fontina or other cheeses. You will need a 10-inch oven-proof frying pan. I used a nonstick skillet. Click here for a link to an older post for savory crustless muffins .
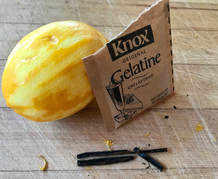
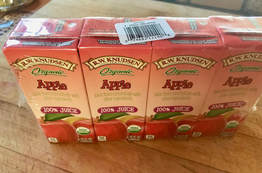
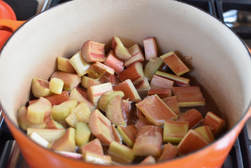
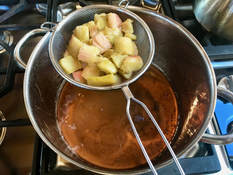
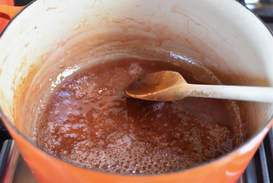
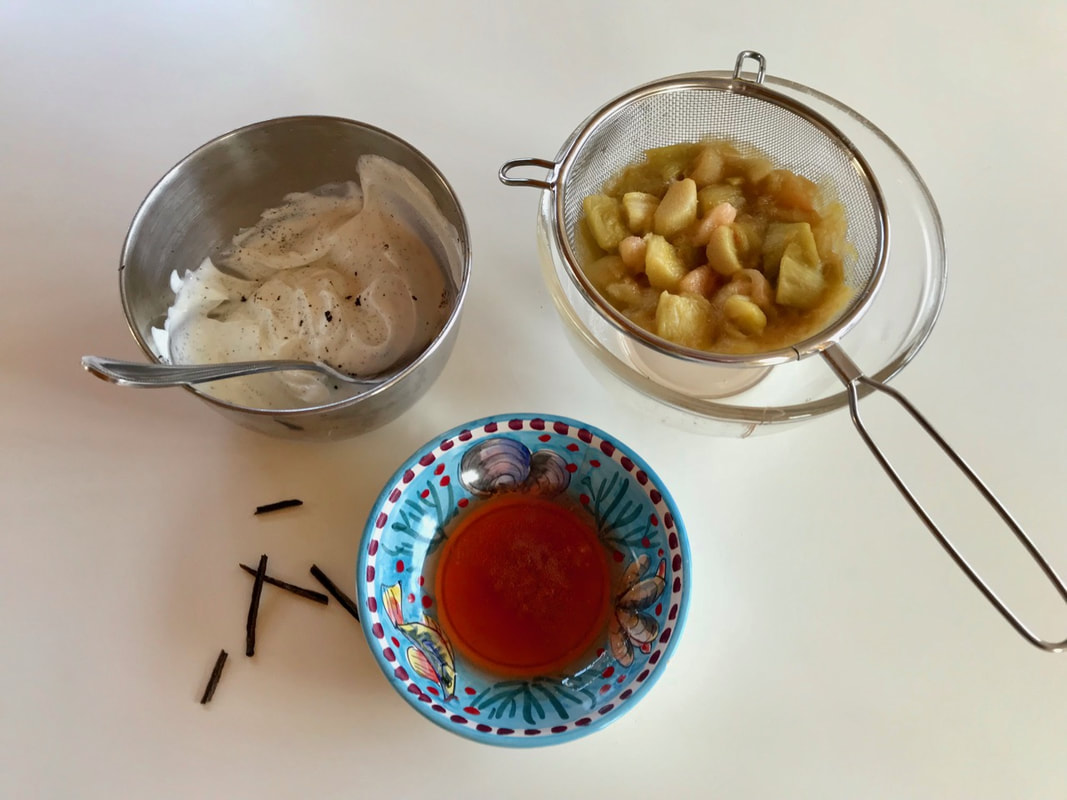
 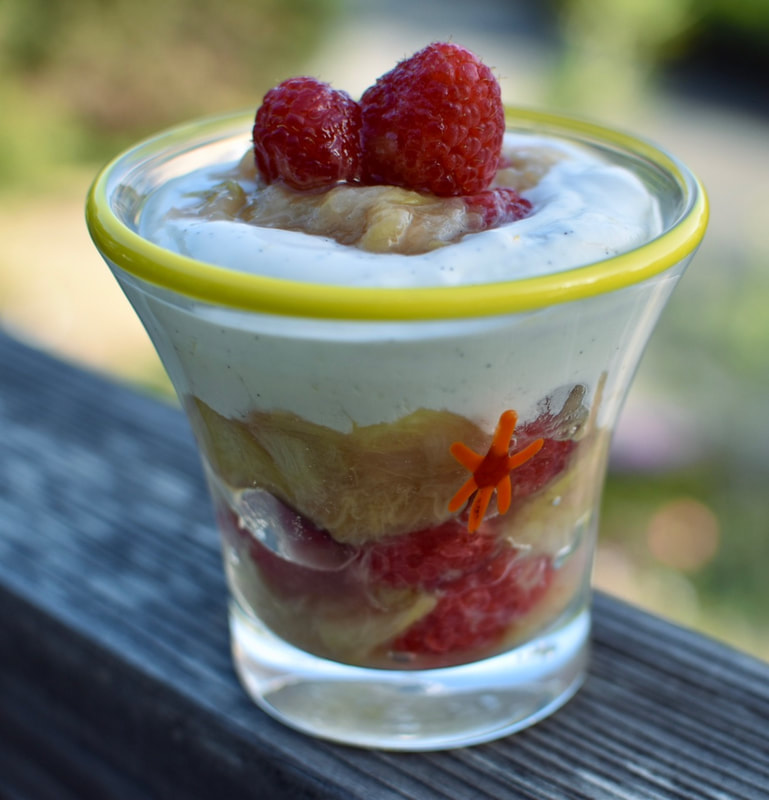 Yogurt Cream with Rhubarb Compote and Raspberries When I was in Germany I came across these interesting recipes that I would like to share with you. It’s a yogurt cream that you can also turn into a mousse by adding gelatin. As soon as I was back in my kitchen at home I started to experiment with these recipes and I am happy to say that I am now ready to post them. You can adjust this recipe to your taste by adding more sugar or lemon zest. It is made in minutes, just remember it is not supposed to be sweet. Surprisingly, my husband likes both recipes and he really has a sweet tooth. One night, my other testers preferred the cream. Of course, you can just make the compote and eat it with ice cream. Whatever you choose, I hope you enjoy this treat as much as I do. The rhubarb compote is sweetened with apple juice and some sugar. Once the rhubarb is cooked the liquid is reduced to a syrup. This is a light and delicious spring dessert. 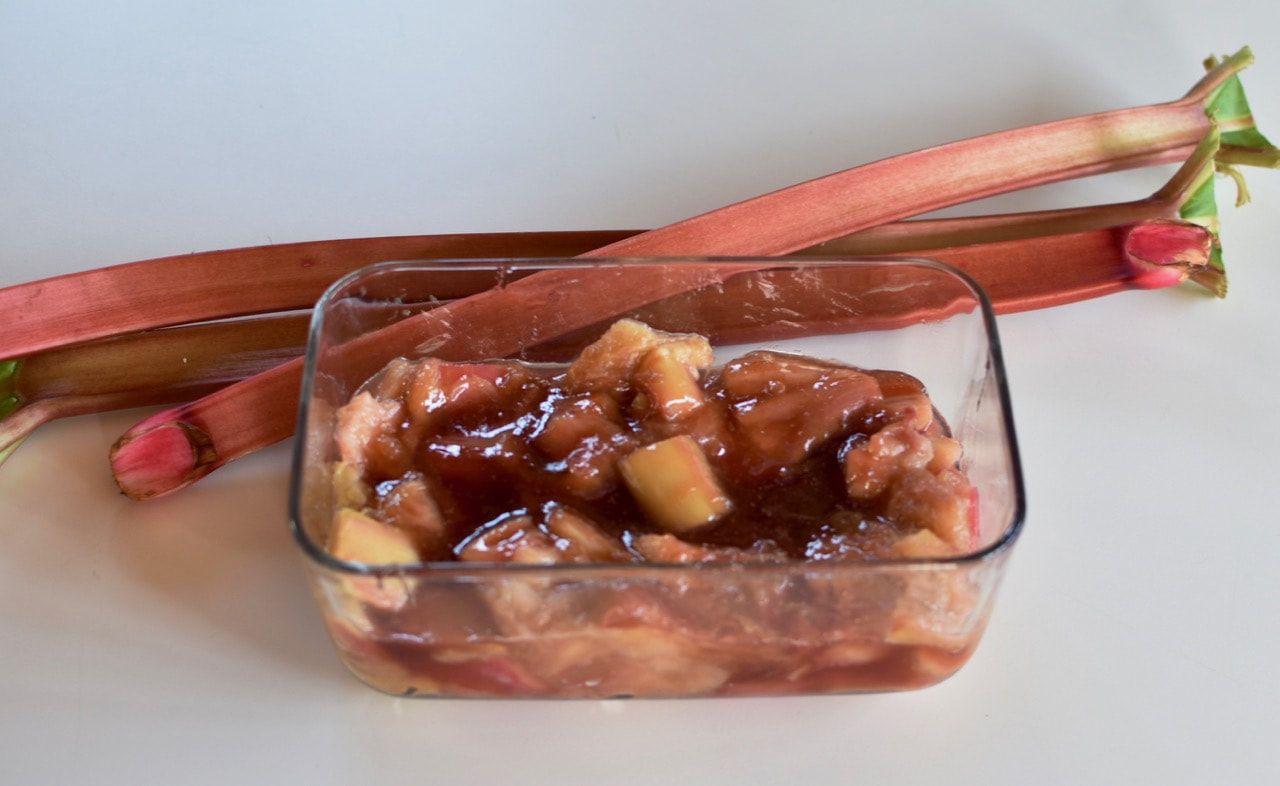 Rhubarb Compote Rhubarb is a seasonal favorite both in Europe and North America. It is technically a vegetable, but is considered a fruit. Rhubarb stalks will show up in stores and the farmer’s markets from April to June. It comes in in different colors; the ones you find in a store are usually red, but it can also be pale green. It will taste the same despite the different colors. Rhubarb is extremely tart, and is normally cooked and often paired with strawberries or other fruit. Children in Scandinavia will dip the stalk in sugar and eat it raw. The leaves of rhubarb are poisonous, so don't eat them. 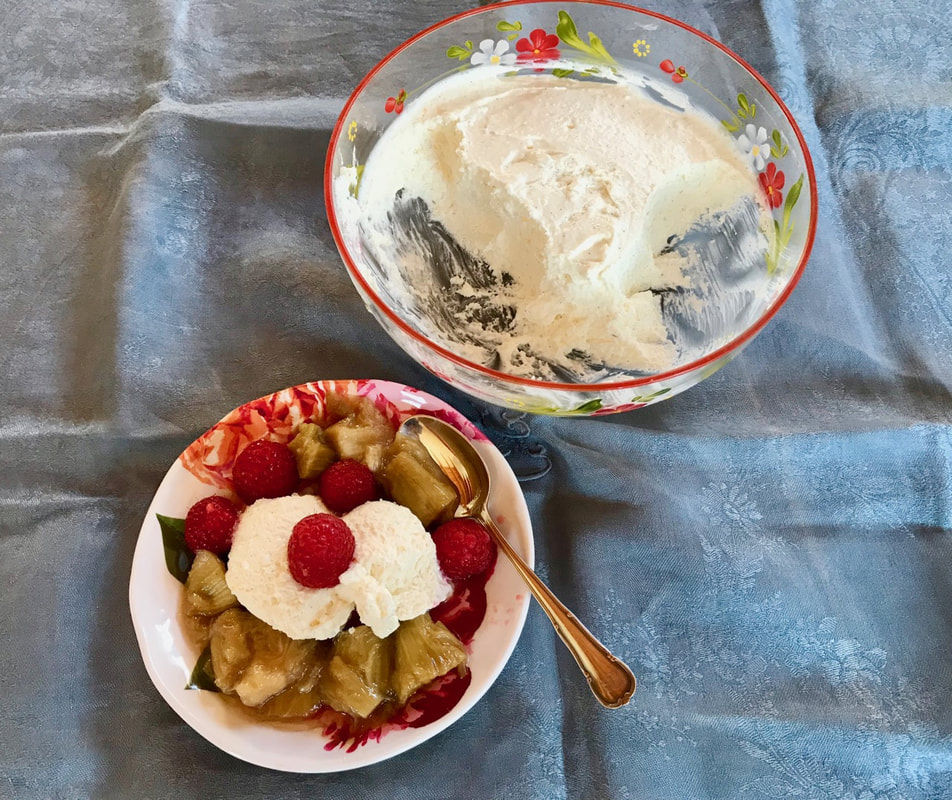 Yogurt Mousse with Rhubarb Compote and Raspberries Here are some more rhubarb recipes from my previous posts click on the images for the recipes 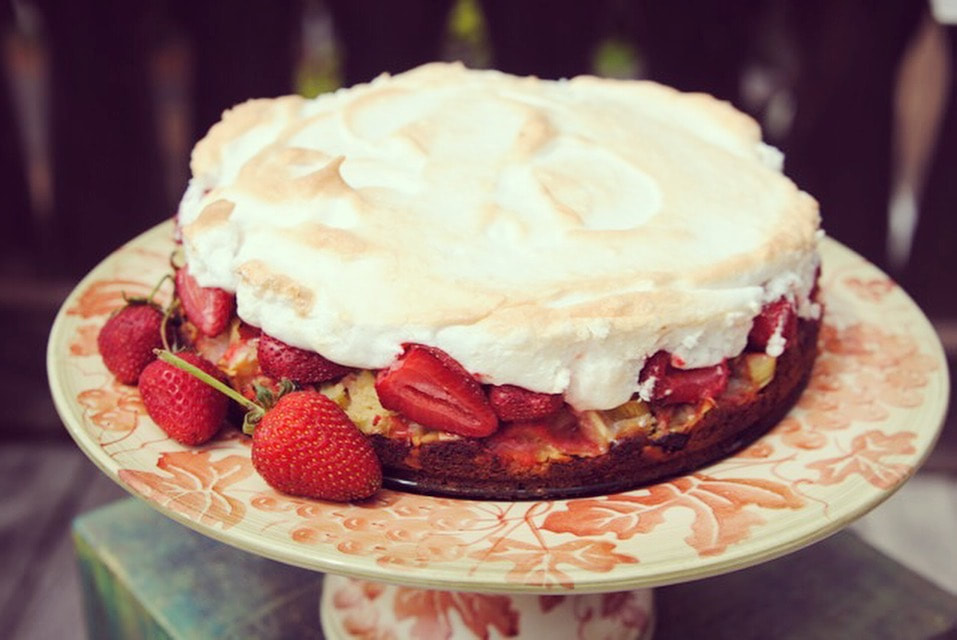 A German Rhubarb, Strawberry , Meringue Cake This Rhubarb Strawberry Hazelnut Crisp is easy to make and I love it, especially with ice cream. 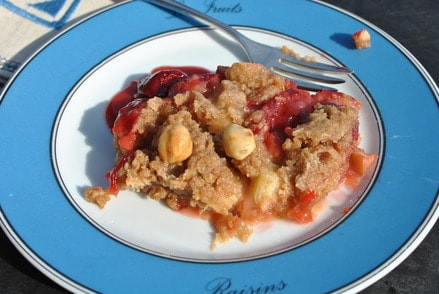 Rhubarb, Strawberry, Hazelnut Crisp And last but not least let's not forget Robert's delicious Rhubarb-Strawberry Pie 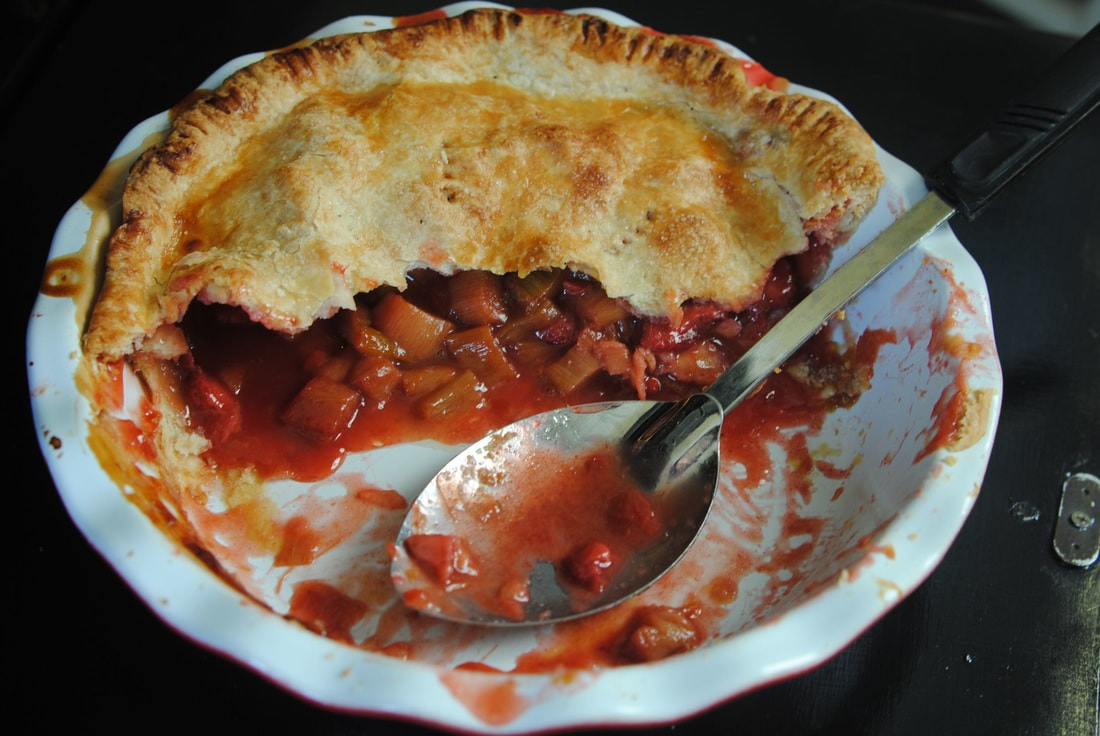 Rhubarb-Strawberry Pie If you decide to make the cream or mousse, use a good vanilla bean because that adds to the flavor. The secret to my compote is to drain the rhubarb juice once it is cooked and reduced to a syrup. This adds richness and additional flavor to the compote. I recommend doubling the rhubarb recipe. One recipe will make about 3 cups of compote. It will last in the fridge for a week. I used a smooth low-fat Greek yogurt that I buy at Costco, but you can use regular Greek yogurt to make it richer. Since I usually don’t drink apple juice, I bought a package of individual containers you put in your kids’ lunch boxes. You can eat the yogurt cream without any whipped cream, however, I think it needs some cream for a richer taste and to offset the tartness of the rhubarb.
|
WELCOME TO SUNNY COVE CHEFThank you for visiting my blog. My two passions are cooking and traveling. Traveling exposes me to a wide variety of food and experiences. I walk around cities looking for markets, restaurants, bakeries, shops, you name it, and if it is related to food you will find me there, tasting, smelling, talking to vendors, and having a great time. Categories
All
Archives
February 2024
|


 RSS Feed